Mastering the n8n Webhook Node: Part A — Fundamentals, JSON Handling & Responses
Table of Contents
📘 Part 1: Foundational Principles of n8n webhook node
What Is a Webhook ?
At its core, a n8n webhook node is an event-driven node that allows push-based communication between systems. In contrast to polling (where one system repeatedly checks another for updates), webhooks notify a client the moment a relevant event occurs—minimizing delay, network overhead, and complexity.
For instance, when a customer completes a purchase on an e-commerce site, a n8n webhook node can instantly notify your n8n workflow with the order details. This model is fundamentally more efficient and forms the backbone of many modern integrations.
In n8n, webhooks become first-class citizens. The Webhook node lets you build your own custom API endpoints, often without writing any backend code. It acts as a universal entry point, making n8n compatible with thousands of services, including:
- CRMs (HubSpot, Salesforce)
- eCommerce platforms (Shopify, Stripe)
- Internal tools
- Custom client applications
With a webhook endpoint in place, you can orchestrate simple or deeply complex multi-step automations.
Anatomy of the Webhook Node
To use a webhook in n8n, you start by dragging a Webhook node onto the workflow canvas—typically as the first node in the flow.
The most common configuration is to set the node’s operation to Catch Hook, meaning it will wait for an incoming request from an external source.
Once the node is added, several critical parameters shape how it behaves:
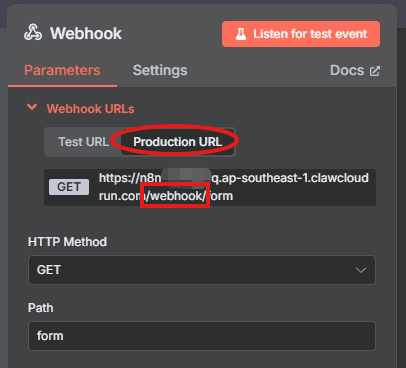
🧪 Test URL vs. 🟢 Production URL
One of the most misunderstood aspects of the n8n Webhook node is the distinction between its two automatically generated URLs:
| URL Type | Description |
|---|---|
| Test URL | Temporary, active only when “Listen for Test Event” is clicked. |
| Production URL | Stable and permanent, active only when the workflow is saved and activated. |
Test URL
- Useful during development.
- Becomes active for one request only.
- Payload data is shown live in the editor.
- Ideal for understanding request structure (headers, query, body) and developing expressions.

Production URL
- Meant for deployment and integration with live systems.
- Only becomes available after the workflow is activated.
- Does not display payloads in real-time—refer to the Execution Logs for inspection.
⚠️ Gotcha: Calling a production URL on an inactive workflow will return a 404 Not Found. This is intentional behavior. The error message typically reads: “The workflow must be active for a production URL to run successfully.”
Core Node Configuration
- HTTP Method: Choose between GET, POST, PUT, PATCH, DELETE. POST is most common for webhooks carrying data.
- Path: The URL path can be customized for clarity. Example:
/webhook/new-orderinstead of/webhook/893d-234s. -
Authentication:
n8n supports multiple authentication types to protect your webhook endpoints from unauthorized access:
✅ Supported Types
- None – No authentication required (not recommended for production).
- Basic Auth – Uses username and password for each request.
- Header Auth – Checks for a static token in request headers (e.g.,
X-API-Key). - JWT Auth – Validates a signed JSON Web Token and its claims.
🛠 Choosing the Right Authentication
Auth Type Use Case Pros Cons None Internal tools, local dev Easiest to test No protection at all Basic Auth Trusted services with fixed creds Simple and widely supported Less secure if exposed Header Auth Custom apps with static tokens Flexible, easier than JWT No metadata validation JWT Auth Complex integrations, mobile apps Secure with claim validation Requires token management 🔒 Pro Tip: Choose the lightest authentication that still protects your endpoint. Header Auth is often ideal for controlled environments, while JWT is best for public-facing or mobile integrations.
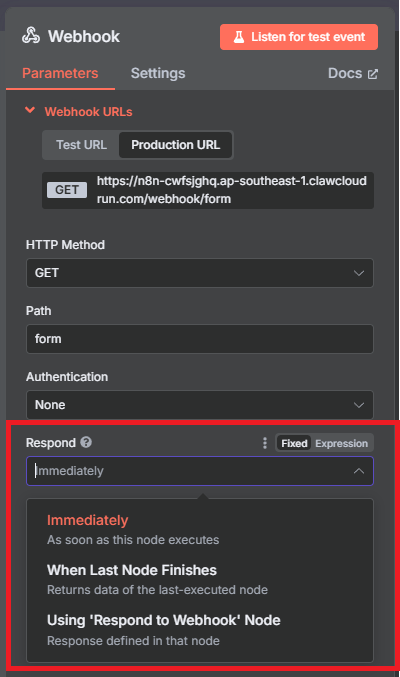
- Response Mode:
- Immediately – Sends a default response instantly. Ideal for simple triggers where no output is needed, such as logging or async notifications.
- When Last Node Finishes – Waits for the entire workflow to finish and automatically sends the output of the last node as the response. Great for simple workflows that return a single, predictable result.
- Using ‘Respond to Webhook’ node – Gives you full control over the response. You must add a separate Respond to Webhook node to explicitly send a response. Recommended for advanced APIs where you need to set custom headers, status codes, or response bodies.
The ability to customize responses is critical when building webhook-powered APIs—this will be covered extensively in Part 3.
📦 Part 2: Data Handling and Payload Processing in Webhook-Driven Workflows
Once a webhook successfully triggers a workflow in n8n, the next critical task becomes understanding, accessing, and manipulating the incoming data. This data arrives in multiple layers—headers, query parameters, path params, and the request body. Handling it correctly is essential for building reliable automations.
However, many user-reported errors originate not from the webhook trigger itself, but from incorrect assumptions about the structure of the incoming payload. This section offers a meticulous breakdown of how to work with that data effectively.
2.1 Accessing Incoming Webhook Data in n8n
When the n8n Webhook node receives a request, it parses the HTTP payload into a structured JSON object and passes it downstream in the workflow. This object contains all the request metadata and payload content, organized into specific top-level keys:
| Key | Description |
|---|---|
headers |
HTTP headers sent with the request |
params |
URL path parameters (e.g., /user/:id) |
query |
Query string parameters (e.g., ?user_id=123) |
body |
POST or PUT payloads; form submissions; JSON data |
These keys can be accessed in any downstream node via n8n expressions, using the $json reference object.
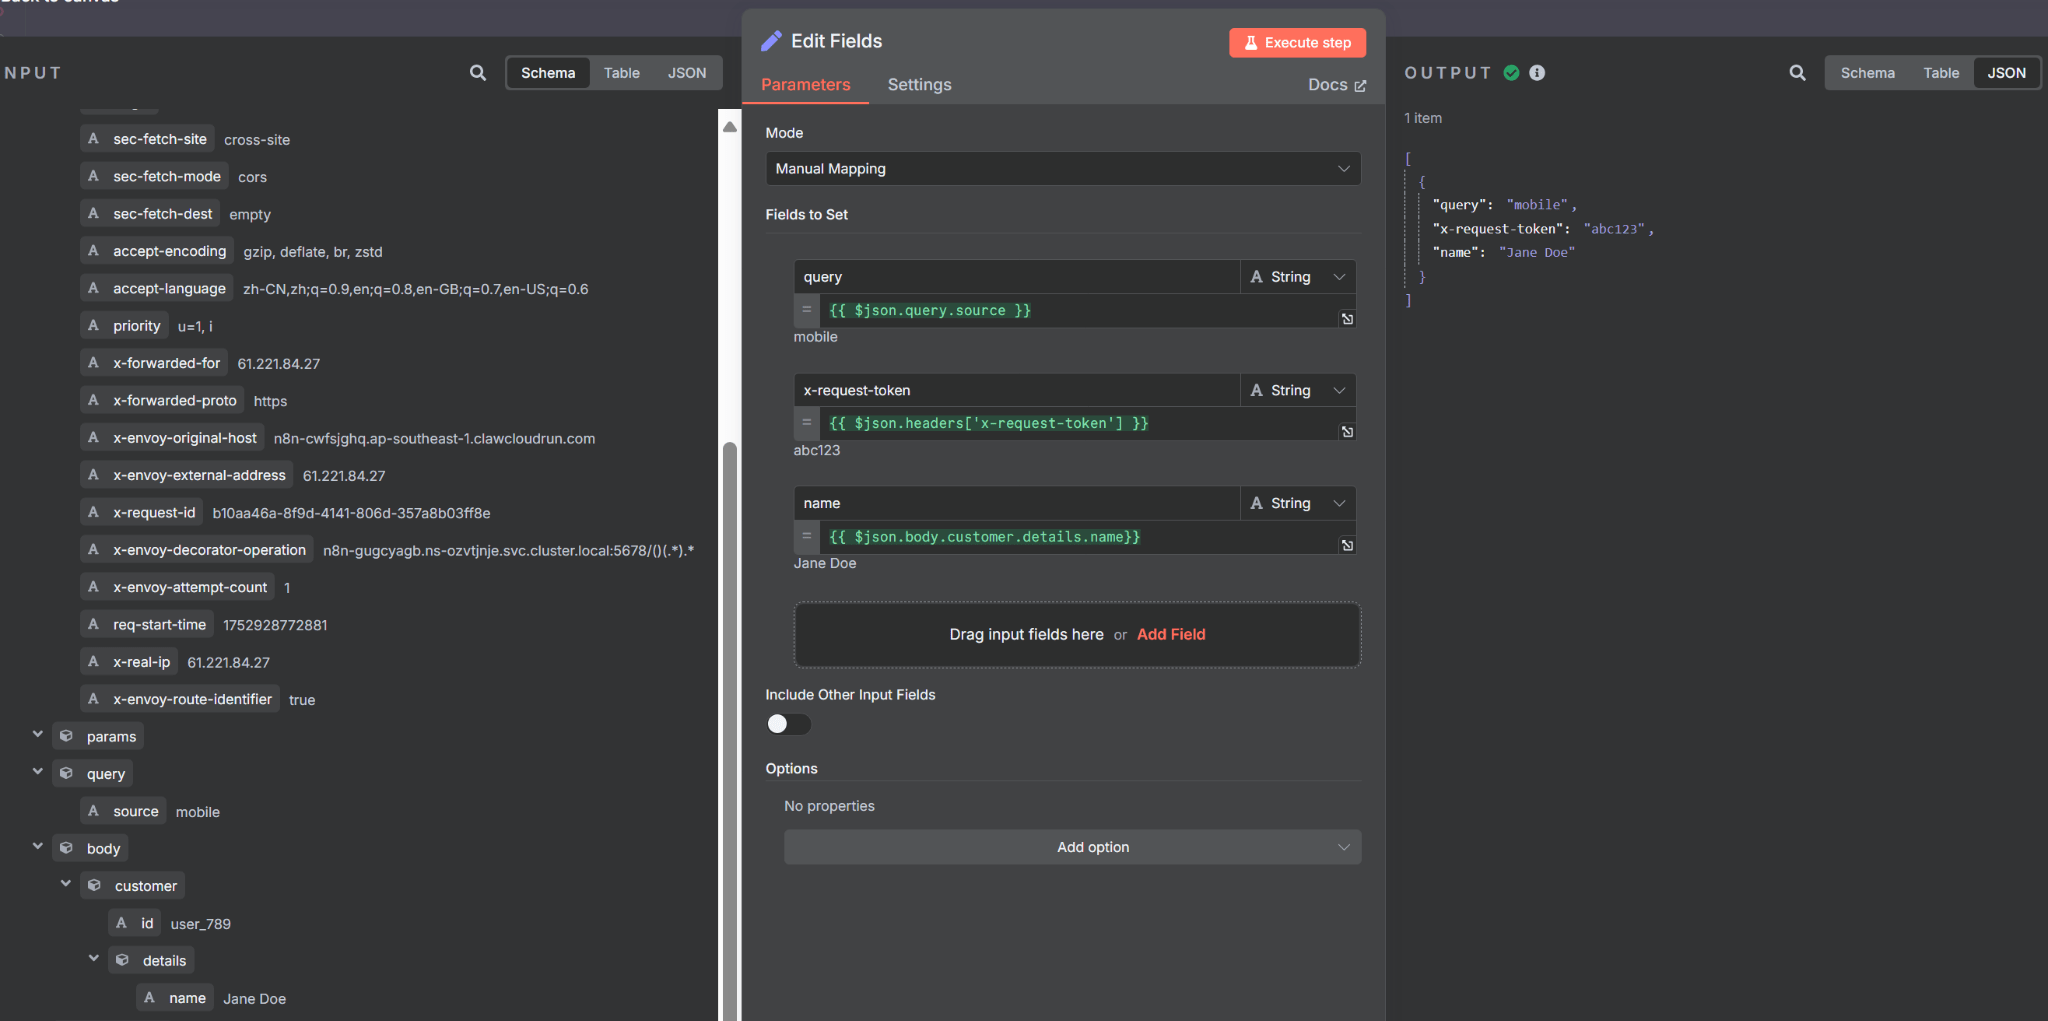
🧪 Example: Deconstructing a Payload
Assume the following HTTP POST request is sent to your webhook:
POST /order/submit?source=mobile
Content-Type: application/json
X-Request-Token: abc123

{
  "customer": {
    "id": "user_789",
    "details": {
      "name": "Jane Doe"
    }
  }
}
You can access key parts of the payload like this:
| Data | Expression |
|---|---|
source query param |
{{ $json.query.source }} |
X-Request-Token header |
{{ $json.headers['x-request-token'] }} |
| Customer name | {{ $json.body.customer.details.name }} |
⚠️ Special Case: Hyphenated Header Names
JavaScript dot notation does not support hyphens (-) in object keys. Attempting to access user-agent via {{ $json.headers.user-agent }} will fail.
✅ Correct Approach: Use bracket notation: {{ $json.headers['user-agent'] }}
This detail is often overlooked, especially when working with services that use standard HTTP headers like Content-Type, User-Agent, or X-Custom-Auth.
2.2 Working with JSON and Form Payloads
The request body is where most data will reside—especially when you’re processing form submissions, JSON payloads, or API messages.
📥 Parsing JSON Payloads
If the incoming request has a Content-Type of application/json, n8n will automatically parse the body into a nested JavaScript object. You can access deeply nested fields using dot notation.
Example Payload:
{
  "order": {
    "items": [
      { "name": "T-shirt", "qty": 2 },
      { "name": "Mug", "qty": 1 }
    ]
  }
}
To access the quantity of the first item: {{ $json.body.order.items[0].qty }}
✅ Pro Tip: Always inspect the full structure using the Webhook node’s output before writing expressions.
🧾 Handling multipart/form-data (HTML Forms)
n8n automatically parses multipart/form-data submissions into a flat structure within the body object.
For example, a typical HTML form input like:
<input type="email" name="customer_email">
<input type="text" name="customerName" >
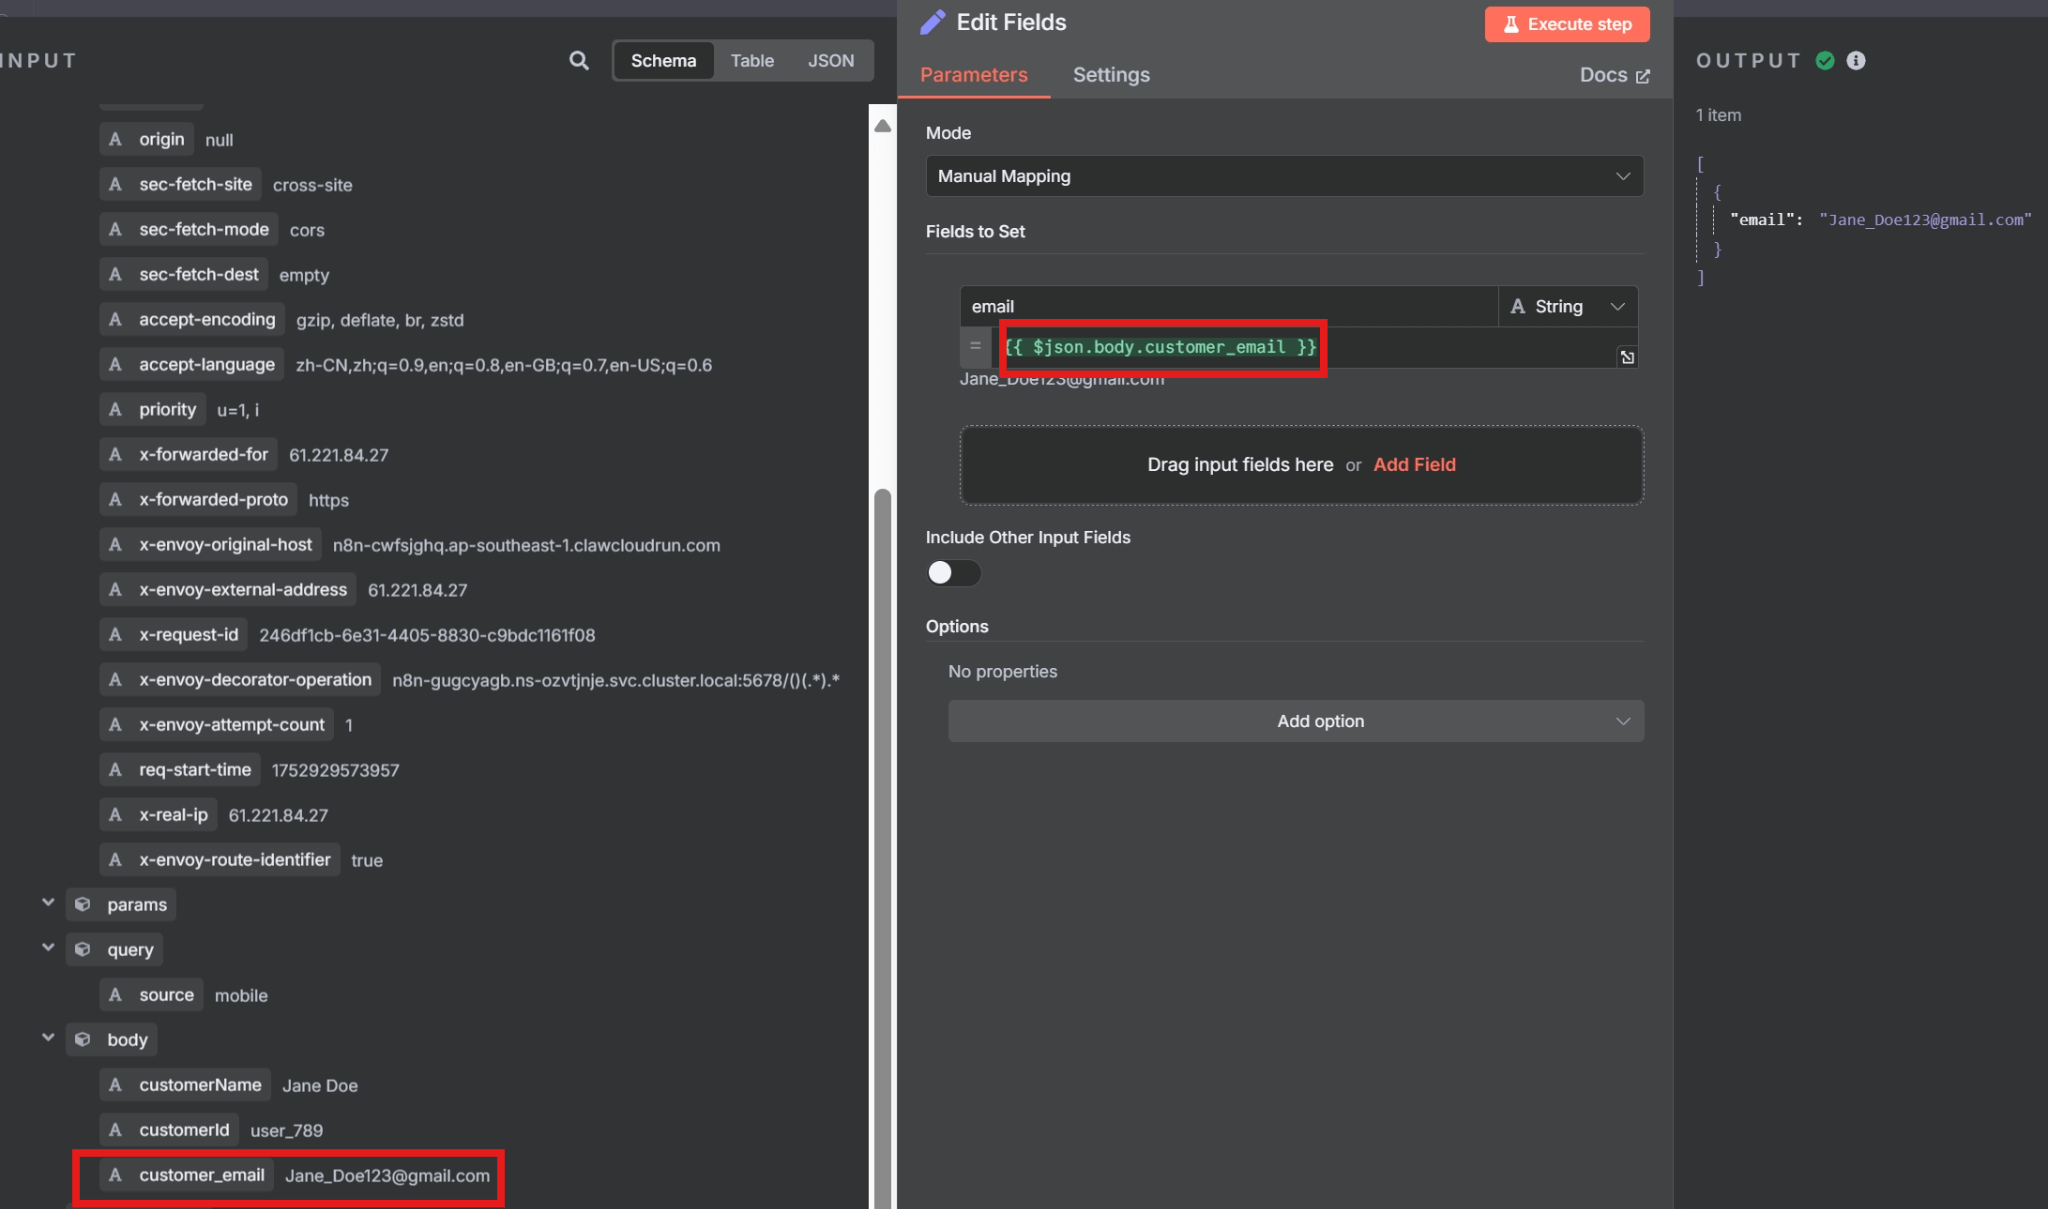
<input type="text" name="customerId">Will result in the following parsed request payload inside n8n:
"body": {
  "customer_email": "Jane_Doe123@gmail.com",
  "customerName": "Jane Doe",
  "customerId": "user_789"
}
To extract customer_email, you can use a Set node with the following expression: {{ $json.body.customer_email }}
✅ This approach works reliably with:
- Contact forms from static websites
- No-code tools like Webflow, Typedream, Framer, etc.
- File upload forms (combined with binary for actual files)
2.3 Using the Code Node for Advanced Data Manipulation
While n8n’s built-in expressions handle most common cases, the Code node (JavaScript) becomes essential when you need to perform more complex transformations.
Use Cases:
- Validate if a query param is valid JSON
- Convert comma-separated strings into arrays
- Flatten nested objects
- Perform conditional logic before branching
Example: Convert query string list into array
const raw = $json.query.tags; // e.g. "n8n,workflow,api"
return {
  json: {
    tags: raw.split(',').map(tag => tag.trim())
  }
};
2.4 Managing File Uploads via Webhooks
Webhooks can also handle binary data — such as files uploaded through HTML forms or API calls. This introduces an extra layer of complexity because files are not stored in the main $json.body object.
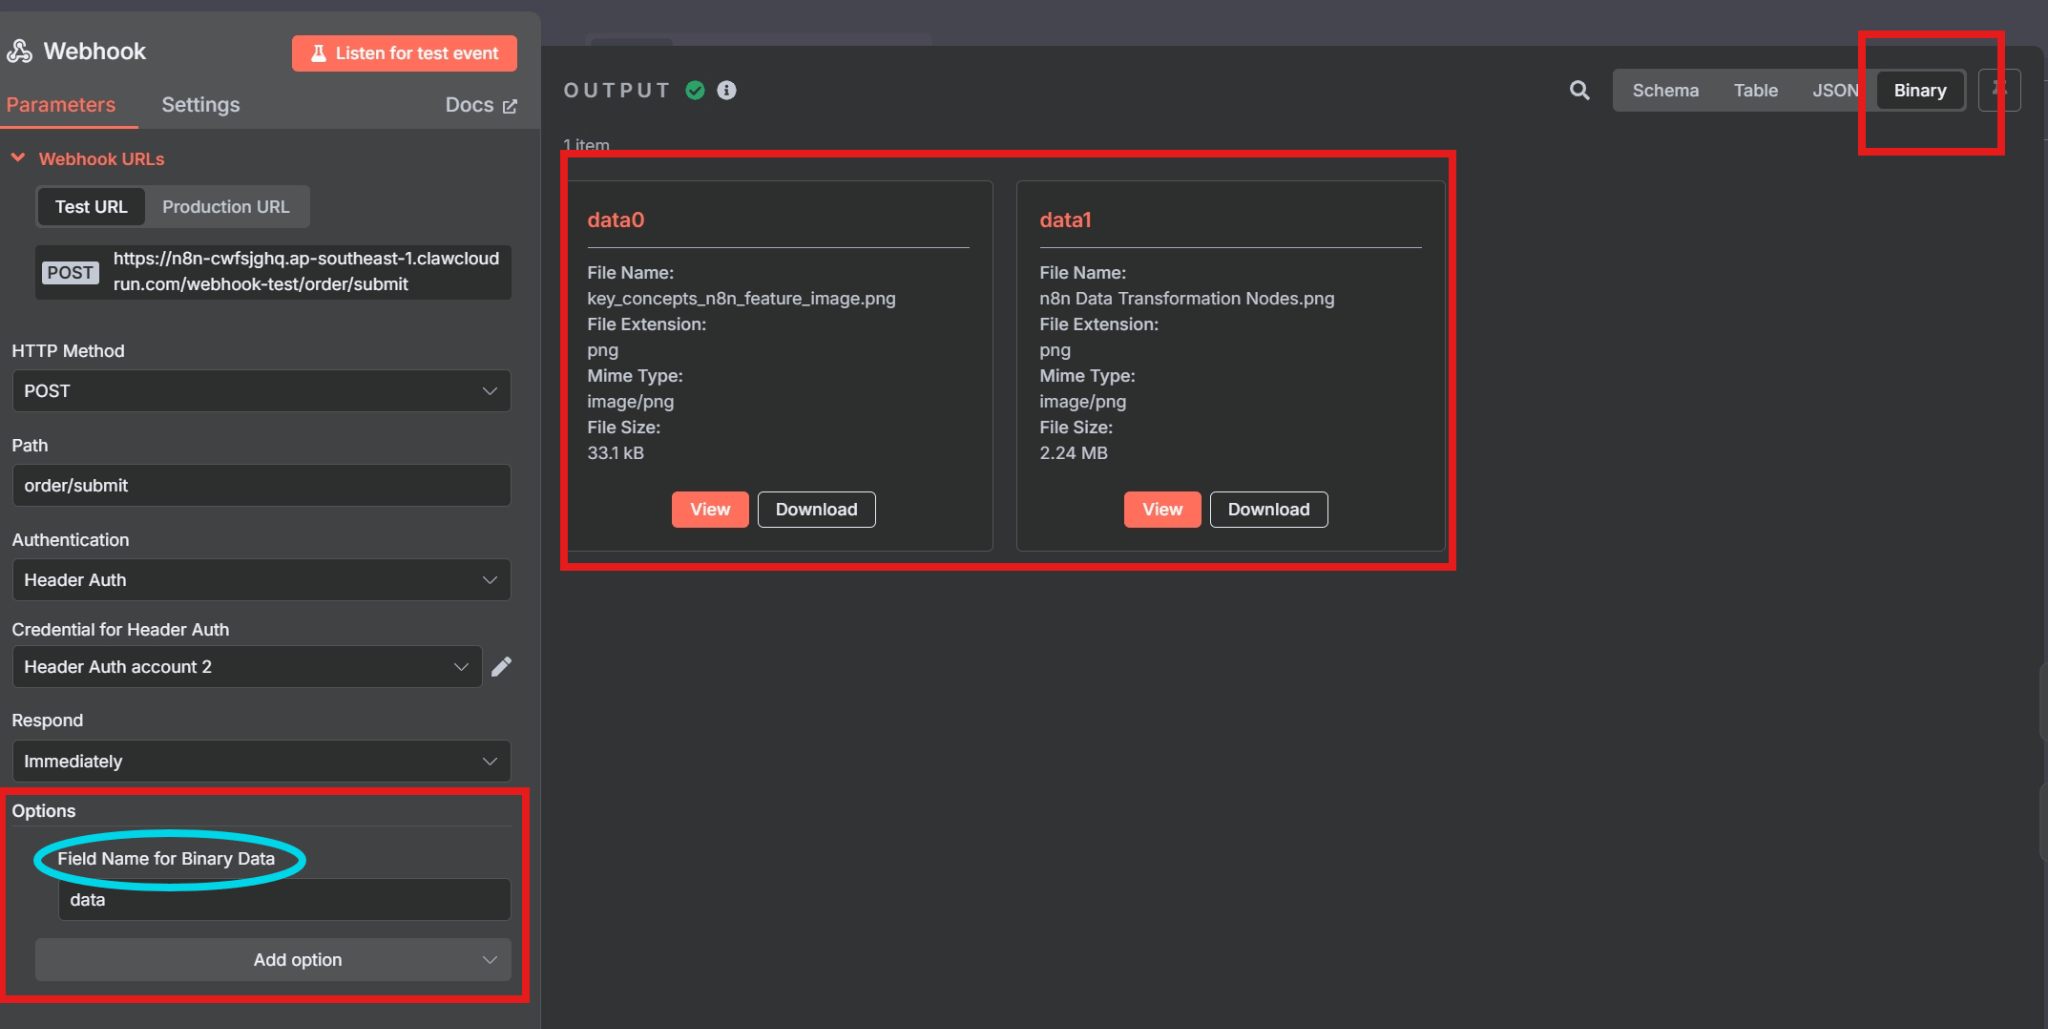
🔄 Enabling Binary Data in the n8n Webhook Node
In the Webhook node settings, Click “Add Option” and Select “Field Name for Binary Data”.
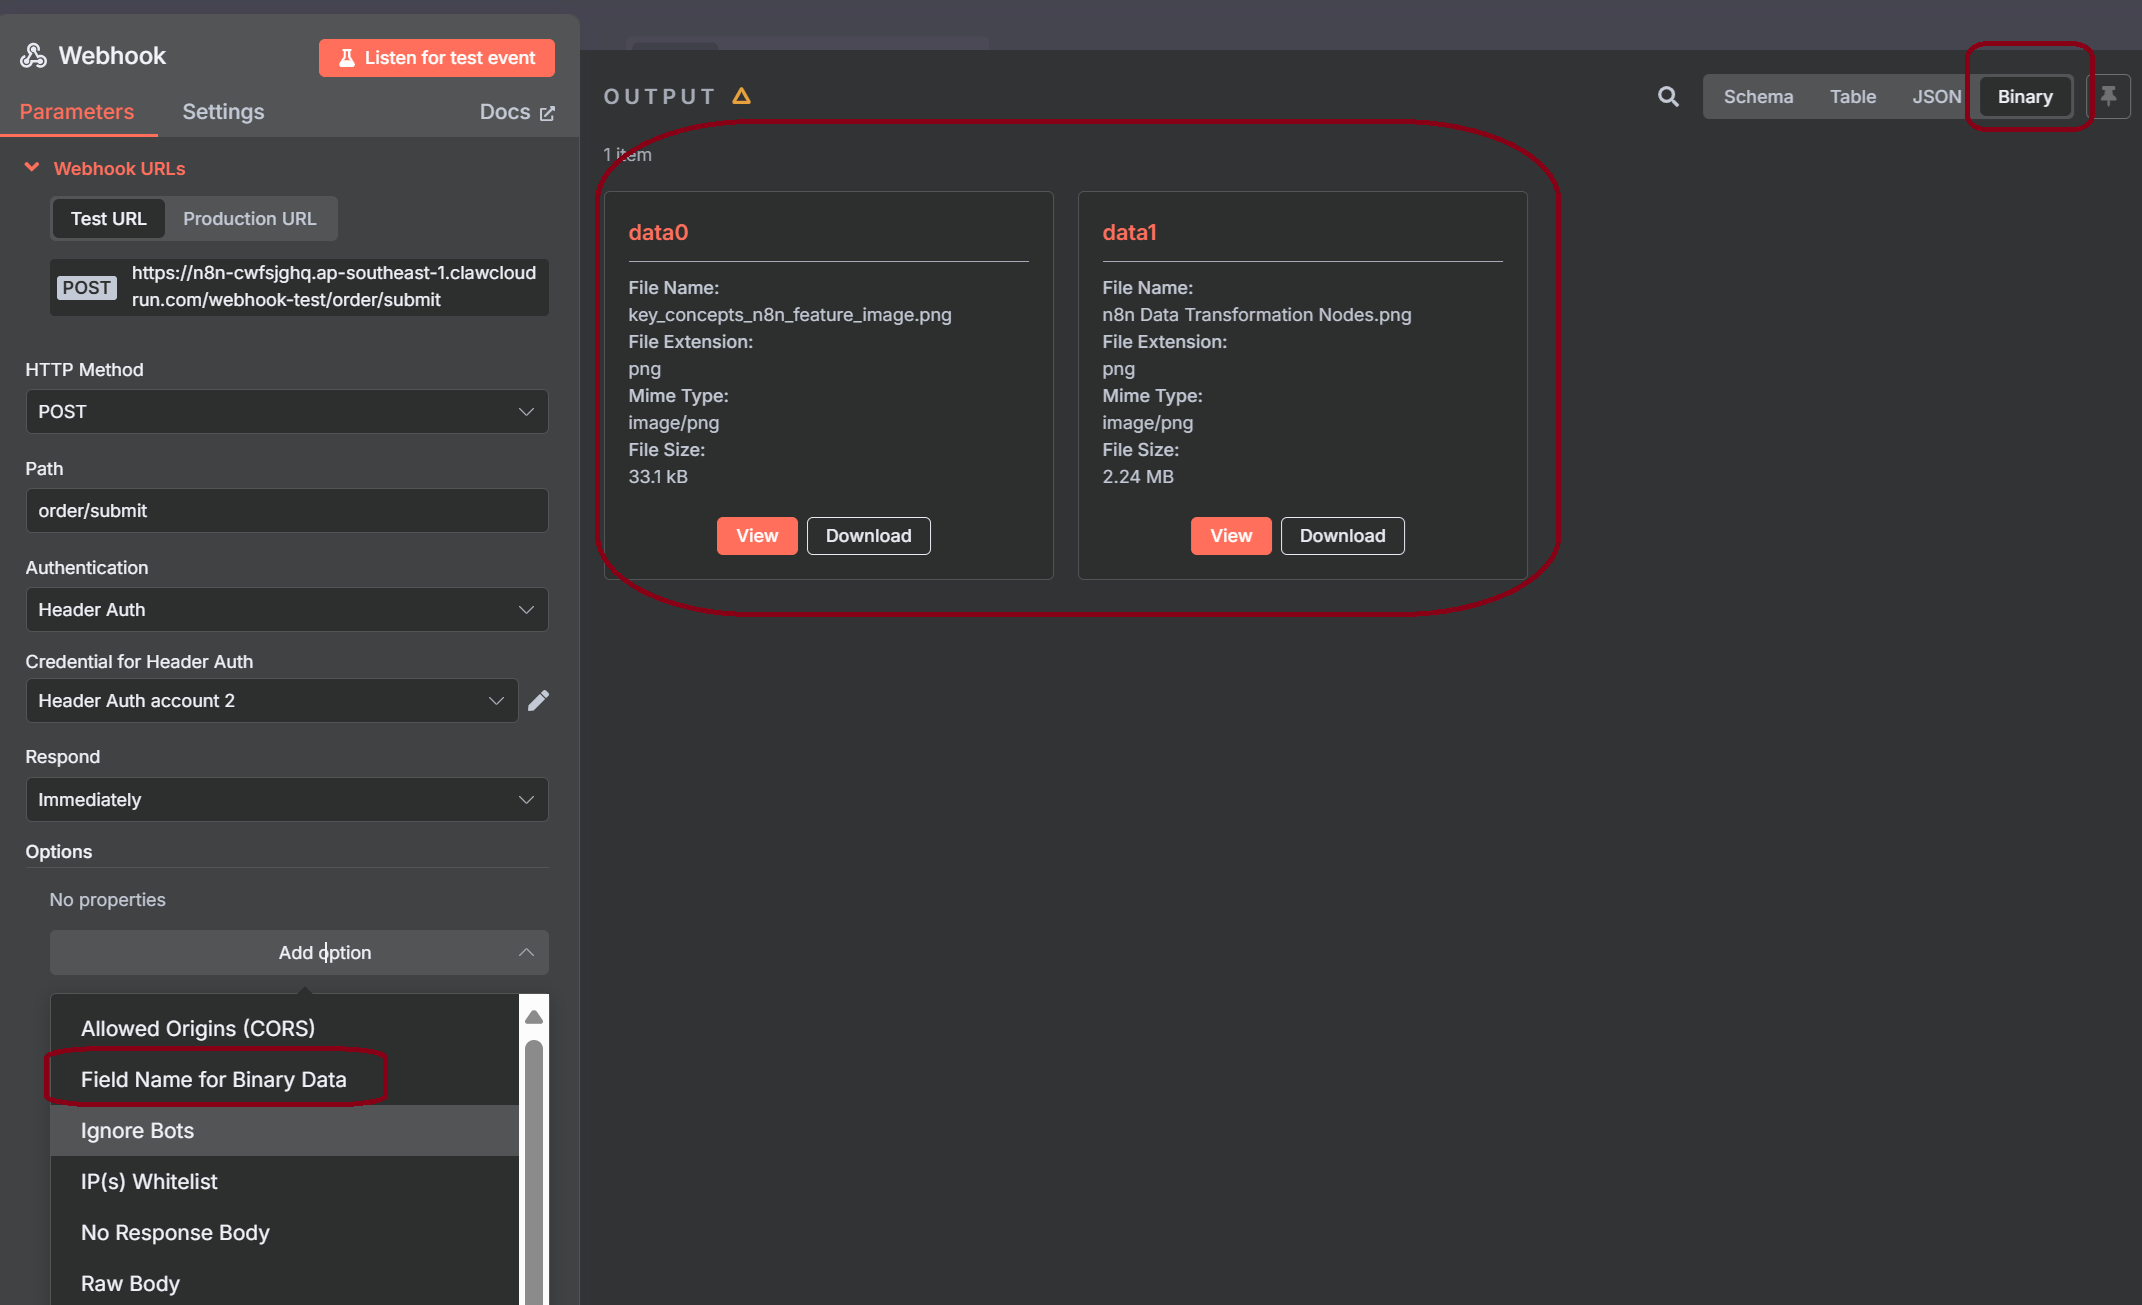
This signals n8n to expect a file upload. Incoming files are placed in a separate binary section, accessible as items[0].binary.
⚠️ Challenge: Preserving Field Names in multipart/form-data
When a form uploads multiple files using unique field names (e.g., profile_picture, cover_image), n8n will rename them to file0, file1, etc. if you use the Binary Property field.
✅ Solution: Leave the “Binary Property” field empty. This preserves the original input field names and associates each file correctly.
| Input Field | Expression |
|---|---|
profile_picture |
{{ $binary.profile_picture.data }} |
cover_image |
{{ $binary.cover_image.data }} |
Leaving the Binary Property blank avoids mapping confusion and is essential for workflows that rely on multiple named files.
📦 File Size Considerations
For self-hosted n8n, the file size limit depends on the underlying formidable parser library.
- Default limit: ~200MB
- To raise limits:
- Set
N8N_PAYLOAD_SIZE_MAX - Adjust Formidable-specific settings in environment
- Set
Example:
export N8N_PAYLOAD_SIZE_MAX=300mbIf you’re expecting large uploads (e.g., videos, PDFs), always configure limits appropriately on both n8n and the reverse proxy layer (e.g., NGINX).
📘 Part 2.5 — n8n Webhook Node JSON Example & Tutorial
This section provides a complete n8n webhook node JSON example and a concise n8n webhook tutorial you can copy and run. It shows how to configure a Webhook node to receive JSON, call an external API, and return the result to the caller.
📦 Example Workflow JSON (copy & paste to import)
Import this workflow JSON into n8n (Import from File/Clipboard). It exposes a POST /webhook/generate-qr endpoint that accepts a JSON body and returns a generated QR code.
{
  "id": "2Ttwb1pfwNkhBDuB",
  "meta": {
    "instanceId": "1777696fb9fddfee653e70940936c2b1e28ba1f1bde53b7182fbd6eb01988706"
  },
  "name": "QR Code Generator via Webhook",
  "nodes": [
    {
      "id": "cb065a0f-562a-432f-9ed4-c942fdd6a808",
      "name": "Receive Data Webhook",
      "type": "n8n-nodes-base.webhook",
      "position": [260, 140],
      "parameters": {
        "path": "generate-qr",
        "httpMethod": "POST",
        "responseMode": "responseNode"
      },
      "typeVersion": 2
    },
    {
      "id": "c9a692b7-62bd-40e2-8c92-0dbbc37f3e12",
      "name": "Generate QR Code",
      "type": "n8n-nodes-base.httpRequest",
      "position": [580, 140],
      "parameters": {
        "url": "=https://api.qrserver.com/v1/create-qr-code/?size=150x150&data={{ $json.body.data }}",
        "method": "GET"
      },
      "typeVersion": 4.2
    },
    {
      "id": "acd3ea0f-7694-4875-994c-3b365c10fc28",
      "name": "Respond with QR Code",
      "type": "n8n-nodes-base.respondToWebhook",
      "position": [920, 140],
      "parameters": {
        "respondWith": "allIncomingItems"
      },
      "typeVersion": 1.2
    }
  ],
  "connections": {
    "Receive Data Webhook": {
      "main": [[{ "node": "Generate QR Code", "type": "main", "index": 0 }]]
    },
    "Generate QR Code": {
      "main": [[{ "node": "Respond with QR Code", "type": "main", "index": 0 }]]
    }
  }
}
🖥️ Example Request (cURL)
Send a JSON body with a data field. The workflow reads it via {{ $json.body.data }} and generates a QR code.
curl -X POST 'https://your-n8n-instance/webhook/generate-qr' \
  -H 'Content-Type: application/json' \
  --data '{"data":"https://automategeniushub.com"}'
📤 Example Response
The webhook responds with the QR code result from the external API. In this example, it encodes https://automategeniushub.com.
✅ This n8n webhook tutorial demonstrates a full path: receive JSON via the Webhook node, pass payload to an external service, and return a response. It’s a practical, production-style n8n webhook node JSON example you can adapt for your own endpoints.
✅ Summary of Part 2
| Task | Best Practice |
|---|---|
| Access query/header/body | Use $json.query, $json.headers, $json.body |
| Handle hyphenated headers | Use bracket notation (['content-type']) |
| Access uploaded files | Leave Binary Property blank to preserve field names |
| Transform inputs | Use Code node for advanced operations |
| Inspect structure | Always run test event first to reveal payload shape |
🔁 Part 3: Crafting Responses and Controlling Workflow Execution in n8n
Receiving webhook requests is only half the equation. The other half—and arguably the most important in production-grade API workflows—is controlling what response gets sent back to the requester. This determines whether your n8n webhook behaves like a simple fire-and-forget trigger or like a fully interactive, asynchronous API.
In this section, we’ll go deep into how n8n handles HTTP responses with its Respond to Webhook node, explore common pitfalls, and show how to design robust response handling patterns—including error branching, asynchronous task processing, and structured JSON replies.
3.1 The Respond to Webhook Node: How It Works
The Respond to Webhook node enables you to customize the HTTP response returned to the caller who originally triggered the webhook. This is what allows you to build stateful APIs—ones that don’t just receive a request, but process it and reply accordingly.
However, its use is governed by one crucial configuration in the initial Webhook node.
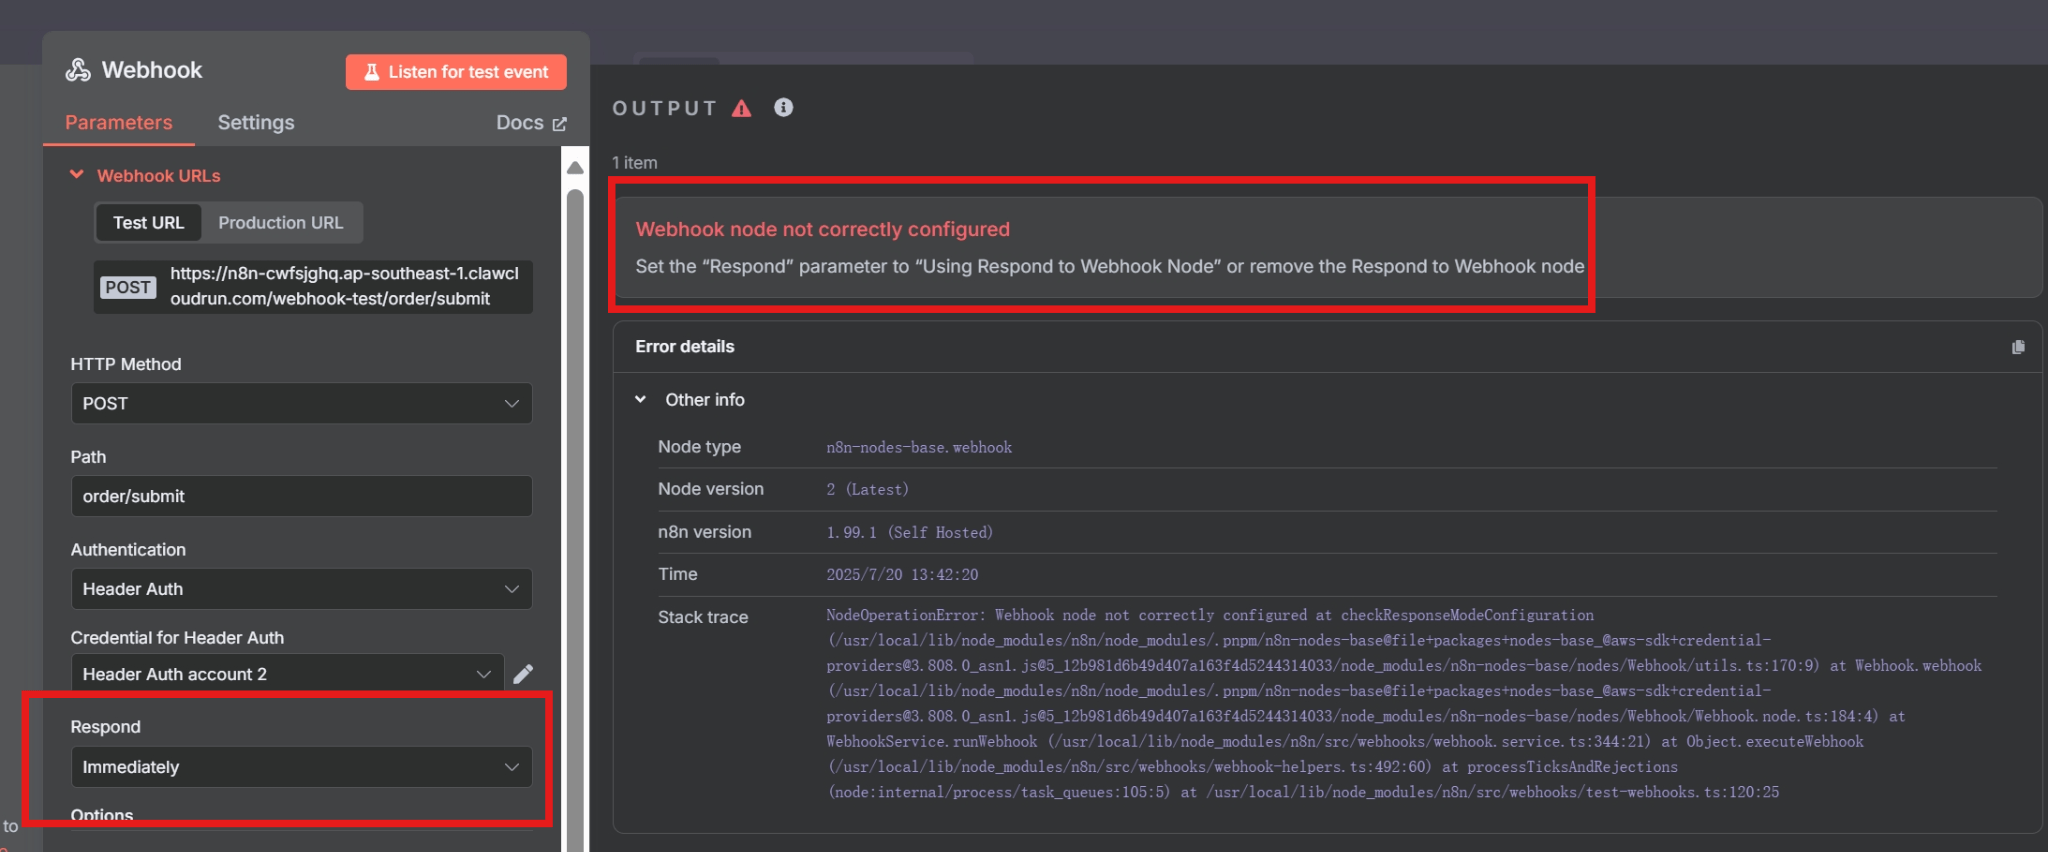
⚠️ Precondition: Response Mode Must Be Correct
In the Webhook node, the “Response” parameter must be explicitly set to:
✅ Using Respond to Webhook node
If the Webhook node is set to Immediately, it will send back a default 200 OK response instantly—and the downstream Respond to Webhook node will never be executed.
This two-part contract is what defines an asynchronous response flow:
- The trigger receives the request and holds it.
- The workflow processes the request.
- A response is returned manually via a
Respond to Webhooknode.
3.2 Configuring the Respond to Webhook Node
The Respond to Webhook node in n8n gives you finegrained control over what’s returned to the caller. Its interface lets you:
✅ Choose the Response Type (Respond With)
- All Incoming Items – returns all JSON items passed to the node
- First Incoming Item – returns just the first JSON item
- JSON – send a custom JSON payload defined in Response Body
- Text – reply with plain text or HTML (
Content-Type: text/html) - Binary File – send binary data (e.g. files) from a specified data source
- JWT Token – return a signed JSON Web Token
- Redirect – issue an HTTP redirect via a specified URL
- No Data – return an empty body (e.g. 204 or other status)
✅ Customize HTTP Status Code
You can set any desired status code under Response Code, such as:
200 OK201 Created400 Bad Request404 Not Found500 Internal Server Error- a custom one
This is essential when using n8n as a backend for web applications, where the client (browser or service) expects specific status codes.
✅ Add Custom Headers
You can add CORS headers, content types, cache control, or custom identifiers.
Example:
[
  {
    "name": "X-Webhook-Source",
    "value": "AI-Agent"
  },
  {
    "name": "Access-Control-Allow-Origin",
    "value": "*"
  }
]
💬 Real-World Examples
| Use Case | Response Type |
|---|---|
| Return OpenAI results | JSON |
| Render a confirmation page | HTML |
| Download a PDF invoice | Binary File |
| Redirect to thank-you page | Redirect (302) |
| Just acknowledge receipt | No Data (204) |
3.3 Response Debugging and Common Pitfalls
Because of the asynchronous nature of webhook responses, developers often run into edge cases and unexpected behavior. Let’s explore the most common ones:
❌ No Response Sent
- Cause: The Webhook node is still set to “Immediately” instead of “Using Respond to Webhook.”
- Fix: Change the
Respondsetting in the trigger Webhook node. Save and reactivate the workflow.

❌ “Invalid JSON in ‘Response body'” Error
This happens when you attempt to return a JavaScript object directly in a field expecting a stringified JSON object.
- ✅ Fix: Use
JSON.stringify():{{ JSON.stringify($json.output) }} - Or, in the JSON field of the node:
{
  "status": "success",
  "result": {{ JSON.stringify($json.result) }}
}
❌ You Don’t See the Actual Response
By default, the Respond to Webhook node’s output panel shows its input, not the response it sent.
- ✅ Fix: Enable the following setting inside the node:
🔧 Enable Response Output Branch
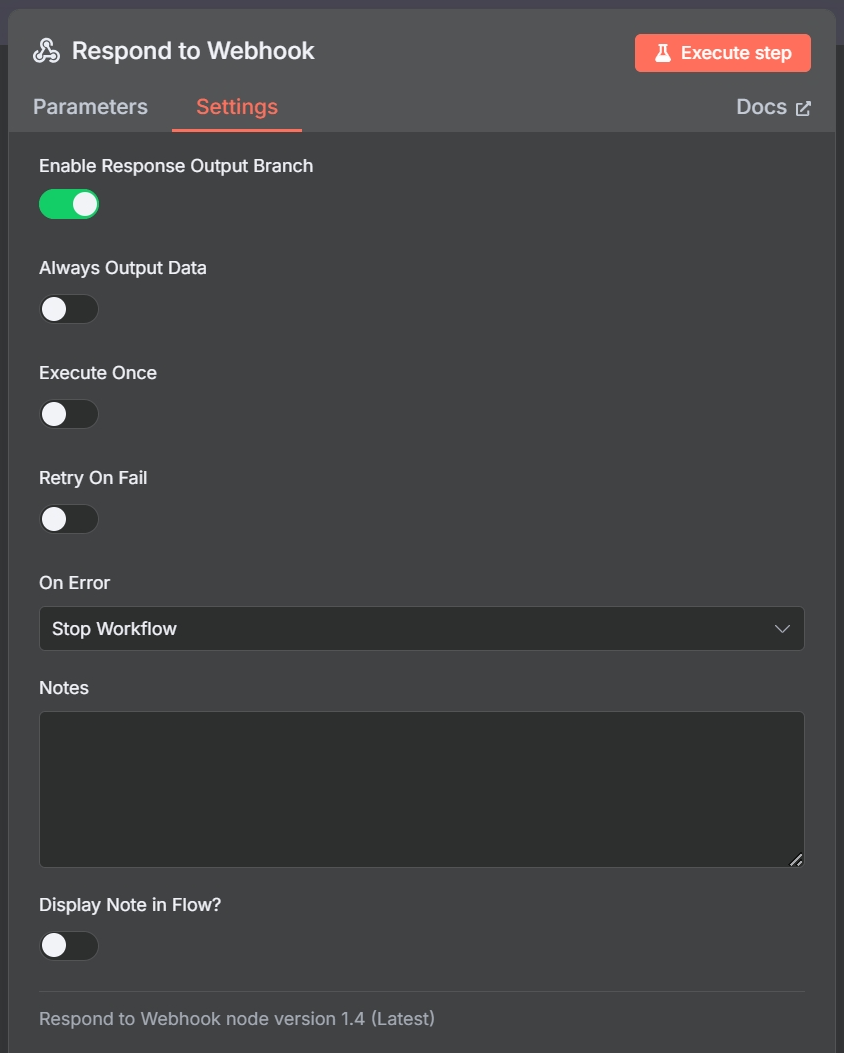
Figure 11: Enabling the ‘Response Output Branch’ in the Respond to Webhook node settings. This creates a second output from the node that contains the full response object, including headers, body, and status. You can inspect this for logging, conditionals, or debugging.
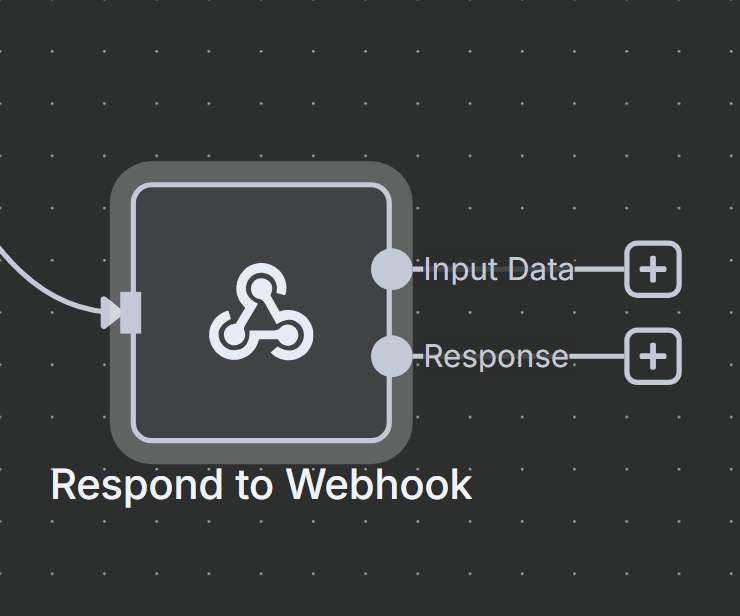
Figure 12: The Respond to Webhook node with the second ‘Response’ output branch enabled.
3.4 Advanced Patterns: Long-Running Workflows, Async Jobs, and Multiple Outcomes
🕒 Handling Long-Running Workflows
Sometimes your workflow needs to perform a time-consuming task—such as calling a slow API or processing a large file. If this task takes too long, the client making the webhook request (such as a browser or Stripe) may time out.
📌 Solution: Use an Asynchronous Polling Pattern
Step-by-Step Breakdown:
- Webhook Node A: Responds Immediately with a
jobId. - Workflow continues processing in the background.
- Client (browser/app) polls a second webhook endpoint (e.g.,
/status/:jobId). - Once processing is complete, the second workflow returns the result.
This pattern is common in:
- AI agent workflows
- Document parsing / conversion tools
- Payment processing integrations
🔀 Conditional Responses with Logic Nodes
n8n executes nodes top-to-bottom, left-to-right—and only the first Respond to Webhook node encountered during execution is triggered.
This behavior allows you to use IF or Switch nodes to route to different response branches based on logic.
Example:
- If data is valid → Respond with
200 OK+ payload - If validation fails → Respond with
400 Bad Request+ error message - If auth token is invalid → Respond with
403 Forbidden
This lets you design API endpoints with true decision-making capabilities, turning n8n into a custom microservice platform.
3.5 Practical Debug Checklist for Response Failures
| Symptom | Likely Cause | Resolution |
|---|---|---|
| “Request “”gets stuck”” / times out” | No Respond to Webhook node reached | Use correct Response Mode + add a catch-all response |
| “””Invalid JSON””” | Response body is not stringified | Use JSON.stringify() |
| Wrong branch sends response | Multiple Respond to Webhook nodes triggered | Use conditionals to control execution flow |
| Browser says “CORS Error” | Pre-flight OPTIONS not handled | See Part 5 on CORS config |
| You don’t see what was sent back | Output panel shows input by default | Enable “Response Output Branch” |
✅ Summary of Part 3
| Concept | Best Practice |
|---|---|
| Customize responses | Use the Respond to Webhook node |
| Enable delayed responses | Set Webhook node to “Using Respond to Webhook” |
| Return clean JSON | Use JSON.stringify() for dynamic objects |
| Handle async workloads | “Respond immediately, process in background, return later” |
| Debug responses | “Enable “”Response Output Branch””” |
Ready for More?
This concludes Part A of our guide. You now have a solid foundation for receiving and processing webhook data in n8n. In the next section, we’ll dive into securing your endpoints and deploying your workflows for production use.
Continue to Part B: Authentication, Security & Deployment
To go deeper, check out the n8n Webhook Node documentation for official usage scenarios and parameters.
If you’re just starting, you may also want to read our n8n beginner’s guide.