Mastering the n8n AI Agent: A Comprehensive Tutorial
Welcome to the ultimate guide to the n8n AI Agent. In the evolving landscape of automation, AI agents have emerged as a transformative force, enabling systems to move beyond simple, predefined tasks and into the realm of autonomous problem-solving. This comprehensive n8n AI Agent tutorial is designed to take you from a curious beginner to a confident practitioner, capable of building sophisticated, intelligent workflows.
Whether you aim to build a smart chatbot, an automated research assistant, or a dynamic data analyst, understanding the n8n AI Agent is your key to unlocking the next level of automation. We will explore what an AI agent is, how it functions within the n8n ecosystem, how to configure its core components, and walk through building a practical, real-world example from scratch.
Table of Contents
What is an AI Agent?
At its core, an AI Agent is an autonomous system designed to perceive its environment, make rational decisions, and take actions to achieve specific goals. Think of it as a system with a “brain”—typically a Large Language Model (LLM)—that can operate independently with minimal human oversight. To truly grasp its power, it’s helpful to break it down into its core components:
- A reasoning engine (the LLM): This is the brain of the operation. It processes information, understands user requests, breaks down complex goals into smaller steps, and decides on a course of action.
- Sensors (Tools): To make informed decisions, the agent needs to gather information from the outside world. These “sensors” are tools that allow it to read data from various sources like web pages, databases, APIs, or internal documents.
- Actuators (Tools): Once a decision is made, the agent needs to act. These “actuators” are also tools that allow it to perform actions, such as sending an email, updating a spreadsheet, calling an API, or posting a message to Slack.
To make this concept more concrete, let’s move away from the technical definitions and think of an AI agent as a specialized digital employee you can assign complex tasks to. Here are a few powerful examples of what a well-configured n8n AI Agent can do:
An Automated Data Analyst
Imagine having a vast database or a sprawling spreadsheet with your company’s sales data. Instead of needing to be a SQL expert or a spreadsheet wizard, you could simply ask an agent in plain English, “What were our total revenues by product category last quarter, and which category grew the most?”. The agent would understand your request, generate the correct SQL query, execute it on the database, analyze the results, and return a clear answer, potentially even creating a chart to visualize the data for your report.
A Smart Customer Support Assistant
You can create an agent that connects to your company’s entire knowledge base—documents in Google Drive, articles in Notion, or a product manual in a vector database. When a customer asks a question via email or a website chatbot, the agent can perform a semantic search across all documents to find the most relevant information and craft a smart, context-aware response. This agent can also remember past conversations with the user, allowing for a highly personalized and efficient support experience.
A Multi-Platform Content Creator
Consider giving an agent the high-level goal of creating and publishing a social media campaign for a new product launch. The agent could first use a web search tool to find trending topics and relevant hashtags in your industry. Next, it could write engaging copy tailored for different platforms (e.g., a professional tone for LinkedIn, a casual one for Twitter). Then, it could use an image generation tool like DALL-E 3 to create a relevant picture. Finally, it would publish the complete post across all your social media accounts, all from a single command.
A Proactive Security Analyst
In a cybersecurity setting, an agent can be set up to constantly monitor for security alerts from various systems. When an alert is triggered, the agent can automatically enrich it with data from threat intelligence frameworks like MITRE ATT&CK, classify the potential threat level, and search internal logs for related suspicious activity. Based on its findings, it can suggest remediation steps and update the corresponding ticket in a system like Zendesk or Jira, all before a human analyst has even seen the initial alert.
In each of these scenarios, the agent isn’t just performing a single, predefined action. It’s taking a high-level goal, breaking it down into a logical sequence of steps, dynamically selecting and using the tools it has available, and working autonomously to achieve the objective. This ability to reason and act is what makes the n8n AI Agent so powerful.
How to Understand the n8n AI Agent?
In n8n, the AI Agent is not an abstract concept but a tangible component you add to your workflow. You can easily recognize it as the AI Agent node on the visual canvas. Here’s a quick guide to identifying and understanding its role:
- It’s a specific node: You can add it to your workflow by clicking the “+” button and searching for “AI Agent”. This node is the central component for building any agent-based automation.
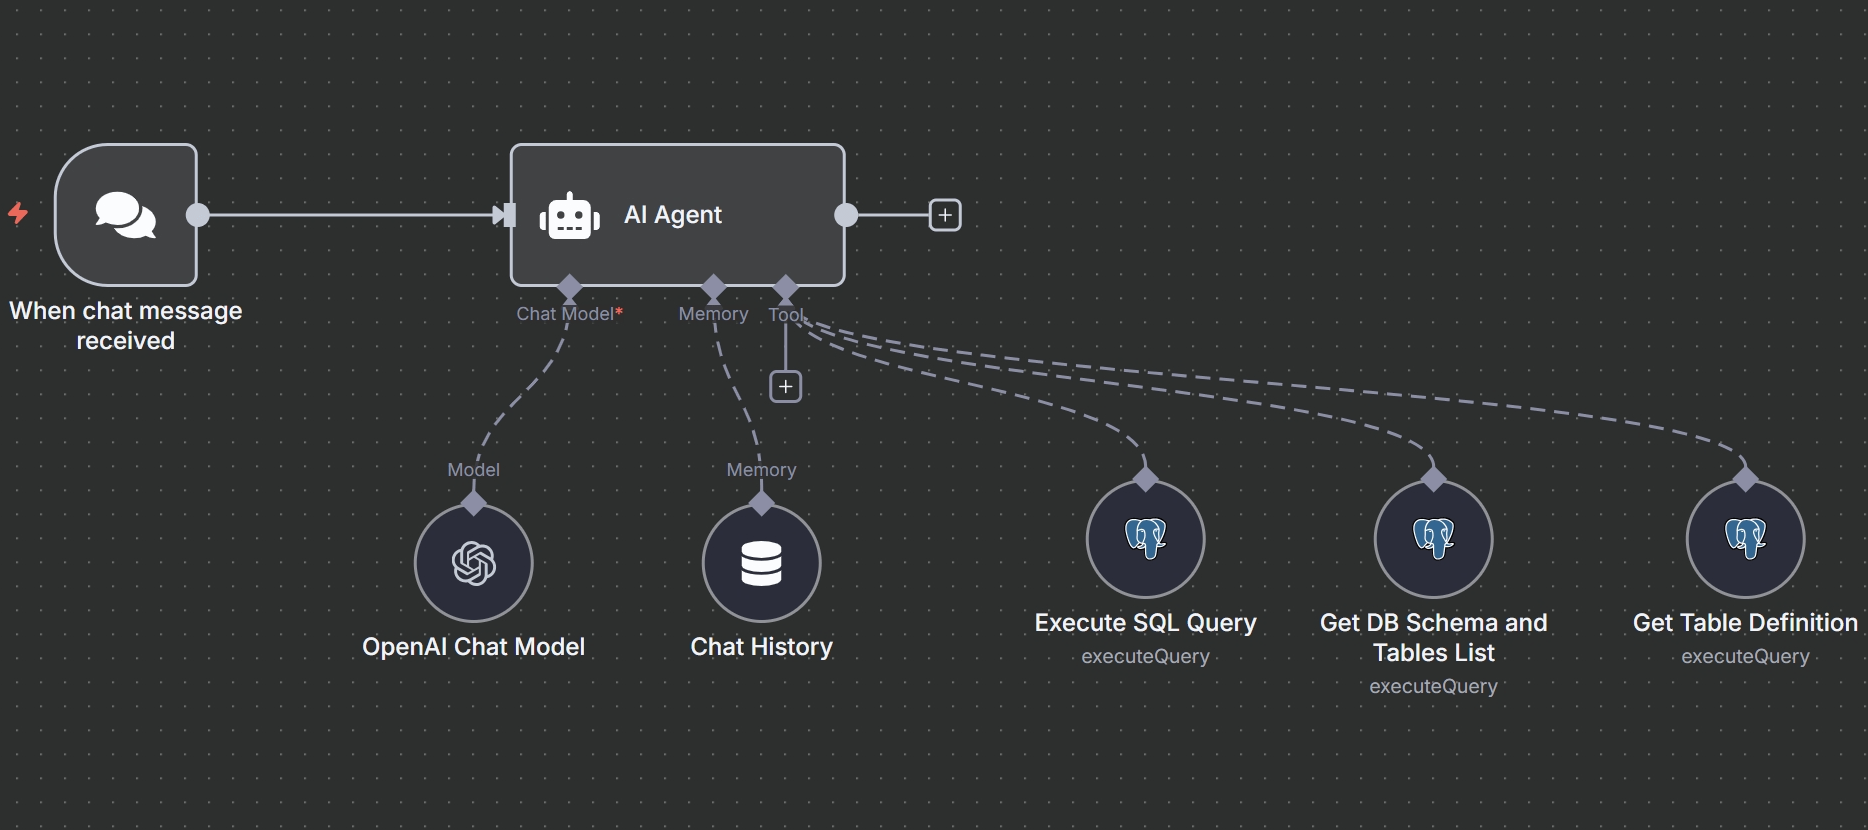
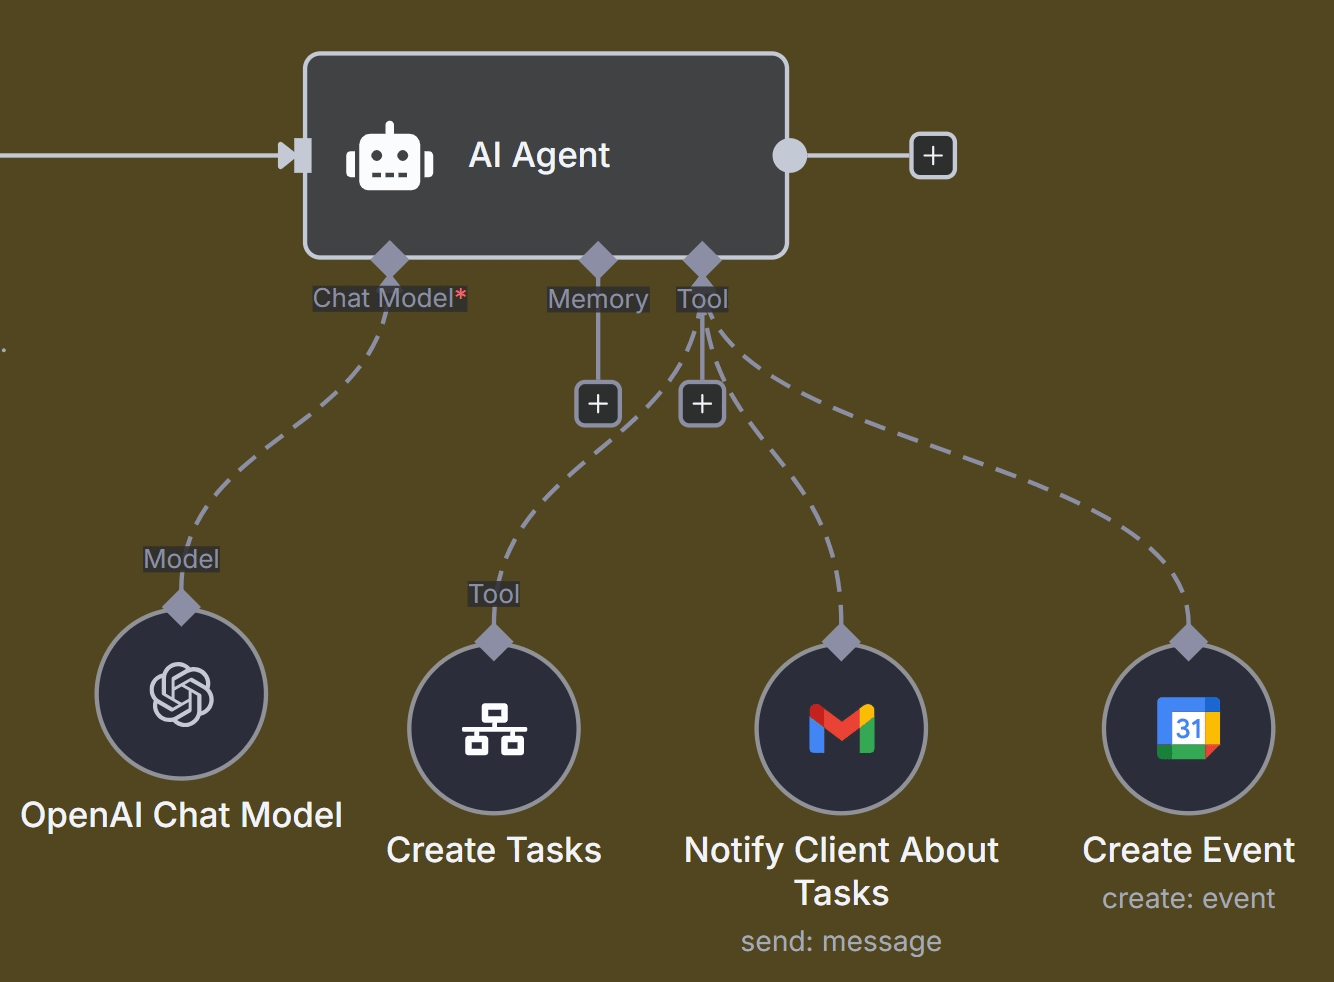
- It acts as a central hub: The AI Agent node is designed to be the “brain” of your autonomous workflow. It has specific, color-coded inputs where you connect other nodes: a Chat Model (like OpenAI or Gemini), Memory (to remember conversation history), and one or more Tools (like Google Search, a Calculator, or a custom API).
- It’s a “Tools Agent”: While older versions of n8n experimented with different agent types, all AI Agent nodes in recent versions now function as a unified “Tools Agent”. This type is specifically optimized to excel at understanding a user’s intent and selecting the most appropriate external tool to perform an action and find a solution.
Difference Between Basic LLM Chain and the AI Agent node
Within n8n, the Basic LLM Chain node and the AI Agent node represent two distinct levels of AI capability. While the agent is an evolution of the chain, they serve different purposes and are suited for different kinds of tasks.
The Basic LLM Chain Node: A Direct Line to the AI
Think of the Basic LLM Chain node as the most fundamental building block for interacting with a Large Language Model. Its purpose is to perform a single, specific AI task in a linear fashion.
- Function: Its primary job is to take a prompt (an instruction), send it to a connected language model, and get a direct response back.
- Simplicity: It is designed for straightforward, one-shot tasks. For example, you can use it to summarize a block of text, translate a phrase from one language to another, or answer a question based on information you provide directly in the prompt.
- Limitations: Crucially, the Basic LLM Chain node does not support tools or memory on its own. It cannot make an independent decision to go search the web or use a calculator. It simply executes the prompt it is given and passes the result to the next node in the workflow.
The AI Agent Node: The Autonomous Orchestrator
The n8n AI Agent node is a far more advanced and powerful system. It uses an LLM not just to complete a task, but as a “reasoning engine” to decide how to achieve a goal.
- Function: An agent’s job is to receive a high-level goal, break it down into logical steps, and then intelligently decide which tools to use to accomplish it.
- Decision-Making: It can be connected to a wide variety of tools (like Wikipedia, a calculator, or your own custom APIs). When you give it a prompt like “What was the score of the last Lakers game and who was the top scorer?”, it decides for itself that it needs to use a web search tool to find the answer.
- Capabilities: It natively supports memory, allowing it to recall previous parts of a conversation to provide more context-aware and personalized responses, making it ideal for building chatbots.
A Direct Comparison
The clearest way to understand the distinction is to see their features side-by-side:
| Feature | Basic LLM Chain Node | AI Agent Node |
|---|---|---|
| Primary Role | To execute a specific, predefined AI task (e.g., “summarize this text”). | To act as a reasoning engine that orchestrates tasks to achieve a goal. |
| Tool Usage | Not supported. It cannot use external tools like web search or calculators. | Core feature. It can be connected to a variety of tools and decides when to use them. |
| Memory | Not supported. It does not remember past interactions. | Supported. It can be connected to a memory node to hold contextual conversations. |
| Execution Flow | Static. It performs one step in a fixed, human-defined workflow. | Dynamic. It can decide its own sequence of actions based on the user’s request and the tools available. |
| Use Case | Best for simple, direct AI operations within a larger, structured workflow. | Best for building complex, interactive chatbots or autonomous systems that need to solve multi-step problems. |
In summary, the Basic LLM Chain is a foundational component for any AI interaction, while the n8n AI Agent node is a more sophisticated orchestrator that adds a powerful layer of autonomous decision-making, tool use, and memory on top.
Key features of n8n AI Agent
4.1 Large Language Model Setting
Choosing the right Large Language Model (LLM) is the most critical first step in configuring your n8n AI Agent, as it directly impacts the agent’s intelligence, performance, cost, and overall capabilities. The best choice depends on a crucial trade-off between flexibility and performance, as well as the specific requirements of your task.
Your LLM Options in n8n
n8n provides a wide array of built-in chat model nodes, giving you the flexibility to connect to many different LLM providers with ease. Your options include:
- Major Providers: OpenAI (all GPT models), Anthropic (Claude models), Google (Gemini and Vertex AI), and Azure OpenAI.
- High-Speed Options: Groq is often selected for its incredibly fast, low-latency response times, making it ideal for real-time applications.
- Open-Source and Other Models: n8n also supports Cohere, Mistral, Ollama (for running models locally or on your own hardware), and many others.
Key Factors for Choosing a Model
The decision isn’t just about picking the most famous name; it’s about balancing several key factors based on your specific use case.
1. Performance vs. Flexibility (The Core Trade-Off)
This is the most important strategic consideration, and it stems from how the n8n AI Agent node is designed.
- Use the AI Agent Node for Flexibility: The AI Agent node is built using the LangChain framework, which acts as a universal adapter. This makes it incredibly convenient to swap between different LLM providers (like OpenAI, Gemini, and Claude) with minimal changes to your workflow, perfect for prototyping and avoiding vendor lock-in.
- Use a Dedicated Node for Performance: However, this convenience comes with a performance cost. For production systems, especially when using a specific provider like OpenAI, experienced n8n developers often bypass the generic AI Agent node and use a dedicated node (like the OpenAI Assistant node) or a direct HTTP Request node. This results in a significant performance boost because it avoids potential “prompt mangling” from the abstraction layer and gives you direct access to native features like OpenAI’s highly reliable tool-calling functions and more efficient context management.
2. Task Requirements and Model Capabilities
Different models excel at different tasks. Consider what your agent needs to do:
- Complex Tool Use: If your agent needs to reliably use multiple, complex tools, a model with strong, native tool-calling or function-calling capabilities is crucial. For example, Gemini 1.5 Pro is noted for its reliable and accurate tool calling performance.
- Creativity vs. Predictability: You can control the randomness of a model’s output using the “Sampling Temperature” setting. A lower temperature (e.g., 0.2) produces more predictable and deterministic outcomes, which is better for tasks like coding or data extraction. A higher temperature (e.g., 0.8) encourages more creative and diverse responses, better for tasks like content creation.
- Speed and Latency: For real-time applications like customer-facing chatbots, speed is essential. Models from providers like Groq are specifically designed for low-latency responses, ensuring a smooth user experience.
3. Cost
LLM usage is typically billed based on the number of tokens processed (both input and output), and these costs are separate from your n8n subscription. Different models have vastly different price points. It’s important to analyze your expected usage, choose a model that fits your budget, and consider building a separate n8n workflow to track your token usage and log the estimated costs to a Google Sheet for monitoring.
4.2 Common Tools for the n8n AI Agent
The true power of an n8n AI Agent comes from its ability to use tools. The n8n platform allows you to connect a wide array of its 500+ integration nodes as “tools” that your AI agent can intelligently select and use to perform actions. These tools can be grouped into several key categories:
Information Retrieval
These tools allow the agent to look up external information to answer questions or complete tasks that require up-to-date or specialized knowledge.
- Web Search: The SerpApi (Google Search) node is a popular choice for giving the agent access to real-time information from the internet, perfect for answering questions about current events.
- Knowledge Bases: The Wikipedia node provides instant access to a vast encyclopedia, perfect for general knowledge queries about historical figures, scientific concepts, or places.
- Web Scraping: The generic HTTP Request node can be used to scrape the content of specific web pages. For more advanced use cases, community nodes like Bright Data can handle more robust scraping that bypasses common blocks.
- Database Interaction: You can connect directly to databases like Postgres, MySQL, or a local SQLite file, allowing the agent to query structured data using natural language commands.
Productivity and Communication
These tools integrate the agent directly into your daily business applications, allowing it to become a true digital assistant.
- Email: The Gmail node can be used to read incoming emails, summarize long threads, or send automated replies on behalf of the agent.
- Messaging: Nodes for Slack and Telegram allow the agent to send notifications, post updates, or even participate in team conversations.
- Spreadsheets: The Google Sheets node is incredibly versatile, enabling the agent to read data from a sheet, update rows, or log its own activities, effectively using a spreadsheet as a simple database.
Custom and General-Purpose Tools
These tools provide maximum flexibility, allowing you to build virtually any capability you can imagine.
- HTTP Request: This is arguably the most powerful tool in the arsenal. It allows your agent to interact with virtually any external service that has a REST API. For example, you can use it to call the DALL-E 3 API to generate images, get weather data, or connect to a custom internal application.
- Code Node: The Code node lets the agent execute custom JavaScript or Python scripts. This enables limitless custom logic, complex data manipulation, or advanced calculations that go beyond the capabilities of standard nodes.
- Calculator: A simple but essential tool for performing mathematical calculations reliably, ensuring the LLM doesn’t make mistakes on arithmetic.
4.3 Prompts for n8n AI Agent
Configuring the prompts is a crucial step in defining how your n8n AI agent will behave, think, and interact. This is where you shape its personality, its goals, and its rules of engagement. There are two primary types of prompts you will configure in the AI Agent node: the User Prompt and the System Prompt.
4.3.1 User Prompt Configuration
The user prompt is the specific, immediate input, query, or message from the user that you want the agent to process. In the AI Agent node, you have two primary ways to configure this:
- Take from previous node automatically: This is the most common setting when your workflow starts with an interactive trigger, like a Chat Trigger or a Telegram trigger. The AI Agent node will automatically look for an input field named
chatInputfrom the preceding node and use its content as the user’s message. This is the simplest way to create a seamless conversational flow. - Define below: This option gives you more explicit control over the input. You can either enter static text or, more powerfully, use an n8n expression to dynamically pull the user’s message from the trigger’s incoming data. For instance, if your workflow is triggered by a webhook from a Telegram message, a common expression to use in the “Prompt (User Message)” field is
{{ $json.message.text }}. This tells the agent to use the text content from the incoming JSON payload as its prompt.
4.3.2 System Prompt Configuration
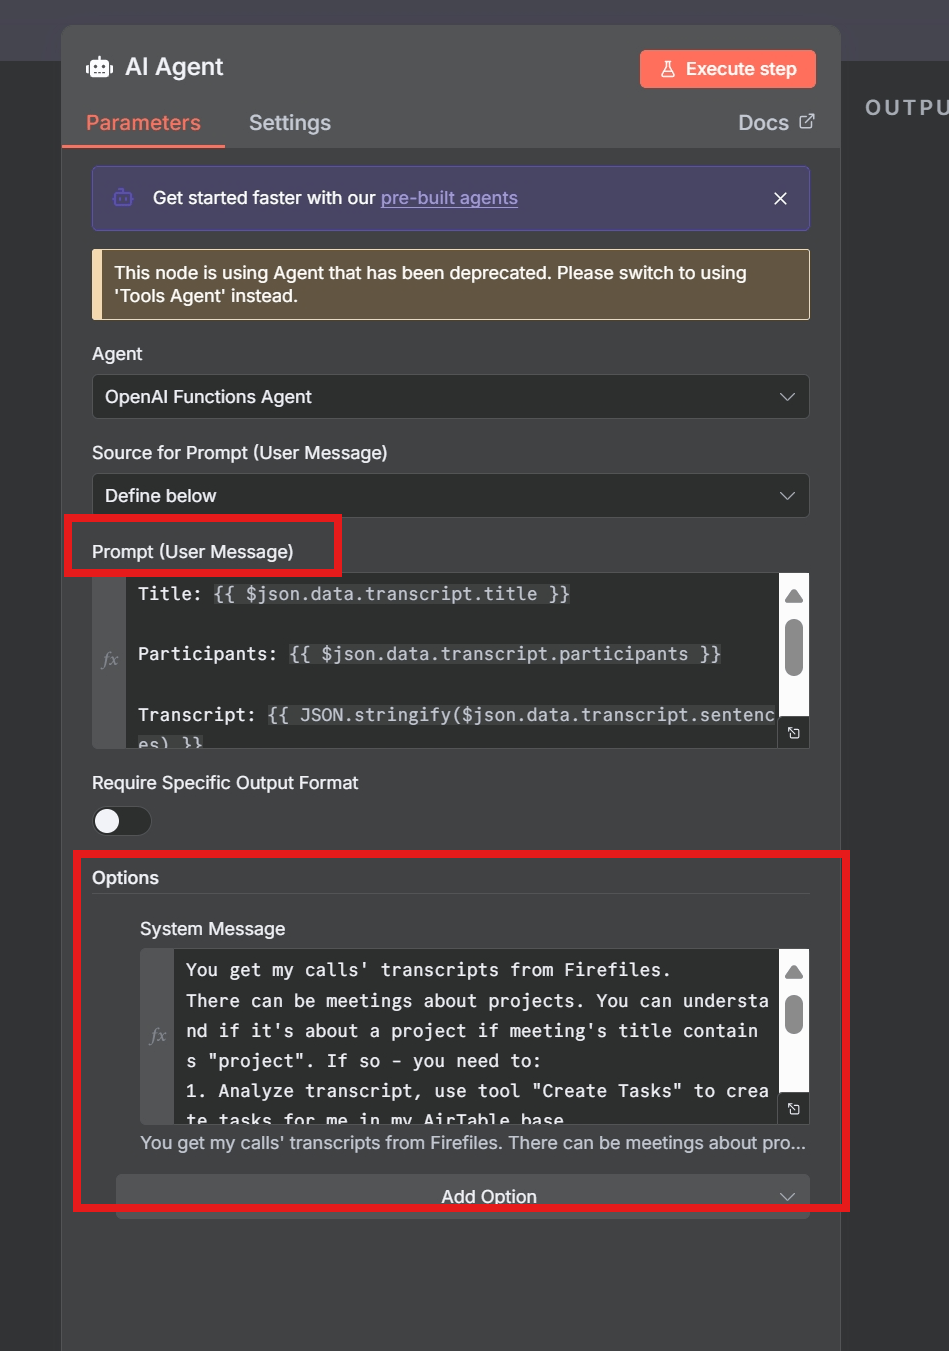
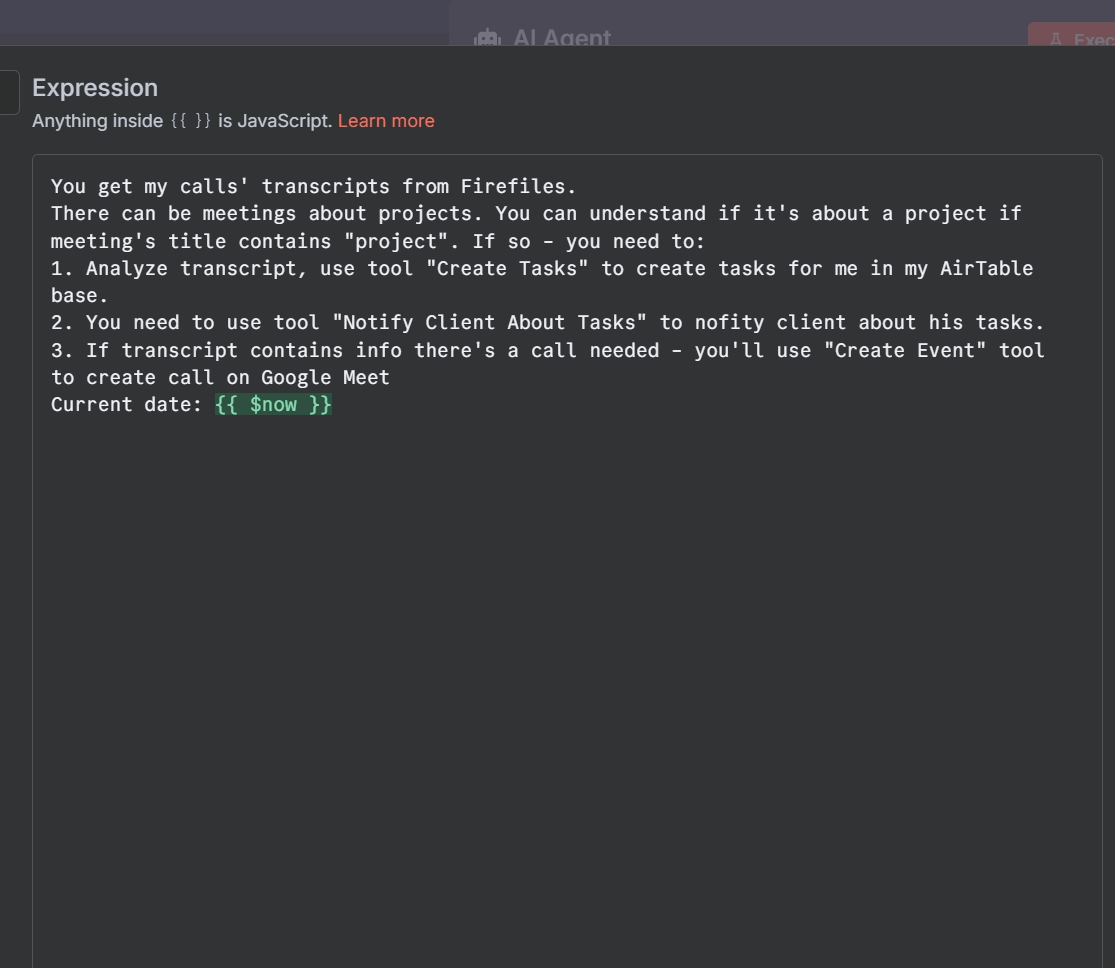
The system prompt (or system message) is where you define the agent’s core identity, personality, and operational instructions. It’s a set of directions given to the agent before the conversation starts, guiding its behavior, tone, and decision-making process throughout the entire interaction. You can find this setting under the “Options” section of the AI Agent node.
A well-crafted system prompt is absolutely essential for reliable and predictable agent performance. Best practices include:
- Clearly stating the agent’s task or role: Define its purpose explicitly. For example: “You are a helpful marketing assistant. Your primary goal is to use web search to find trending topics and then create engaging social media content with a vibrant and youthful tone”.
- Providing context and personality: You can make the interaction more personal and engaging. For example: “You are a friendly and helpful assistant. You are communicating with a user named
{{ $json.message.from.first_name }}. Always address the user by their name in your responses”. - Giving explicit instructions on tool usage: Don’t assume the agent knows how and when to use its tools. Be direct. For example: “You have access to a web search tool. You should use this tool to look up any information that you do not know or that may be helpful in answering the user’s original question”.
- Adding important constraints and rules: Set clear boundaries for the agent’s behavior to prevent errors. For example: “If the user asks for an image, you must always send the full link to the generated image in the final reply” or “Crucial instruction: You must always scrape the provided website URL using the
website_scrapertool. Do not ever try to summarize a website without scraping it first!”.
In essence, the user prompt is the what—the immediate task for the agent—while the system prompt is the how—the underlying constitution that governs all its actions and decisions.
4.3.3 Mention Tools in the Prompt
Equipping your AI agent with the right tools is only half the battle; you must also instruct it on how to use them effectively. The system prompt is your primary method for giving the LLM enough context to make an intelligent decision about which tool to select for a given task.
Here are the best practices for mentioning tools in your system prompt:
- State the Agent’s Role in a Way That Implies Tool Usage: Define the agent’s overall purpose clearly. Example: “You are a marketing assistant that uses web search to create engaging social media content”. This immediately tells the agent its core function and hints that a web search tool is available and relevant to its job.
- Provide Explicit, Direct Instructions: Be direct about when and how a tool should be used. Example for an image generation tool: “You have a tool called ‘image_generator’. Call this tool to request a DALL-E 3 model when the user asks you to draw or create a picture. If you get a response from this tool, forward the image URL directly to the user”.
- Use the `{tools}` Placeholder for Automatic Descriptions: For the Tools Agent, you can use a generic but powerful template that automatically includes the descriptions of all connected tools. The
{tools}expression is a special placeholder that n8n replaces with a formatted list of all available tools and their functions (which you define in each tool node).
A highly effective system prompt template using this placeholder looks like this:
TOOLS
------
Assistant can use tools to look up information that may be helpful in answering the user's original question. The tools the assistant can use are:

{tools}

USER'S INPUT
--------------------
Here is the user's input: {{ $json.chatInput }}
This structure clearly separates the tool descriptions from the user’s query, which helps the agent to reason more effectively and reliably select the correct tool for the job.
How to deliver the result of AI Agent
Once the n8n AI Agent has processed the input, reasoned through the problem, and used its tools to generate a final answer, you need a way to deliver that result to the user or another system. In n8n, this is accomplished by connecting additional nodes to the output of the AI Agent node. The agent’s final response is passed on as structured data that these subsequent nodes can use to perform an action.
Here are the most common methods for outputting the result:
Sending a Message
This is the most frequent use case, especially for building chatbots and interactive assistants. You can connect a messaging node directly after the AI Agent to send its response to a user.
- Telegram/Slack: If your workflow is triggered by a message from a platform like Telegram or Slack, you would add a corresponding “Send Message” node after the agent. This allows the agent to reply directly to the user in the same chat, creating a natural conversational loop.
- Email: You can connect a Gmail or other email node to send the agent’s output as a formatted email. This is useful for sending detailed summaries, reports, or notifications generated by the agent.
Responding to Webhooks
For custom web applications or interactive chat widgets embedded on a website, the workflow is often triggered by a webhook. After the AI Agent generates its response, you would connect a Respond to Webhook node to send the answer back to the front-end application that made the initial request, powering the chat interface.
Updating a Database or Application
The agent’s output doesn’t always have to be sent directly to a user. It can be used to programmatically update other systems, making the agent a powerful back-end automation engine.
- Google Sheets: A very common pattern is to connect a Google Sheets node to log the agent’s responses, create a record of all user interactions, or store data that the agent has extracted from a source.
- CRM/Ticketing Systems: In business contexts, you can connect a Zendesk, Salesforce, or other CRM node to have the agent update a support ticket with enriched information, add a note to a customer’s file, or create a new lead.
Advanced Tip: A community best practice is to instruct your agent to output its results in a structured format like JSON. For example, instead of just a text response, you can ask it to return `{“response”: “Here is the answer…”, “source”: “Wikipedia”}`. This makes the data predictable and machine-readable, which dramatically improves the reliability of downstream nodes that need to parse and use the information. You can also toggle the Return Intermediate Steps option in the agent’s settings to get a detailed log of its thought process and tool usage, which is invaluable for debugging.
5.1 Advanced Output Control: Using a Structured Output Parser
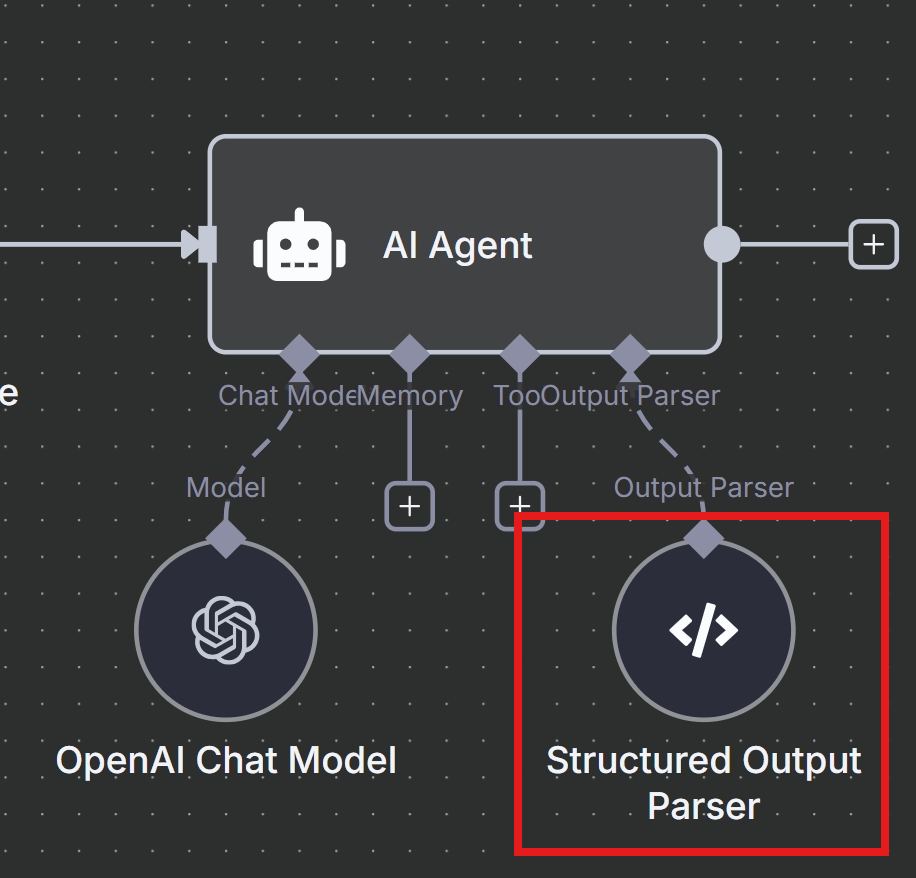
While getting a natural language response from an agent is great for chatbots, it can be unreliable for complex automations. If you need to pass the agent’s output to another machine or a series of other nodes, you need the data to be predictable and structured. This is where the Structured Output Parser node comes in. Using it is the recommended way in n8n to guarantee that the AI’s output is always in the correct JSON format, as it automatically adds specific formatting instructions to the prompt for you.
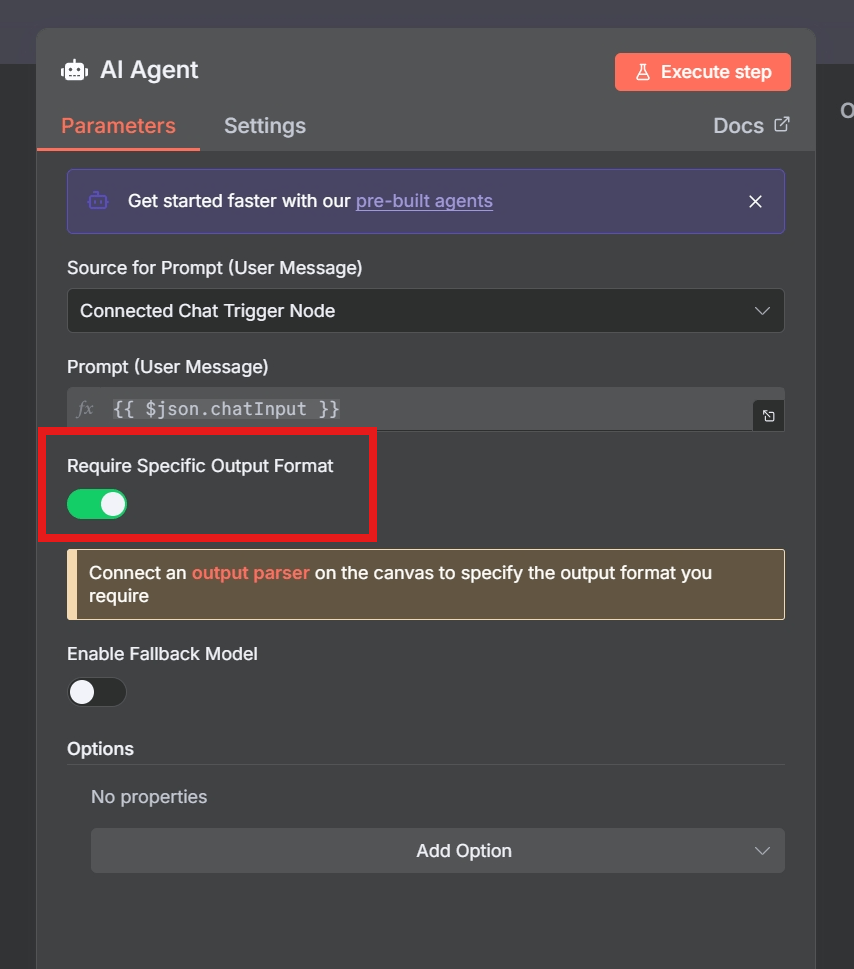
Step 1: Adjust the AI Agent Node
Open the settings for your AI Agent node, find the toggle for Response Specific Output Format, and ensure it is turned on. This tells the agent to use the connected output parser to structure its final response.
With this setup, the Structured Output Parser tells the AI the exact JSON structure to use, while your main prompt still tells the AI what content to generate. The AI Agent will automatically use the parser, and its output will be a perfectly formatted JSON object, ready for the next steps in your workflow. This makes it incredibly easy and reliable to use the generated data in downstream nodes, such as accessing the Instagram caption with a simple expression like {{ $json.output.platform_posts.Instagram.caption }} without any fear of parsing errors.
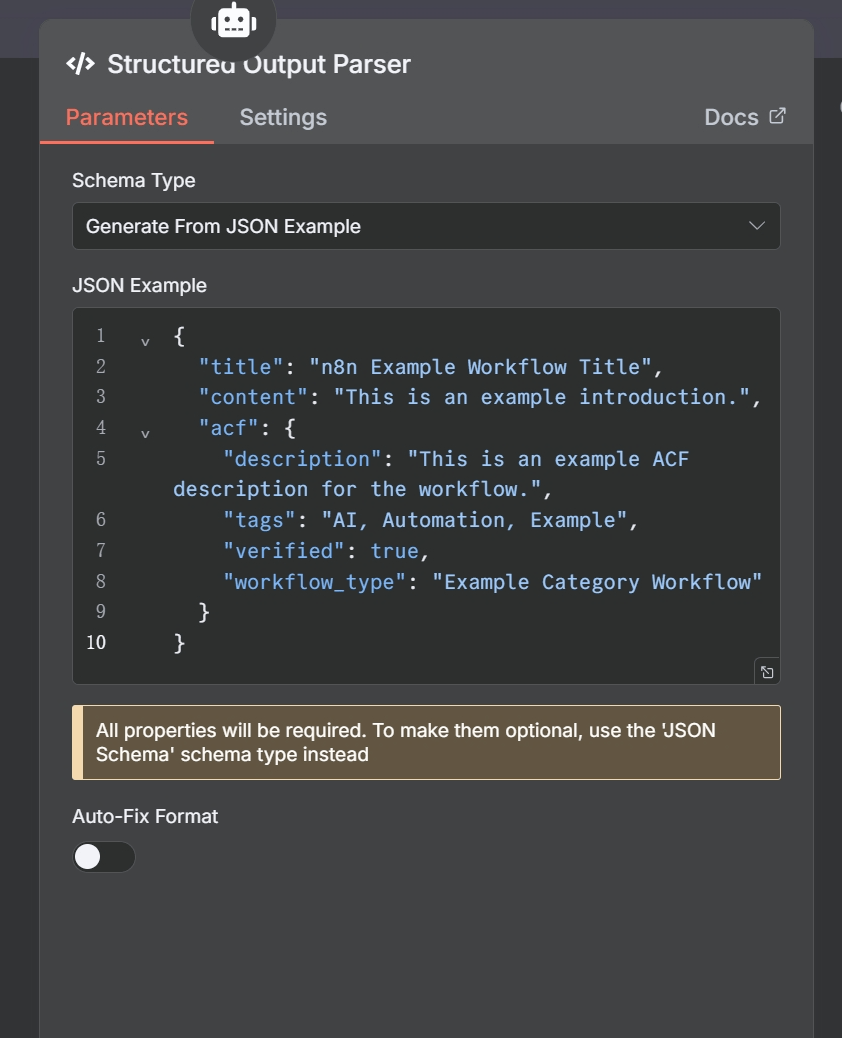
Step 2: Configure the Structured Output Parser
You need to provide the parser with an example of the exact JSON structure you want. Open the settings for your Structured Output Parser node and paste your desired JSON structure into the JSON Example text box. For example, in a social media content factory workflow, you might use the following schema to ensure you get all the necessary components for each platform:
{
  "title": "n8n Example Workflow Title",
  "content": "This is an example introduction.",
  "acf": {
    "description": "This is an example ACF description for the workflow.",
    "tags": "AI, Automation, Example",
    "verified": true,
    "workflow_type": "Example Category Workflow"
  }
}
Best Practices: To get the ideal, consistent output you want, you need to make the prompt more direct and leave less room for interpretation.The key is to simplify the instructions and be extremely clear about the required output format from the very beginning.
You are an AI assistant that generates a single, specific JSON object based on n8n workflow data.
Your only task is to output a raw JSON object.
Do not include markdown formatting like `json` or any other text before or after the JSON.

The output JSON MUST strictly follow this exact structure:
{
  "title": "string",
  "content": "string",
  "acf": {
    "description": "string",
    "tags": "string",
    "verified": boolean,
    "workflow_type": "string"
  }
}

---
INSTRUCTIONS FOR JSON FIELDS:
---
How to Build Your First AI Agent in n8n: A Step-by-Step Tutorial
Now that we’ve covered the theory, it’s time to get hands-on. This section of our n8n AI agent tutorial will guide you through building a fully functional chatbot from a ready-to-go template.
By the end of this section, you will know how to:
- Deploy an n8n AI Agent from a template.
- Connect it to Gemini or OpenAI as its “brain”.
- Add short-term memory for natural, contextual conversations.
- Equip it with useful tools like Wikipedia search, a password generator, and a loan calculator.
- Embed the final agent into any website with a clean, customizable chat UI.
🧩 Section 1: What We’re Building (An Overview)
Before we dive in, here’s a high-level view of the workflow’s structure. It’s a modular design where each component has a specific job:
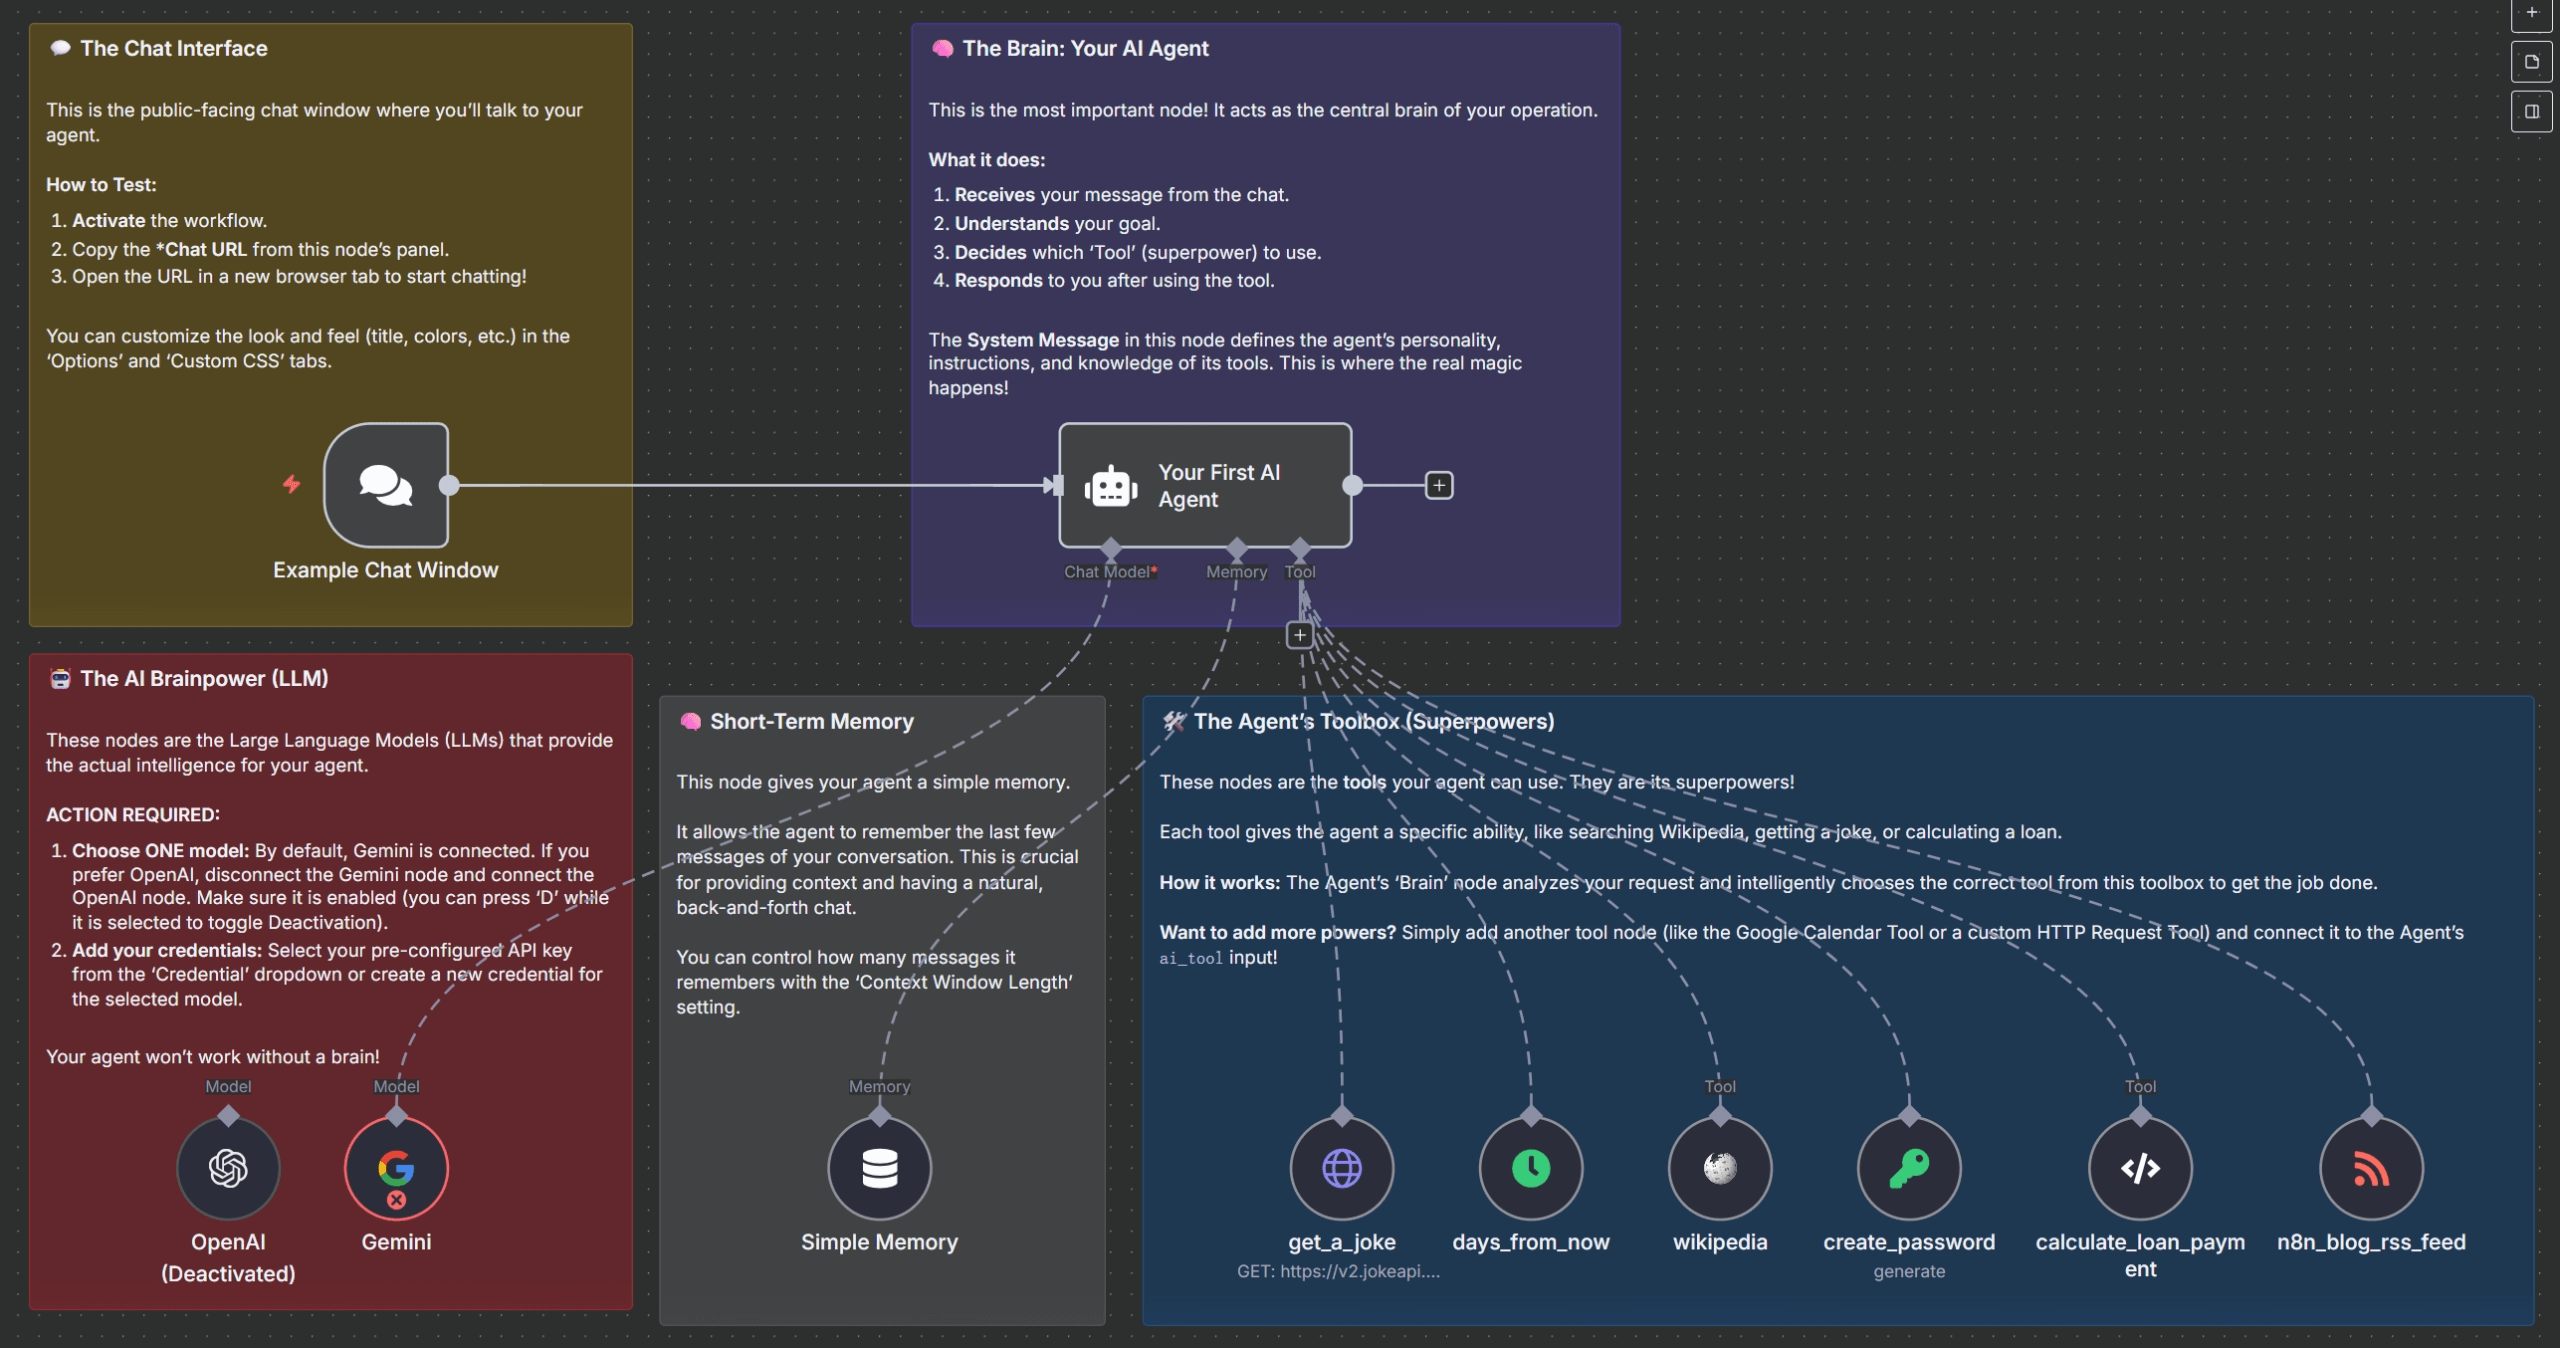
- Chat Trigger: This node creates the public-facing chat window where the user interacts.
- AI Agent Node: This is the central brain that receives the user’s message and decides what to do next.
- Memory Node: This node is connected to the agent and keeps track of the recent conversation history.
- LLM Node: This provides the core reasoning and language capabilities (e.g., Google Gemini or OpenAI GPT).
- Tool Nodes: These are individual nodes connected to the agent that extend its powers, allowing it to fetch data, perform calculations, or generate content.
💬 Section 2: Setting Up the Chat Interface
One of the best features of this template is that it includes a ready-made chat UI. The Chat Trigger node, named “Example Chat Window” in the template, is responsible for this. It creates a public URL that hosts a chat interface, which you can customize with a title, placeholder text, and even custom CSS to match your brand’s look and feel. The template even includes a modern “glassmorphism” style sheet out of the box.
🧠 Section 3: Giving Your Agent a Brain (LLM Integration)
Your agent is only as smart as the LLM behind it. The template provides two pre-configured options:
- Option A: Gemini (enabled by default): Uses the fast and cost-efficient
models/gemini-1.5-flashmodel. You will need an API key from Google AI Studio. - Option B: OpenAI (disabled by default): Uses the
gpt-4o-minimodel. You will need an API key from the OpenAI Platform.
Only one of these should be active at a time. You can easily toggle between them by selecting the node you don’t want to use and pressing ‘D’ on your keyboard to disable it.
🧠 Section 4: Adding Memory for Context
To avoid frustrating, context-less conversations, the template includes a Window Buffer Memory node. It’s configured to store the last 30 messages of the conversation, allowing the AI Agent to reference recent context when responding. This means a user can ask follow-up questions like, “What was that loan calculation we just did?” and the agent will remember. You can adjust the context window length, but remember that more memory leads to higher token usage per call.
🧑🔧 Section 5: Equipping Your Agent with Tools
This is where the magic happens. Tools are the “superpowers” your AI Agent can use when it needs information or capabilities it doesn’t have on its own. The template comes with six pre-built tools:
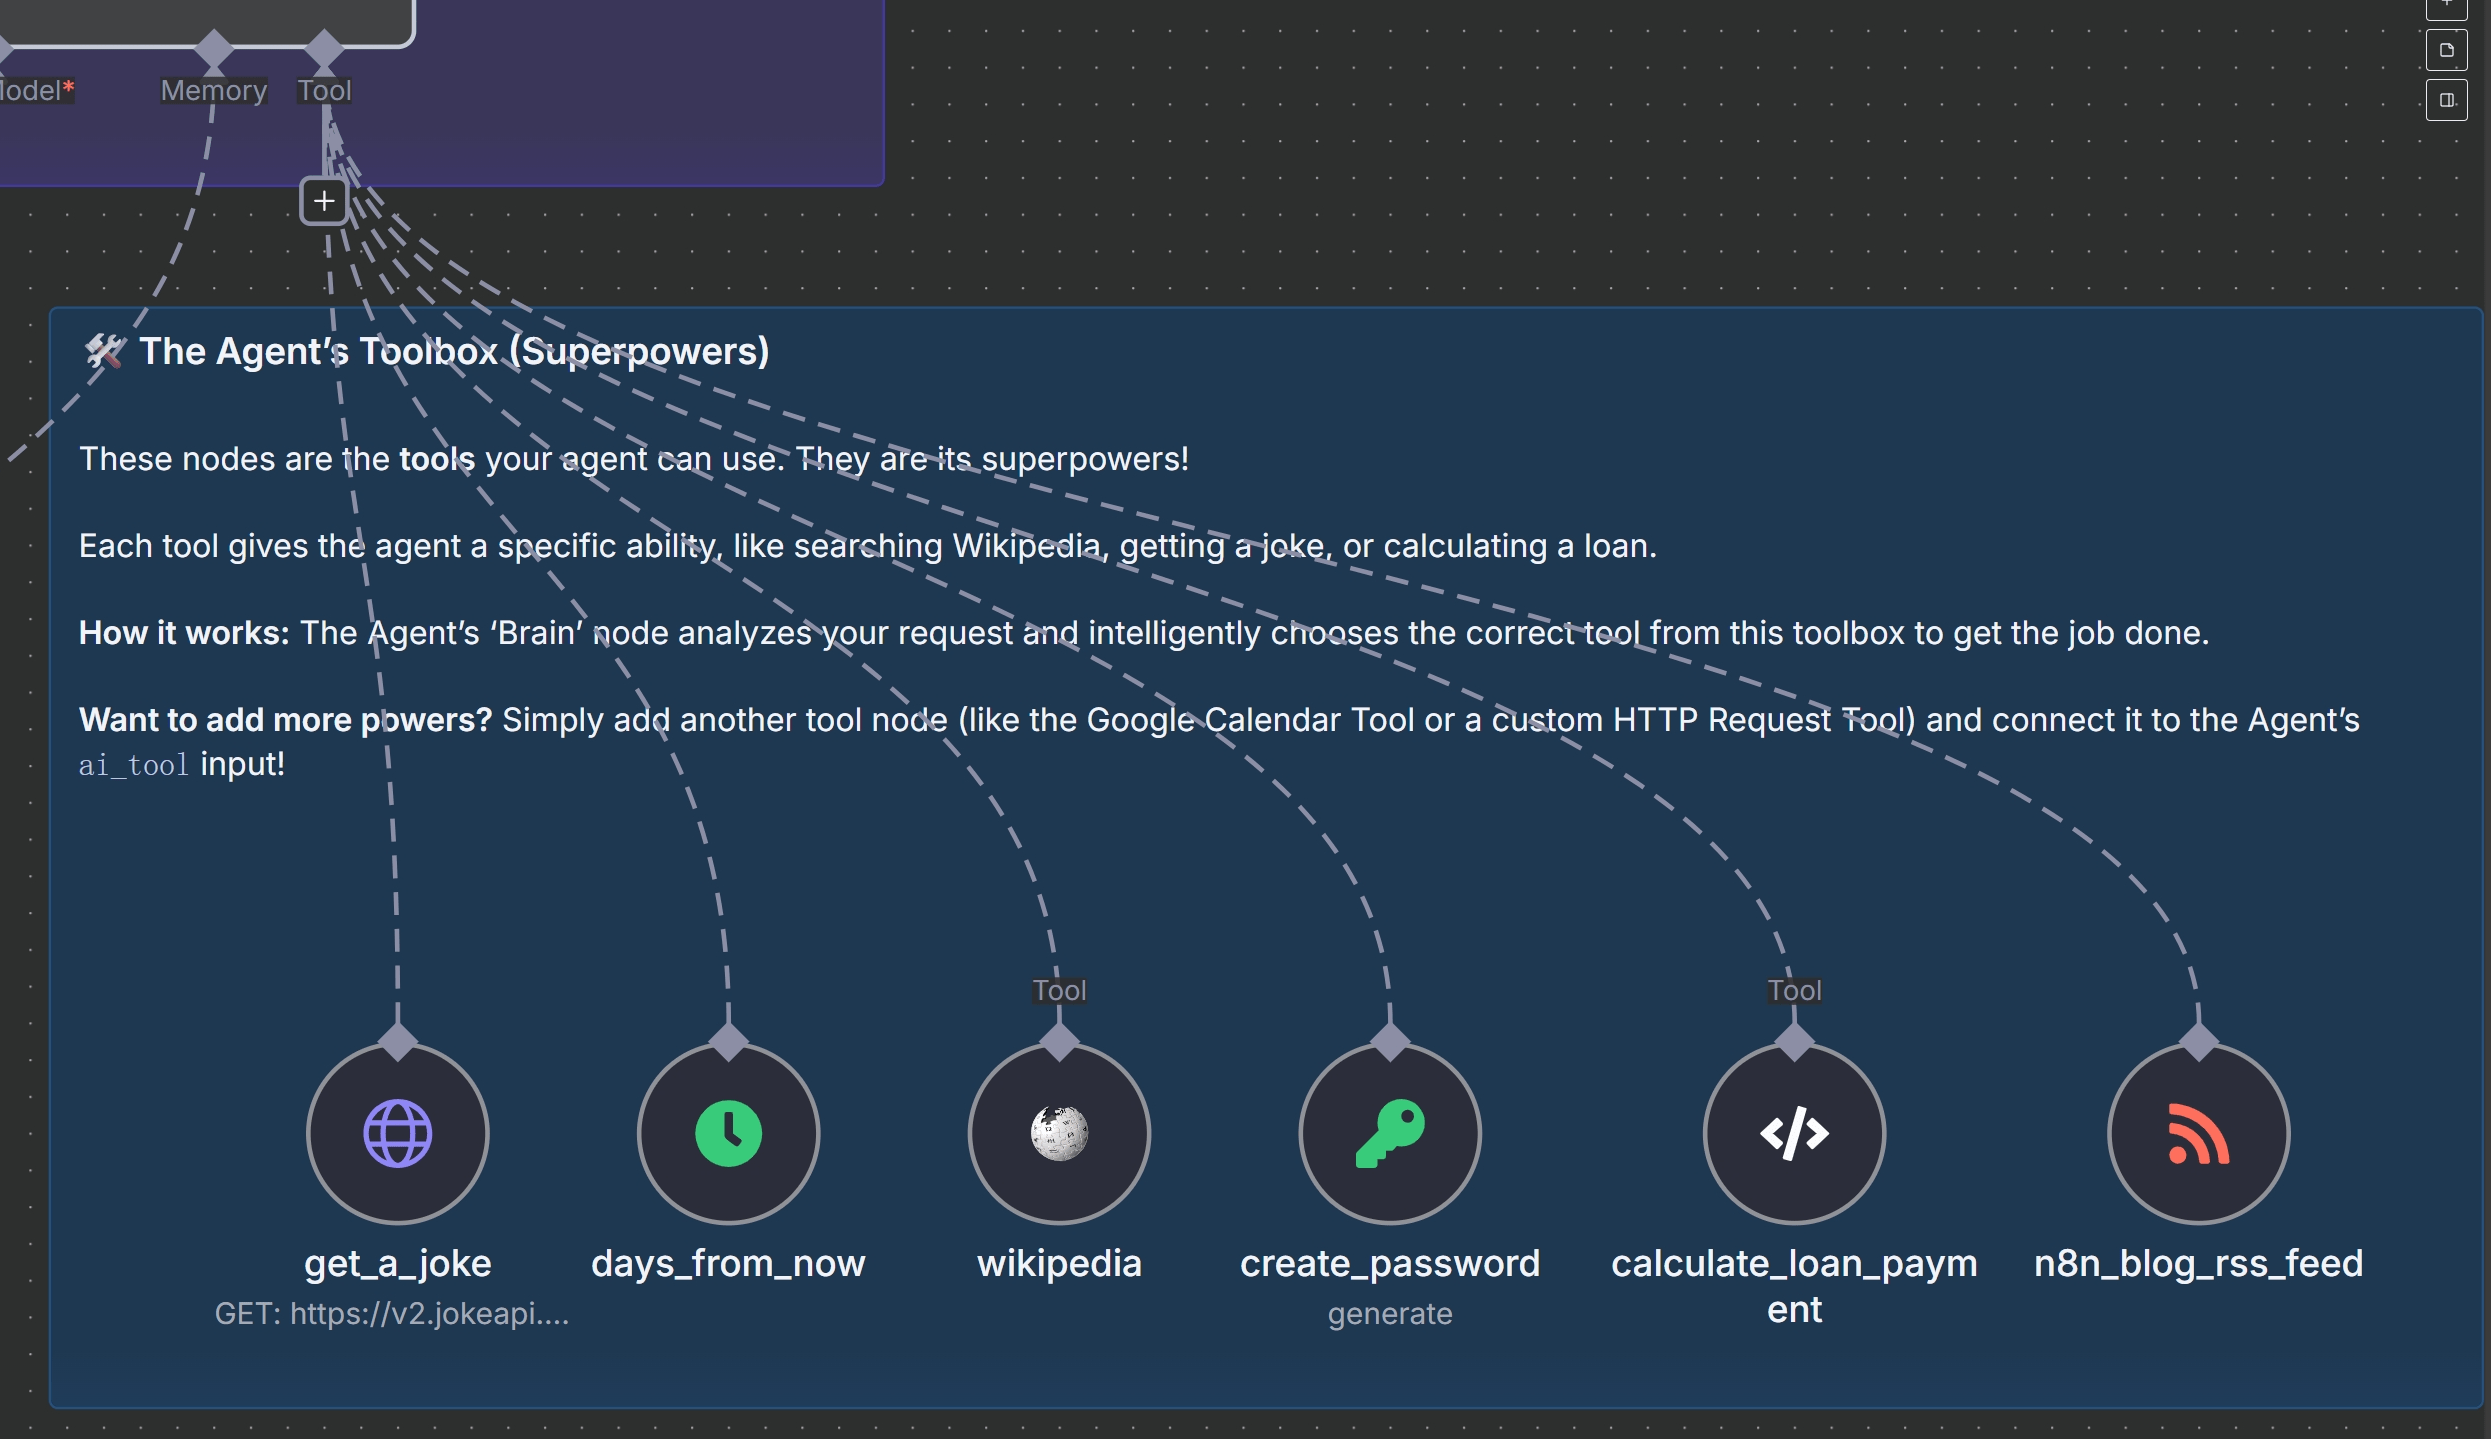
- 🃏 Get a Joke: Calls an external API to fetch a clean one-liner joke.
- 📅 Days from Now: Calculates the number of days between today and a future date.
- 📖 Wikipedia: Fetches a concise summary of any topic from Wikipedia.
- 🔑 Create Password: Generates a secure random password of a specified length.
- 💰 Loan Calculator: Computes monthly loan payments using the amortization formula.
- 📰 n8n Blog RSS: Fetches the latest posts from the official n8n blog.
Adding more tools is easy—just drop another node onto the canvas, connect it to the Agent’s ai_tool input, and give it a clear name and description so the agent knows what it does.
⚙️ Section 6: Step-by-Step Deployment Guide
Let’s deploy the agent:
- Import the Workflow: In your n8n editor, go to Import from URL and paste the workflow link from the template page. Save it as “My First AI Agent”.
- Add LLM Credentials: Open either the Gemini or OpenAI node and add your corresponding API key in the credentials section.
- Activate the Workflow: Toggle the workflow from “Inactive” to “Active” in the top right corner.
- Test It: Open the Chat Trigger node, copy the “Chat URL,” and open it in a new browser tab. Start chatting! Try asking it to use its tools: “Tell me a joke,” “Summarize ‘quantum computing’ from Wikipedia,” or “What is the monthly payment for a $300,000 loan at 5.5% over 30 years?”.
🎨 Section 7: Customizing and Embedding
You can easily customize the chat window’s appearance by editing the CSS in the Chat Trigger node. Change the primary color, font family, and more to match your website’s branding. Once you’re happy with it, you can embed the chat agent directly into your website using a simple HTML iframe or have it pop up from a button click.
Security Best Practices: Always run your public-facing n8n instance over HTTPS. Use n8n’s built-in credential store for your API keys—never hardcode them. For critical, back-end business processes, use structured, deterministic workflows instead of relying on an agent’s probabilistic nature. An agent is perfect for user-facing interactions, but less so for tasks that must be 100% accurate every time.
🚀 Section 8: Taking It Further
This template is just the beginning. Now you can extend your n8n AI Agent with even more powerful tools:
- Google Calendar Tool: Allow users to ask, “What’s on my schedule tomorrow?”.
- Social Media Tool: Enable commands like, “Post this summary to my Twitter account”.
- Notion/Sheets Tool: Let users say, “Log this conversation into my project notes database”.
- Your Own Custom API Tool: Use the HTTP Request node to integrate with any internal or external API, unlocking limitless possibilities.
Conclusion
The n8n AI Agent represents a significant leap forward in automation, moving beyond simple, linear workflows into the realm of dynamic, intelligent systems. Throughout this comprehensive tutorial, we have explored the fundamental concepts of AI agents, dissected the powerful capabilities of the n8n AI Agent node, and provided a step-by-step guide to building your very first intelligent chatbot.
By understanding how to configure the LLM, equip your agent with a diverse set of tools, and write effective system prompts, you now have the knowledge to create sophisticated automations that can reason, act, and solve complex problems. The journey into AI-powered automation is just beginning, and with the flexible and powerful n8n platform, the only limit is your imagination. We encourage you to continue experimenting, building, and pushing the boundaries of what’s possible with your own n8n AI Agent workflows.
Looking to expand beyond AI Agents? Check out our featured n8n workflows to explore real-world automation templates you can implement right away.