Mastering the n8n HTTP Request Node: Docs, Examples, and Authentication Explained

Table of Contents
- 1. Introduction
- 2. Fundamentals of HTTP & APIs (brief refresher)
- 3. Getting Started: n8n HTTP Request Node Example Setup
- 4. Detailed Field-by-Field Breakdown
- 5. Response Handling and Node Options
- 6. Advanced Options:Batching and Bearer Token in n8n HTTP Request Node
- 7. Importing cURL Commands
- 8. Troubleshooting:Troubleshooting:How to Debug HTTP Request in n8n
- 9. Real-World Use Case Examples
- 10. Tips, Best Practices & Security
- 11. Summary & Next Steps
- Appendix
The n8n HTTP Request node stands as one of the most powerful and versatile tools in your automation arsenal. It acts as your workflow’s gateway to the vast world of APIs (Application Programming Interfaces), allowing you to interact with countless web services and integrate them seamlessly into your n8n automations. Whether you’re fetching data, triggering actions, or synchronizing information between disparate systems, a solid understanding of this node is paramount.
Many beginners search for “n8n HTTP Request node docs” or “n8n HTTP Request node documentation” to understand how this feature works. In this guide, we’ll not only walk through the official documentation but also provide real-world n8n HTTP Request node examples, authentication setups, and debugging tips.We’ll break down each parameter, explore practical scenarios, and equip you with the knowledge to tackle even the most complex API interactions. Get ready to unlock the full potential of web automation within n8n!
1. Introduction
What is the HTTP Request node and why it matters
At its core, the HTTP Request node in n8n enables your workflows to send HTTP (Hypertext Transfer Protocol) requests to specified URLs. Think of it as your n8n workflow making a direct call to another application or service over the internet. The response from that service is then passed on to the next nodes in your workflow, allowing you to process, transform, or utilize the data as needed.
The significance of this node cannot be overstated. In today’s interconnected digital landscape, APIs are the backbone of data exchange and service integration. By mastering the HTTP Request node, you gain the ability to:
- Retrieve data from various online sources (e.g., weather APIs, social media platforms, financial data providers).
- Send data to other applications (e.g., CRM systems, marketing automation tools, internal databases).
- Trigger actions in external services (e.g., creating a new ticket in a support system, posting on social media, initiating a payment).
- Automate repetitive tasks that involve interacting with web-based services.
- Build custom integrations where no pre-built n8n node exists.
In essence, the HTTP Request node extends the reach of your n8n workflows far beyond the pre-built integrations, opening up a universe of possibilities for automation.
Scenarios when you’d use it vs built‑in integrations or community nodes
n8n boasts a growing library of built-in nodes and a vibrant community contributing even more. So, when should you opt for the HTTP Request node instead? Here are some key scenarios:
- No dedicated node exists: If n8n doesn’t have a specific built-in node for the API you need to interact with, or if a community node is unavailable or doesn’t offer the functionality you require, the HTTP Request node is your direct solution.
- Fine-grained control: The HTTP Request node provides granular control over every aspect of the API interaction, from the HTTP method and headers to the request body and authentication. This level of customization might not be available in more abstracted built-in nodes.
- Exploring new APIs: When working with a new API or one that’s under development, the HTTP Request node allows you to experiment and understand its intricacies before a dedicated node might be created.
- Specific or uncommon API features: Some APIs might have unique features or less common authentication methods that are not supported by generic integration nodes. The HTTP Request node allows you to implement these specific requirements.
- Lightweight interactions: For simple API calls where pulling in a potentially larger integration node might feel like overkill, the HTTP Request node offers a more direct and efficient approach.
However, it’s also important to recognize when built-in or community nodes might be preferable:
- Ease of use: Dedicated nodes often come with a user-friendly interface tailored to the specific service, simplifying setup and configuration.
- Abstraction and error handling: Integration nodes often handle authentication, data formatting, and common error scenarios behind the scenes, reducing the complexity you need to manage.
- Community support: Dedicated nodes often benefit from community support and shared knowledge specific to that integration.
The choice ultimately depends on the complexity of the API, the level of control you need, and the availability and functionality of existing nodes. Often, a combination of these approaches can be the most effective.
How this post is structured to guide you from zero to expert
This post is structured to provide a progressive learning experience, starting with the foundational concepts and gradually moving towards more advanced applications. Here’s a roadmap of what you can expect:
- Introduction: Setting the stage and highlighting the importance of the HTTP Request node.
- Fundamentals of HTTP & APIs: A brief refresher on the underlying technologies that power API interactions.
- Getting Started: A hands-on introduction to adding and configuring the basic parameters of the node.
- Detailed Field-by-Field Breakdown: An in-depth exploration of each configurable option within the node.
- Response Handling and Node Options: Understanding how to interpret and manage the data returned by API calls.
- Advanced Options & Performance Controls: Leveraging features like batching and retries for robust workflows.
- Importing cURL Commands: A convenient way to quickly set up HTTP requests from existing API documentation.
- Troubleshooting Common Issues: Identifying and resolving frequent problems encountered when working with APIs.
- Real-World Use Case Examples: Practical examples demonstrating how to apply the HTTP Request node in various scenarios.
- Tips, Best Practices & Security: Guidance on building efficient, secure, and maintainable workflows.
- Summary & Next Steps: A recap of the key takeaways and suggestions for further learning.
- Appendix (Optional): Supplementary information like a glossary and quick reference.
By following this structure, you’ll build a solid foundation and progressively gain the expertise needed to confidently utilize the n8n HTTP Request node in your most demanding automation projects.
2. Fundamentals of HTTP & APIs (brief refresher)
Before diving deep into the n8n node, let’s take a moment to revisit the core concepts of HTTP (Hypertext Transfer Protocol) and APIs (Application Programming Interfaces), particularly RESTful APIs. Understanding these fundamentals will significantly enhance your ability to effectively use the HTTP Request node.
What a REST API is—endpoints, methods, headers, status codes
A REST (Representational State Transfer) API is a widely adopted architectural style for building web services. RESTful APIs allow different software applications to communicate with each other over the internet using standard HTTP protocols. Key components of a REST API include:
- Endpoints: These are specific URLs (Uniform Resource Locators) that represent resources or functionalities offered by the API. Think of them as the addresses you’re calling when you want to interact with the API. For example,
https://api.example.com/usersmight be an endpoint to access user data. - HTTP Methods: These verbs indicate the type of action you want to perform on a resource at a specific endpoint. The most common HTTP methods are:
- GET: Used to retrieve data from a specified resource. It should not have any side effects on the server.
- POST: Used to send data to the server to create a new resource.
- PUT: Used to send data to the server to update an existing resource. It typically replaces the entire resource.
- PATCH: Similar to PUT, but used to partially update an existing resource.
- DELETE: Used to delete a specified resource.
- Headers: These are key-value pairs that provide additional information about the HTTP request or response. They can include details about the content type, authentication credentials, caching directives, and more. For instance, the
Content-Typeheader specifies the format of the data being sent in the request body (e.g.,application/json). TheAuthorizationheader often carries authentication tokens. - Status Codes: These are three-digit codes returned by the server in the HTTP response to indicate the outcome of the request. Understanding status codes is crucial for debugging and handling API interactions. Some common examples include:
- 200 OK: The request was successful.
- 201 Created: A new resource was successfully created (often in response to a POST request).
- 400 Bad Request: The server could not understand the request, often due to invalid data.
- 401 Unauthorized: Authentication is required, but the client has not provided valid credentials.
- 403 Forbidden: The client has valid credentials but does not have permission to access the resource.
- 404 Not Found: The requested resource could not be found at the specified endpoint.
- 429 Too Many Requests: The client has sent too many requests in a given period (rate limiting).
- 500 Internal Server Error: The server encountered an unexpected error.
Overview of GET/POST/PUT/PATCH/DELETE requests
Let’s briefly elaborate on the common HTTP methods and their typical use cases:
- GET: Imagine you’re asking a website for information, like a list of products or a user’s profile. A GET request is the equivalent of that. It retrieves data from the server without modifying it.
- POST: When you fill out a form on a website and submit it, you’re typically sending a POST request. This method is used to send data to the server to create a new resource, such as a new user account, a new order, or a new blog post.
- PUT: Think of a PUT request as updating an entire existing document. If you wanted to completely replace the information in a user’s profile, you might use a PUT request, sending all the updated details.
- PATCH: If you only need to update a specific piece of information in a resource, like changing a user’s email address without affecting other details, a PATCH request is more appropriate. It sends only the modified data.
- DELETE: As the name suggests, a DELETE request is used to remove a resource from the server, such as deleting a user account or an order.
Understanding which HTTP method to use for a specific API interaction is crucial, as it tells the server what action you intend to perform on the targeted resource. API documentation will always specify the expected HTTP method for each endpoint.
3. Getting Started: n8n HTTP Request Node Example Setup
Now that we have a basic understanding of HTTP and APIs, let’s dive into the n8n HTTP Request node itself.
Locating and adding the node in the n8n workflow UI
Adding the HTTP Request node to your n8n workflow is straightforward:
- Open your n8n workflow editor.
- Click on the “+” button either at the beginning of your workflow or after an existing node to add a new node.
- In the “Add Node” modal, you can either search for “HTTP Request” in the search bar or navigate to the “Communication” category and find it there.
- Click on the “HTTP Request” node to add it to your workflow canvas.
Once added, the node will appear with its default configuration, ready for you to customize.
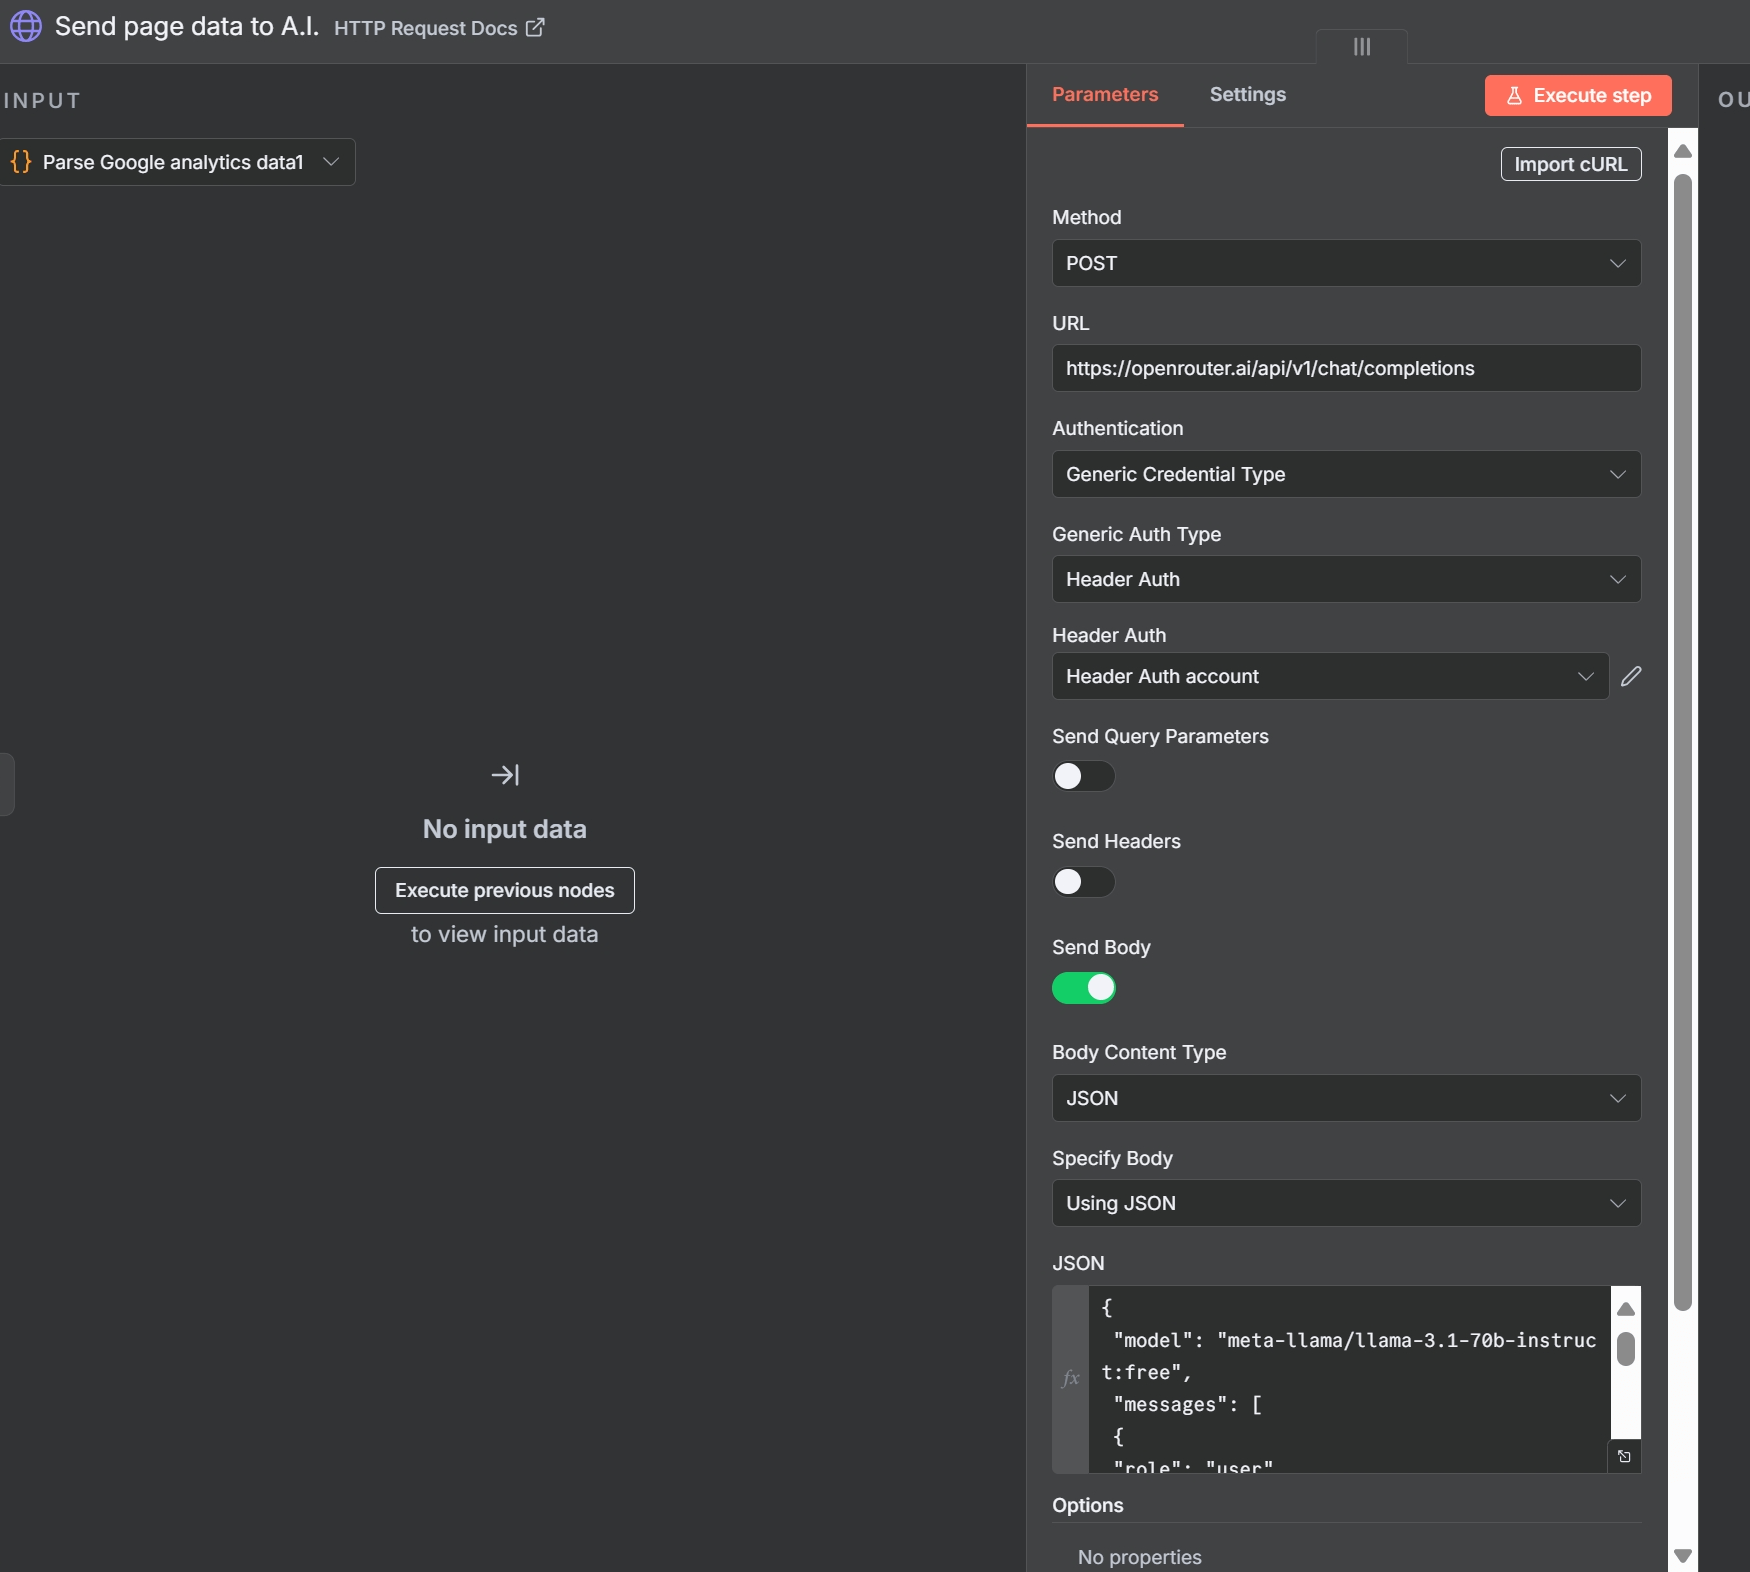
Core parameters: Method, URL, Authentication setup (predefined vs generic)
The HTTP Request node has several key parameters that you’ll need to configure for each API interaction:
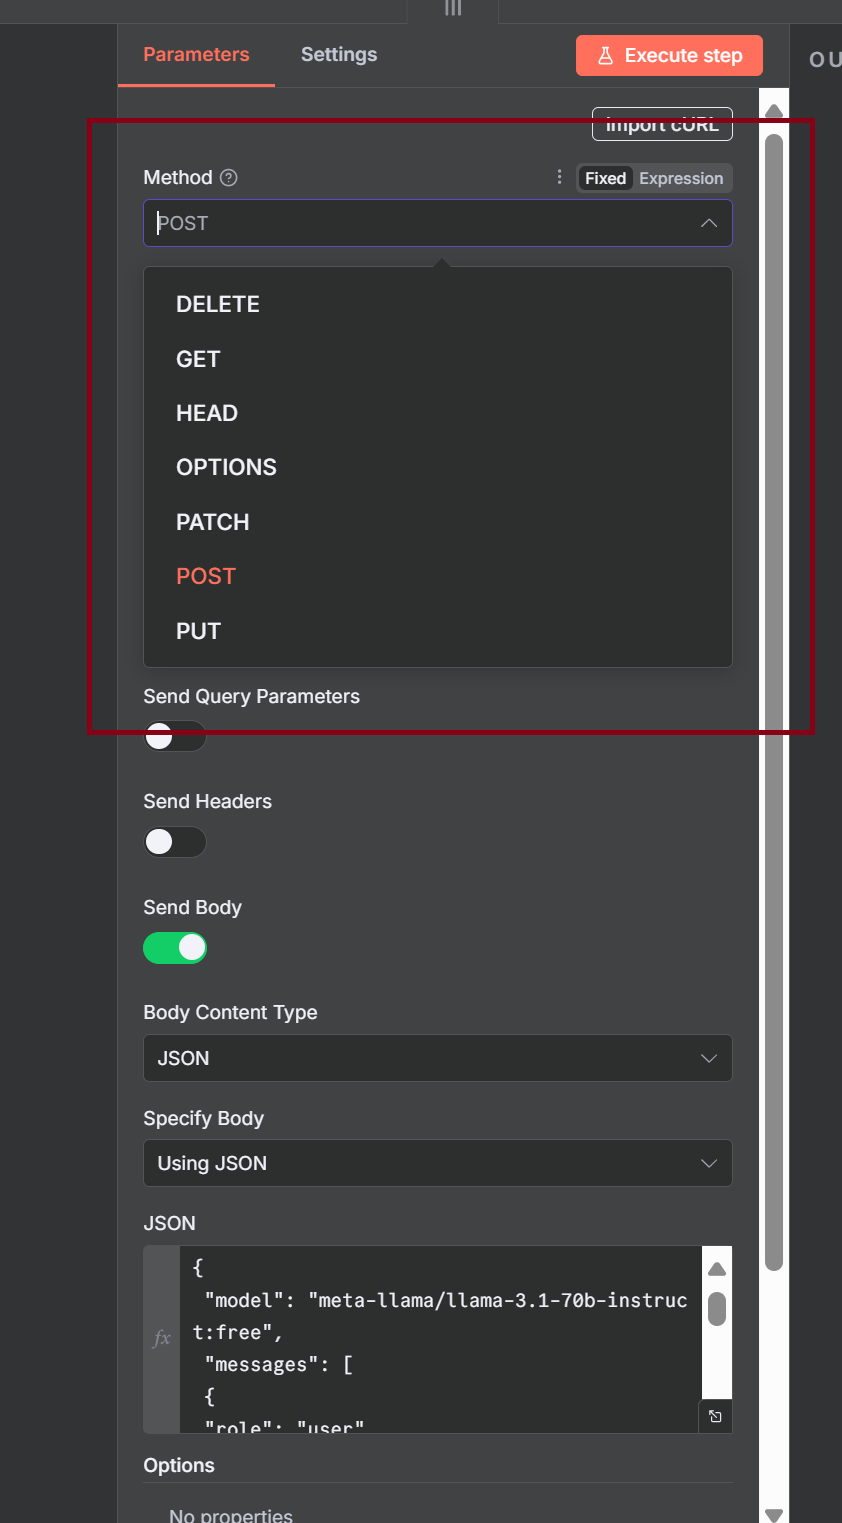
- Method: This dropdown menu allows you to select the HTTP method you want to use for the request (GET, POST, PUT, PATCH, DELETE, HEAD, OPTIONS). Choose the method appropriate for the API endpoint you’re calling and the action you want to perform.
- URL: This is where you enter the complete URL of the API endpoint you want to interact with. This URL will typically include the base API address and the specific path to the resource.
- Authentication: This section allows you to configure how your request will be authenticated with the API. n8n offers two main ways to handle authentication:
- Predefined Credentials: n8n allows you to create reusable credential configurations for various services. If you’ve already set up credentials for the API you’re using (e.g., via an OAuth 2.0 flow or by storing an API key), you can select them from the “Credential Type” dropdown. This is the recommended approach for security and reusability.
- Generic Credentials: If there isn’t a predefined credential type for your API, or if you need more granular control, you can use generic credentials. n8n supports several generic authentication methods, including:
- Basic Auth: For APIs that require a username and password.
- Header Auth: For APIs that expect authentication tokens or API keys in custom headers (e.g.,
X-API-Key). - OAuth1: For APIs using the OAuth 1.0a protocol.
- OAuth2: For APIs using the OAuth 2.0 protocol.
- Digest Auth: A less common authentication scheme.
- Query Auth: For APIs that expect authentication parameters to be passed in the URL’s query string.
You’ll need to consult the API documentation of the service you’re interacting with to determine the required authentication method and how to configure it in n8n.
New to credentials in n8n? Follow our detailed guide to n8n credentials (OAuth2, API keys & header auth) to create secure, reusable auth before making requests.
Quick “first request” example (e.g. public API), capturing response
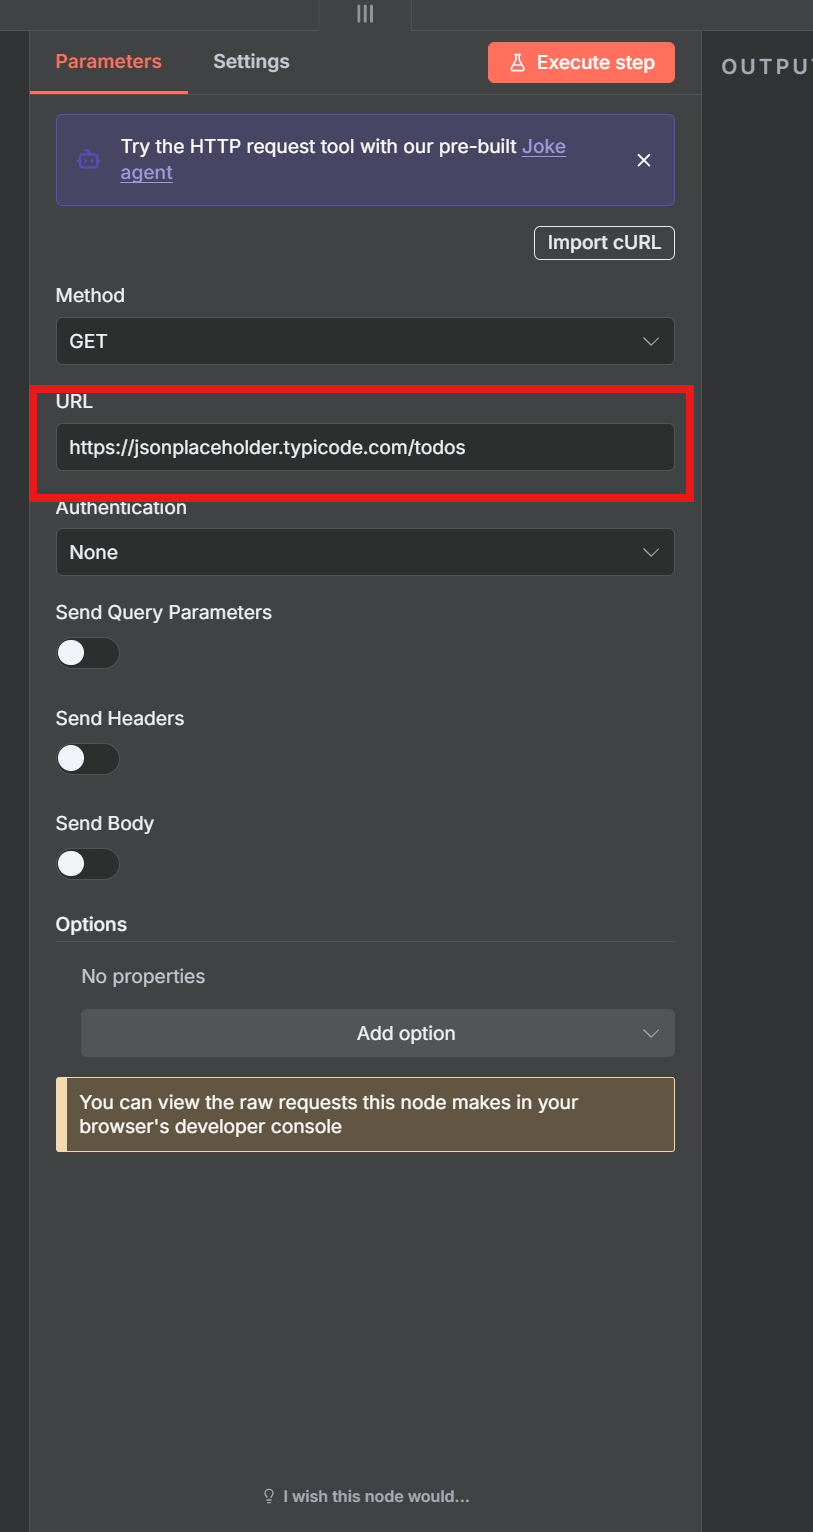
Let’s walk through a simple example of making a GET request to a public API that provides JSON data – the JSONPlaceholder API, which is great for testing. We’ll fetch a list of todos.
- Add an HTTP Request node to your workflow.
- In the “Method” dropdown, select GET.
- In the “URL” field, enter
https://jsonplaceholder.typicode.com/todos. - Leave the “Authentication” set to “None” as this is a public API that doesn’t require authentication.
- Click the “Execute Node” button (the play button below the node).
After execution, the node will output the response from the API. You can view the output by clicking on the node and inspecting the “Data” tab in the right-hand panel. You should see an array of JSON objects, each representing a todo item.
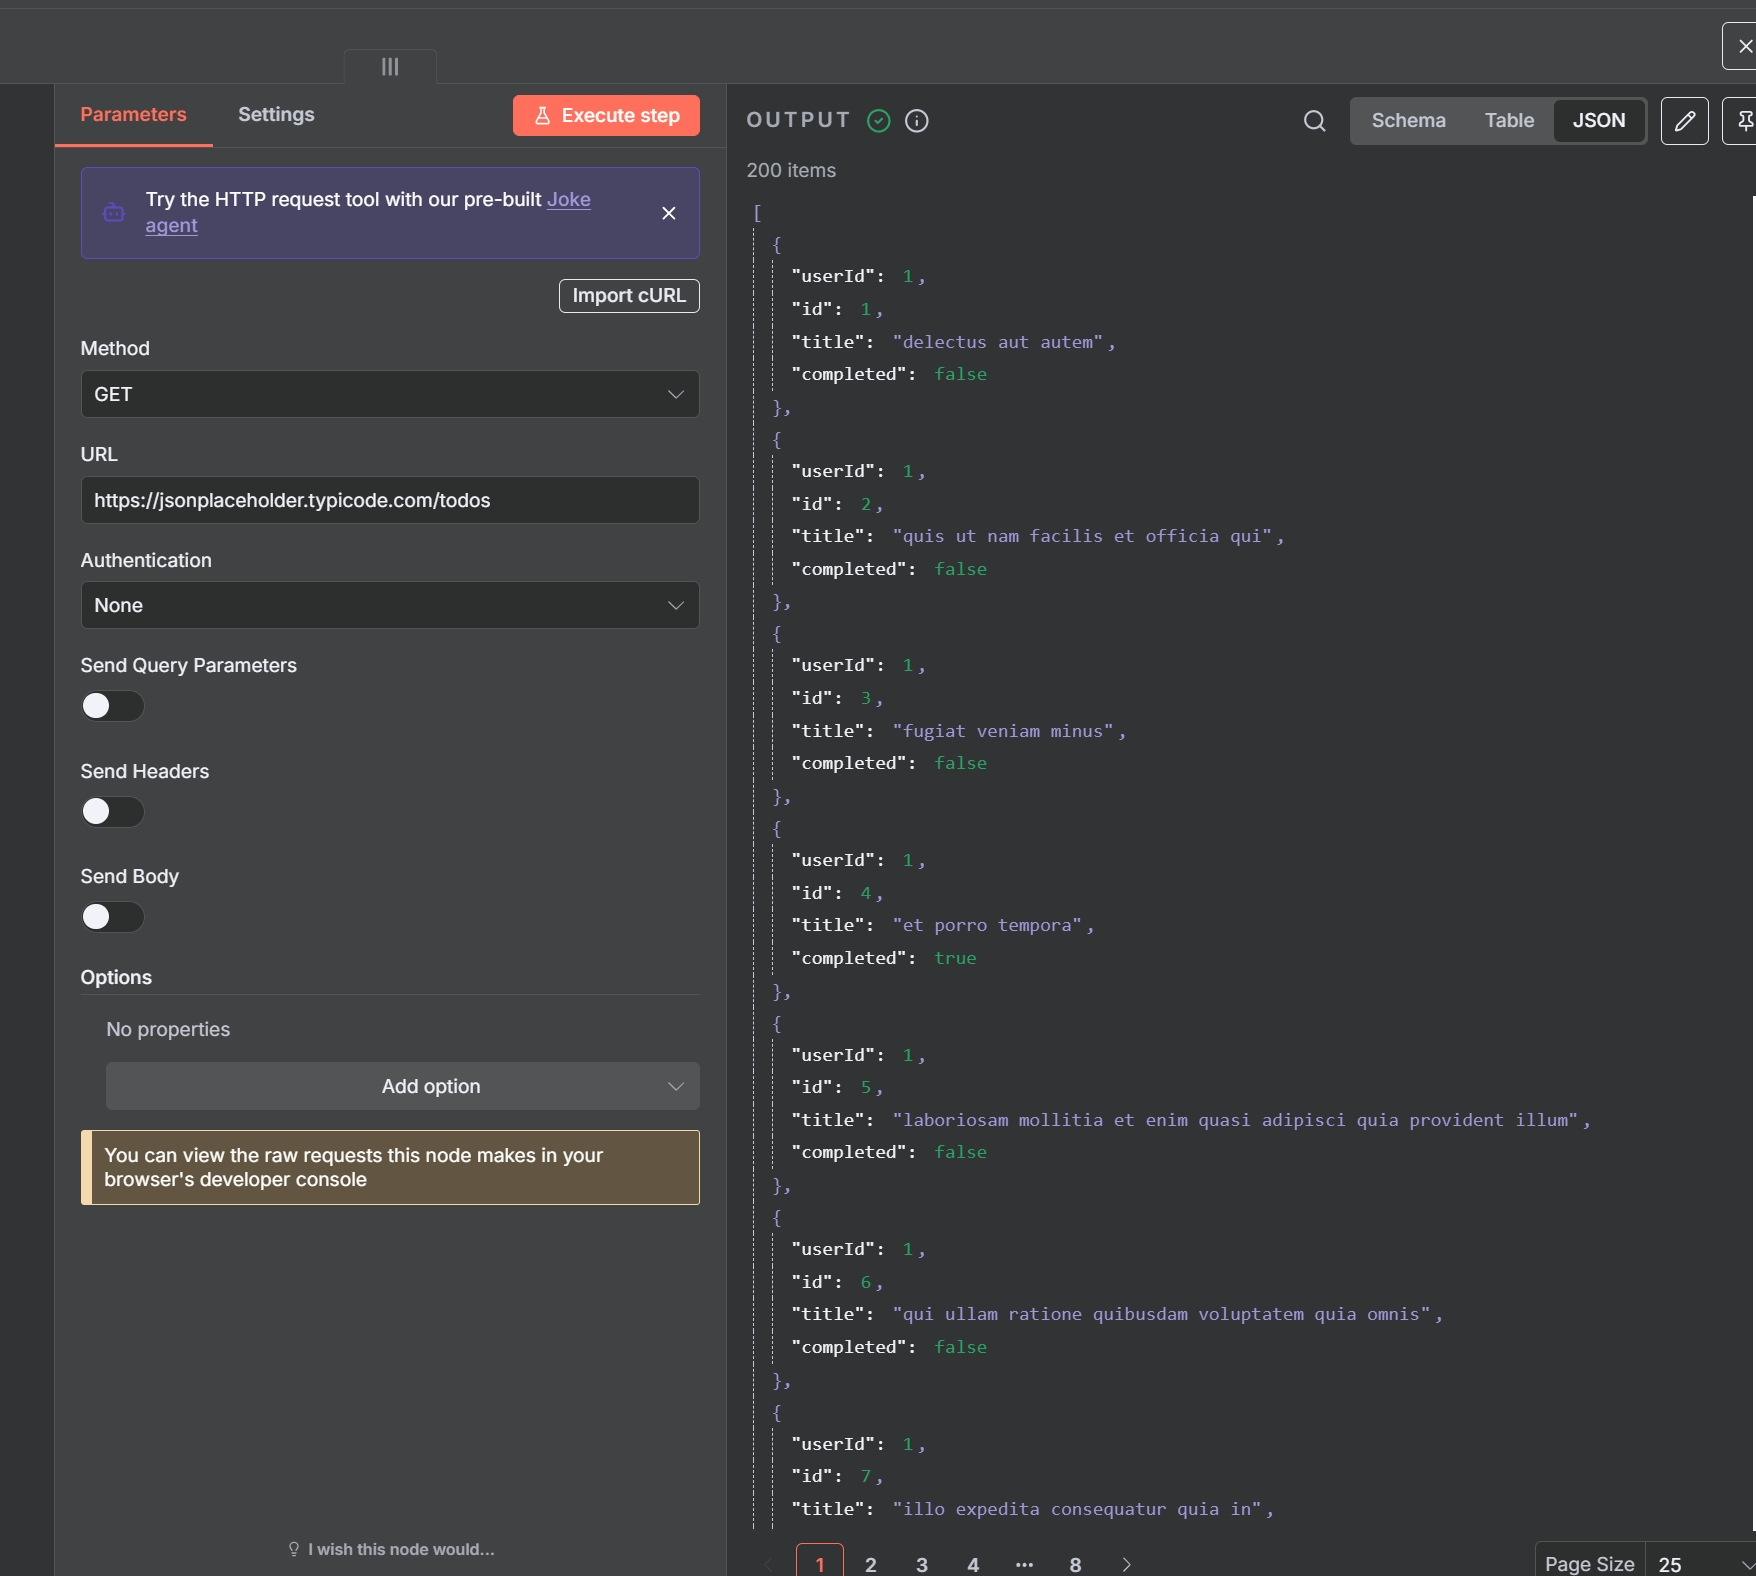
This simple example demonstrates the basic flow: configure the method and URL, execute the node, and receive the API response as output. Now, let’s delve into the details of each configuration option.
4. Detailed Field-by-Field Breakdown
Let’s explore each section and parameter of the HTTP Request node in detail to give you a comprehensive understanding of its capabilities.
4.1 Method and URL
- HTTP Methods Explained and Typical Use Cases: We’ve already touched upon the basic HTTP methods. Remember to always consult the API documentation to determine which method is expected for each endpoint you want to interact with. Using the wrong method will likely result in an error.
- Tips on Dynamic URLs using expressions: n8n’s powerful expression language allows you to build dynamic URLs based on data from previous nodes in your workflow. This is incredibly useful when you need to make requests to different endpoints based on certain conditions or data transformations.
To use an expression, click on the gear icon next to the “URL” field and select “Expression.” You can then write JavaScript expressions that can access the data from previous nodes using the
$variable.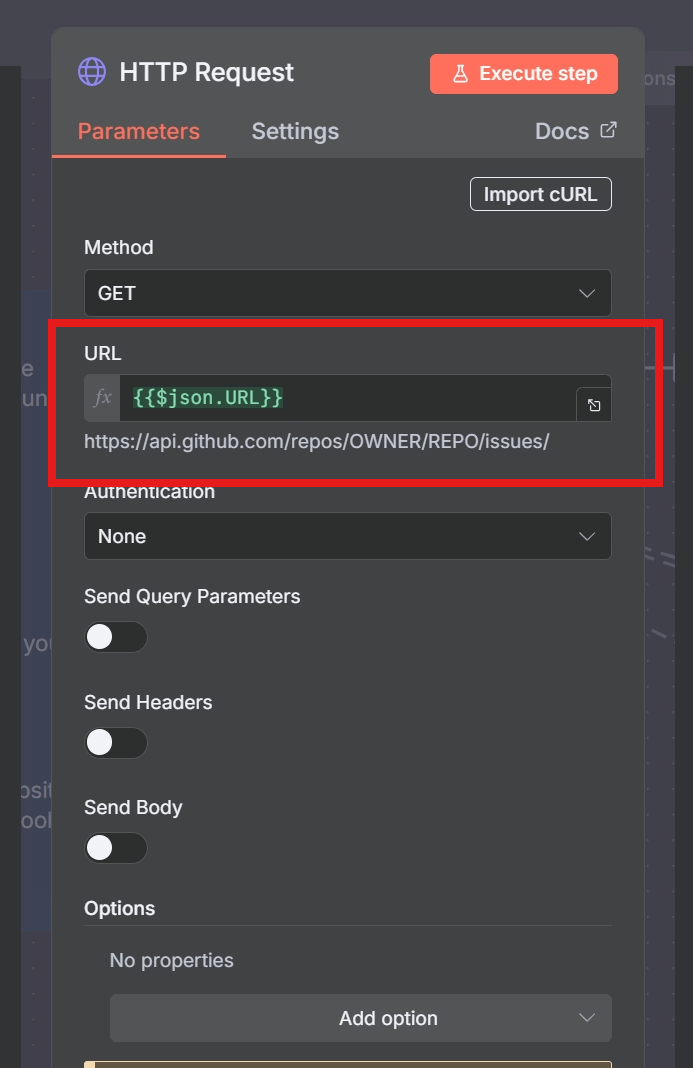
Using an expression to dynamically set the resource ID in the URL. Example: Suppose a previous node returns a list of user IDs in an array called
userIds. You want to fetch details for each user from an API endpoint likehttps://api.example.com/users/{userId}. You could use an expression in a Loop node and the HTTP Request node’s URL field like:https://api.example.com/users/{{ $json.userId }}
accesses the userId property of the current item. Here,
$json.userIdaccesses theuserIdproperty of the current item being processed in the loop.
4.2 n8n HTTP Request Authentication & Credentials
If you’re looking at n8n http request node docs, you’ll often see that most APIs require either an API key, OAuth2 flow, or a bearer token. In practice, n8n supports all of these authentication methods through its credentials system.
- Predefined credentials vs generic credentials (Basic, Header, OAuth1/2, Digest, Query auth):
- Predefined Credentials: These are set up separately in n8n’s “Credentials” section. When you select a predefined credential type in the HTTP Request node, the necessary authentication details are automatically handled based on how you configured the credential. This is the most secure and efficient way to manage API keys and other sensitive information.
- Generic Credentials: When you choose a generic authentication type, you’ll be presented with specific fields to enter the required credentials directly within the HTTP Request node’s settings.
- Basic Auth: Requires a “Username” and “Password.” These are typically sent in the
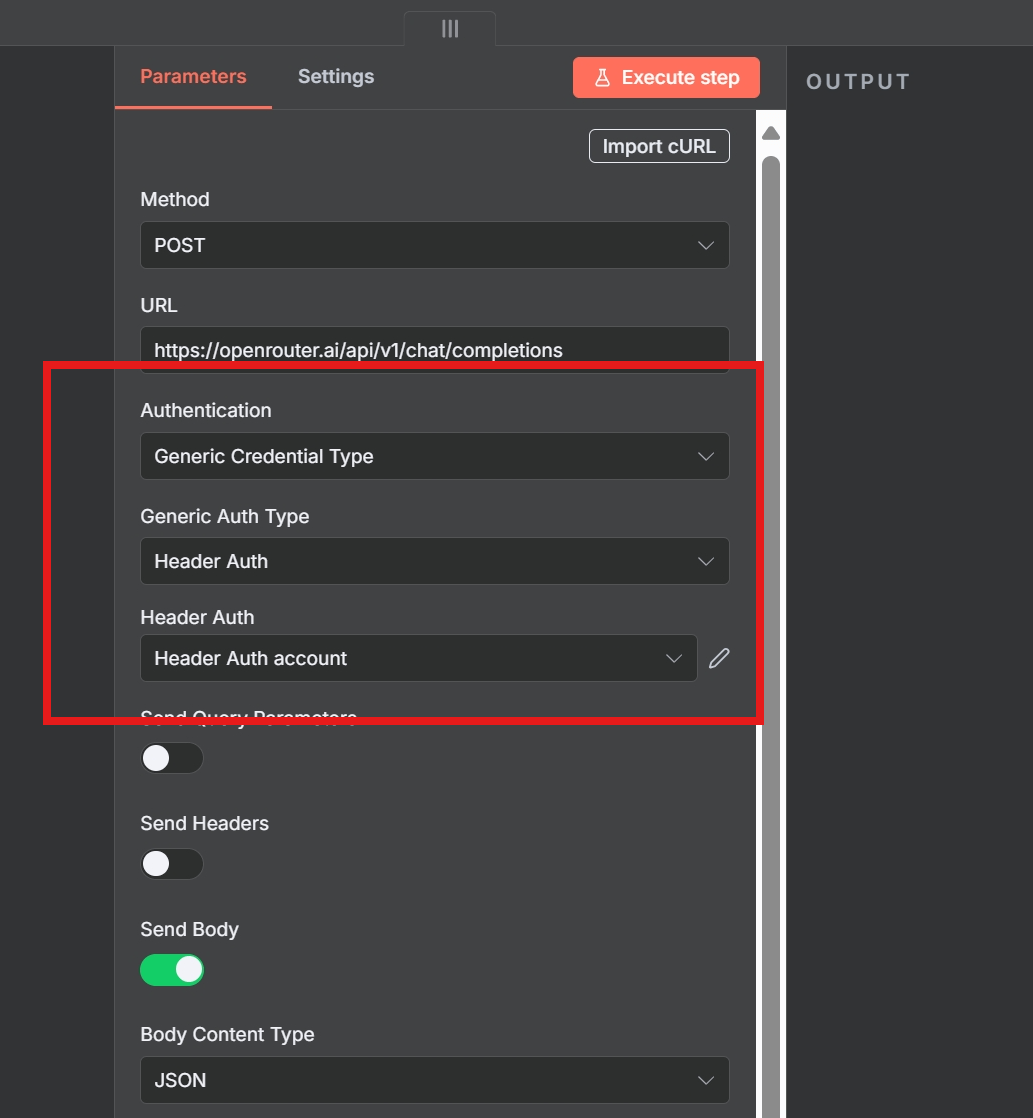
Authorizationheader as a base64 encoded string of “username:password.” - Header Auth: Allows you to specify one or more custom headers that will contain your authentication details. You’ll need to provide the “Header Name” (e.g.,
X-API-Key) and the corresponding “Header Value” (your API key or token). - OAuth1: Requires configuring consumer key, consumer secret, token, and token secret, usually obtained through an OAuth 1.0a authorization flow with the API provider.
- OAuth2: A widely used protocol that typically involves obtaining an access token through an authorization server. n8n provides a user-friendly interface to handle the OAuth 2.0 flow, requiring you to configure client ID, client secret, authorization URL, access token URL, and scope.
- Digest Auth: Requires a username and password, but the authentication process involves a challenge-response mechanism.
- Query Auth: Appends authentication parameters directly to the URL’s query string. You’ll need to specify the parameter names and their corresponding values (e.g.,
apikey=YOUR_API_KEY).
- Basic Auth: Requires a “Username” and “Password.” These are typically sent in the
- Best practices for API keys, secrets, and environments:
- Never hardcode API keys or secrets directly in your workflow nodes. This is a significant security risk. Always use n8n’s credential management system.
- Utilize environment variables within your credential configurations. This allows you to have different API keys for different environments (e.g., development, staging, production) without modifying your workflows.
- Follow the principle of least privilege. Only grant the necessary permissions or scopes to your API keys and tokens.
- Regularly review and rotate your API keys as recommended by the API provider or your organization’s security policies.
- Be mindful of how you log or store workflow execution data, ensuring that sensitive credentials are not inadvertently exposed.
4.3 Query Parameters
Query parameters are key-value pairs appended to the URL after a question mark (?) to filter, sort, or specify additional information for the API request. For example: https://api.example.com/users?status=active&limit=10.
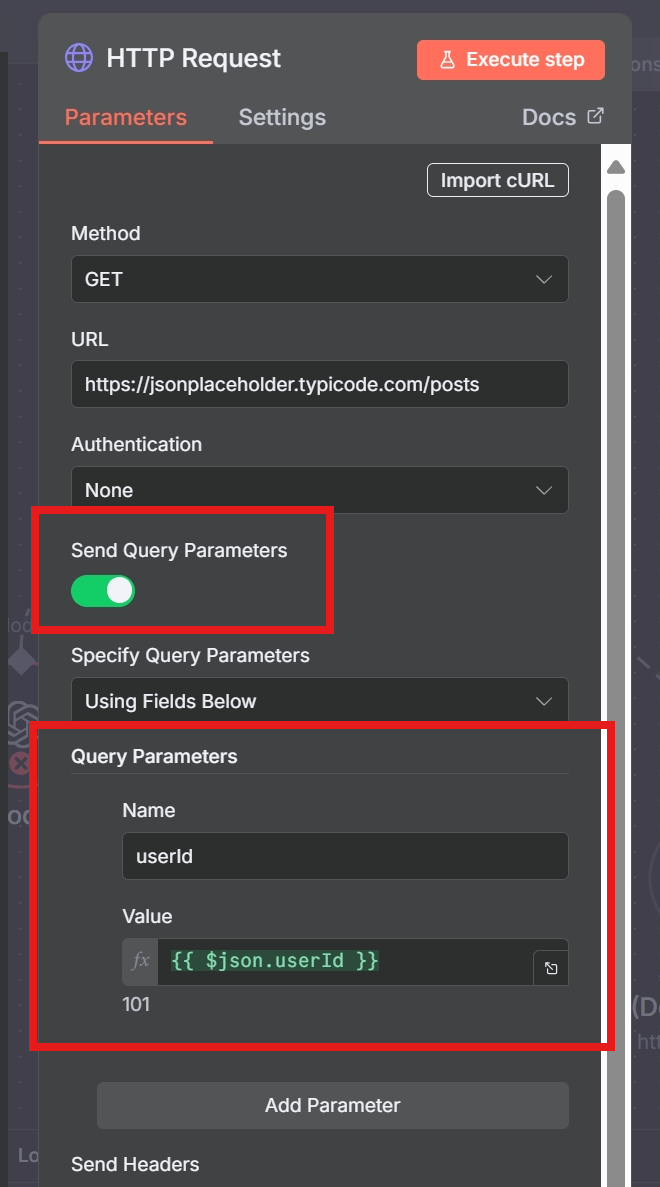
- Turning on “Send Query Parameters”: In the HTTP Request node, you’ll find a checkbox labeled “Send Query Parameters.” Enable this to configure query parameters.
- Using fields below vs JSON mode: Once enabled, you have two ways to define your query parameters:
- Using the fields below: This provides a user-friendly table where you can enter the “Name” (the parameter key) and the corresponding “Value.” You can add multiple parameters by clicking the “Add Value” button. You can also use expressions in the “Value” field to dynamically set parameter values.
- JSON mode: If you have a complex set of query parameters or prefer to define them in JSON format, you can click the “Edit as JSON” button. The expected format is a JSON object where the keys are the parameter names and the values are the parameter values (as strings or arrays).
- How to handle arrays and the “Array Format in Query Parameters” option: Some APIs accept multiple values for a single query parameter, often represented as an array. n8n provides the “Array Format in Query Parameters” option to control how these arrays are formatted in the URL:
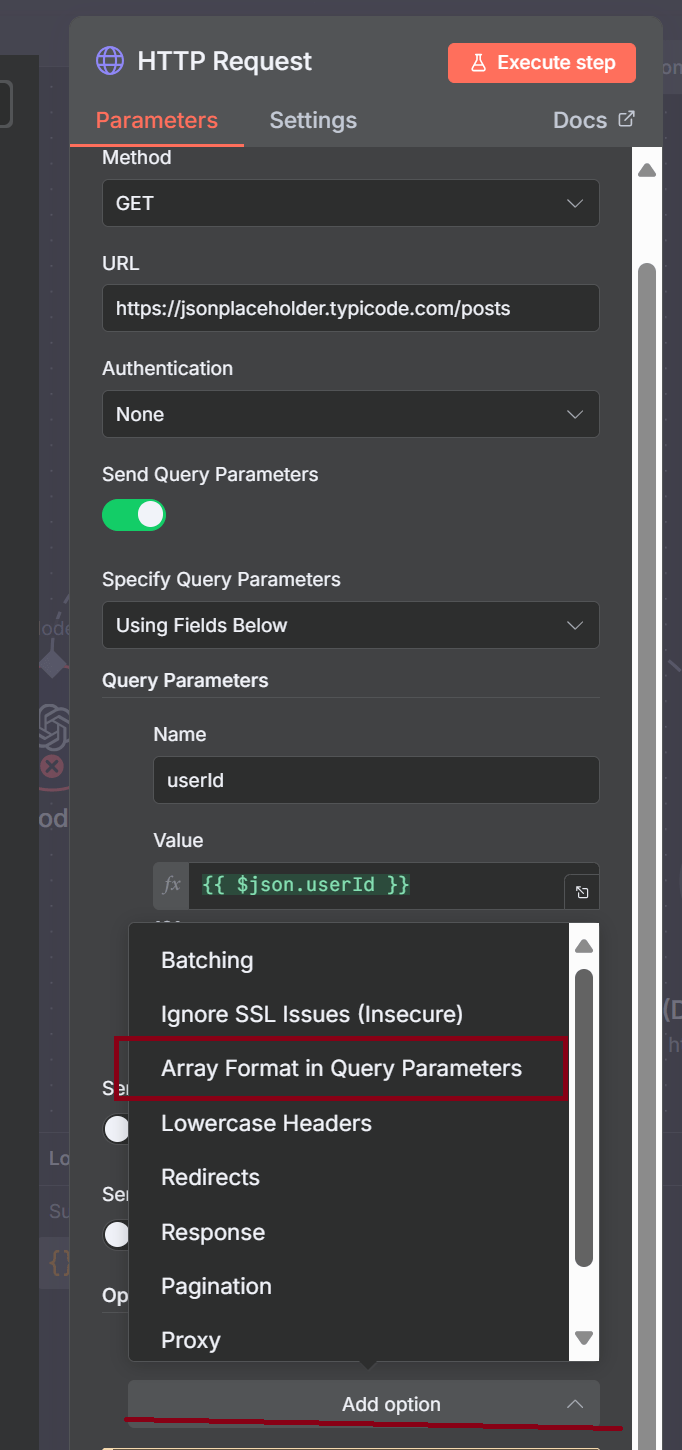
You can find the “Array Format in Query Parameters” under the Options panel. - No Brackets: Array elements are simply repeated with the same parameter name (e.g.,
ids=1&ids=2&ids=3). - Brackets Only: The parameter name is followed by empty brackets for each value (e.g.,
ids[]=&ids[]=&ids[]=). The values themselves are then appended. Note that some APIs might expect the values to be within the brackets (e.g.,ids[]=1&ids[]=2&ids[]=3). - Indexed: Each array element is appended with an index in brackets (e.g.,
ids\[0]=1&ids\[1]=2&ids\[2]=3).
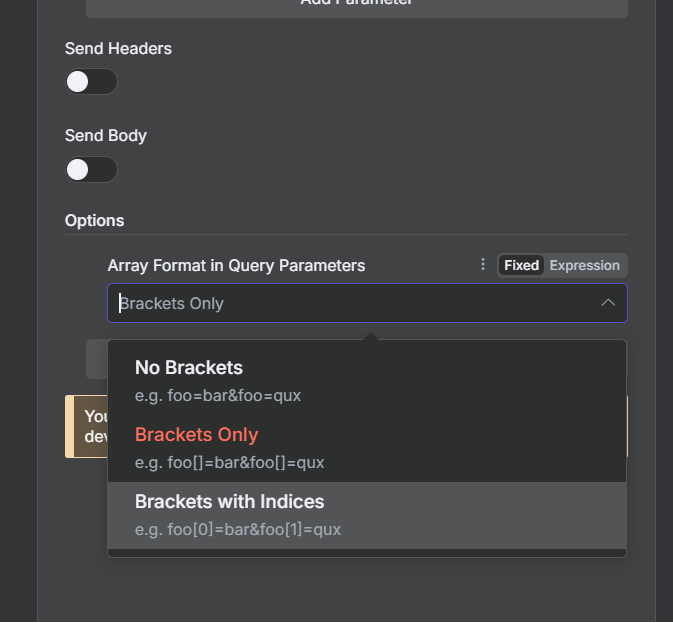
Choosing the correct array format based on the API’s requirements. Consult the API documentation to determine the expected format for array parameters.
- No Brackets: Array elements are simply repeated with the same parameter name (e.g.,
4.4 Headers
HTTP headers provide additional information in both the request and the response.
- Specifying custom headers, dynamic values via expressions add security‑related headers: In the “Headers” section of the HTTP Request node, you can define custom headers by clicking the “Add Header” button and specifying the “Name” and “Value.”
Similar to query parameters and the URL, you can use expressions in the “Value” field of headers to dynamically set their values based on data from previous nodes.
Example (Setting an Authorization Bearer token):
If a previous node (e.g., an OAuth 2.0 authentication node) returns an access token in a field called
accessToken, you can set anAuthorizationheader with the value:Bearer {{ $json.accessToken }}This dynamically inserts the access token into the header.
Security-related headers you might encounter or need to set include:
- Authorization: Used to provide authentication credentials (e.g.,
Bearer <token>,Basic <base64_credentials>). - Content-Type: Specifies the media type of the request body (e.g.,
application/json,application/x-www-form-urlencoded,multipart/form-data). - Accept: Indicates the media types that the client can understand in the response (e.g.,
application/json,application/xml). - User-Agent: Identifies the client making the request (while sometimes optional, some APIs may require or recommend setting a descriptive User-Agent).
- X-Request-ID: A custom header often used for tracing requests across different services.
Always refer to the API documentation for any specific headers they require or recommend.
- Authorization: Used to provide authentication credentials (e.g.,
4.5 Request Body Types
When sending data to an API (e.g., with POST, PUT, or PATCH requests), you’ll often need to include a request body containing the data. The HTTP Request node supports several common body formats:
- JSON: This is a widely used format for data exchange on the web. When you select “JSON,” you can enter a JSON object directly into the “Body” field. You can also use expressions to dynamically construct the JSON body from data in your workflow. Make sure your JSON is valid; otherwise, the request might fail with a “Bad Request” error.
- Form-urlencoded: This format encodes data as key-value pairs in the request body, similar to query parameters but sent in the body instead of the URL. It’s commonly used for submitting HTML forms. When you select “Form-urlencoded,” you’ll see a table where you can enter the keys and values.
- Form-data (binary files): This format is used to send binary data, such as files, along with other form fields. It’s essential for file uploads. When you select “Form-data,” you’ll see a table where you can add fields. For file uploads, you’ll typically set the “Type” of the field to “File” and then either:
- Enter the binary data directly using an expression that retrieves it from a previous node (e.g., a Read Binary File node).
- Provide a file path (this is generally discouraged in production workflows due to portability issues).
- Refer to binary data from a previous node by its binary property name (e.g.,
{{ $json.data }}).
- Raw: This mode allows you to send the request body in any arbitrary format, such as plain text, XML, or other custom formats. When you select “Raw,” you’ll need to specify the
Content-Typeheader manually to inform the server about the format of the data you’re sending. You can then enter the raw data in the “Body” field.

When to use each format:
- JSON: Use this when the API expects data in JSON format, which is very common for modern web APIs.
- Form-urlencoded: Use this when interacting with APIs that expect data in the traditional HTML form submission format.
- Form-data: Use this specifically when you need to upload files or send a combination of file data and other form fields.
- Raw: Use this for APIs that require specific, non-standard body formats. Always ensure you set the correct
Content-Typeheader in this mode.
The API documentation will always specify the expected request body format for endpoints that accept data.
5. Response Handling and Node Options
After sending an HTTP request, the server will send back a response. The HTTP Request node in n8n provides options to control how this response is handled.
- Choose response format: JSON / Text / File / Autodetect: This dropdown determines how n8n will interpret the response body:
- JSON: If the API returns JSON data (indicated by the
Content-Type: application/jsonheader), selecting this option will automatically parse the JSON response into a JavaScript object that you can easily access in subsequent nodes. - Text: If the API returns plain text data (e.g.,
text/plain), selecting this option will treat the response body as a string. - File: If the API returns a file (e.g., for a download), selecting this option will make the response body available as binary data in the output, typically with a
$binaryproperty containing the file content and amimeTypeproperty. - Autodetect: This is often a good default. n8n will attempt to automatically determine the response format based on the
Content-Typeheader. If it detects JSON, it will parse it; if it detects a known binary type, it will treat it as a file; otherwise, it will default to text.
- JSON: If the API returns JSON data (indicated by the
- Include headers & status, or “Never Error” mode :
- Include headers & status: When checked (which is the default), the output of the HTTP Request node will include not only the response body but also the HTTP headers returned by the server and the HTTP status code. This information can be invaluable for debugging and conditional logic in your workflow. You can access these details under the
headersandstatusCodeproperties in the output. - “Never Error” mode: When checked, the HTTP Request node will not throw an error even if the API request returns an error status code (e.g., 4xx or 5xx). Instead, it will output the response, including the error status and body, allowing you to handle the errors gracefully in subsequent nodes using conditional logic (e.g., an If node to check the
statusCode). Use this with caution, as it means your workflow won’t automatically stop on errors, and you’ll need to implement your own error handling.
- Include headers & status: When checked (which is the default), the output of the HTTP Request node will include not only the response body but also the HTTP headers returned by the server and the HTTP status code. This information can be invaluable for debugging and conditional logic in your workflow. You can access these details under the
- Handling binary responses (file downloads or images): When you expect a binary response (e.g., when calling an API endpoint that serves a file or an image), make sure the “Choose response format” is set to “File” or “Autodetect” (if the
Content-Typeis correctly set by the API). The output of the node will then contain a$binaryproperty with the file content. You can then use other n8n nodes like “Write Binary File” to save the file or process the binary data further.
Sometimes you might need to add the response of HTTP request to existing data in n8n workflows. You can do this by combining the HTTP Request node with a Set or Merge node.
6.Advanced Options:Batching and Bearer Token in n8n HTTP Request Node
The HTTP Request node offers several advanced options that allow you to fine-tune its behavior for performance, reliability, and compatibility.
- Batching: sending multiple requests with delay to avoid rate limits: Many APIs impose rate limits to prevent abuse and ensure fair usage. If your workflow needs to make a large number of API requests, you can use the “Batch” options to send requests in smaller groups with a specified delay between each batch. This helps you stay within the API’s rate limits. You can configure the “Number of Items in Each Batch” and the “Wait Between Batches (ms).”
- Retry on Fail and related settings: max tries, wait between retries : For unreliable network conditions or temporary API issues, the “Retry on Fail” option can be crucial. If enabled, n8n will automatically retry the request if it fails (returns an error status code or times out). You can configure the “Max Tries” (how many times to retry) and the “Wait Between Retries (ms).” Consider using an exponential backoff strategy in your retry logic (perhaps in a Function node combined with a loop) for more sophisticated error handling.
- Ignore SSL issues: In some cases, you might need to interact with APIs that have invalid or self-signed SSL certificates. The “Ignore SSL Issues” option allows you to bypass SSL certificate verification. Use this with extreme caution, as it can expose your workflow to security risks. It should only be enabled in trusted environments and when absolutely necessary.
- Lower‑case headers: Some APIs might be case-sensitive with regards to header names. If you encounter issues, you can try enabling “Lower-Case Headers” to ensure all headers are sent in lowercase.
- Redirects: By default, the HTTP Request node will automatically follow HTTP redirects (e.g., 301 Moved Permanently). You can disable this behavior if needed.
- Timeout settings: You can configure the “Request Timeout (ms)” to specify how long the node should wait for a response from the API before timing out and throwing an error. Adjust this value based on the expected response time of the API.
- Proxy support: If your network requires the use of a proxy server to access external resources, you can configure the proxy settings (HTTP, HTTPS, and No Proxy) in this section. You’ll need to provide the proxy URL and optionally authentication details if required by the proxy.
7. Importing cURL Commands
One of the most user-friendly features of the n8n HTTP Request node is its ability to import cURL commands. This is an absolute game-changer when you’re working with API documentation.
How to copy cURL examples from API docs into the HTTP Request node
Most modern API documentation provides example requests in various programming languages, and cURL is almost always one of them. cURL is a command-line tool for transferring data with URLs, and its syntax is a standard way to represent an HTTP request.

The process in n8n is incredibly simple:
- Find the cURL example in the API documentation you want to replicate.
- Copy the entire cURL command to your clipboard.
- In your n8n workflow, open the HTTP Request node’s parameters.
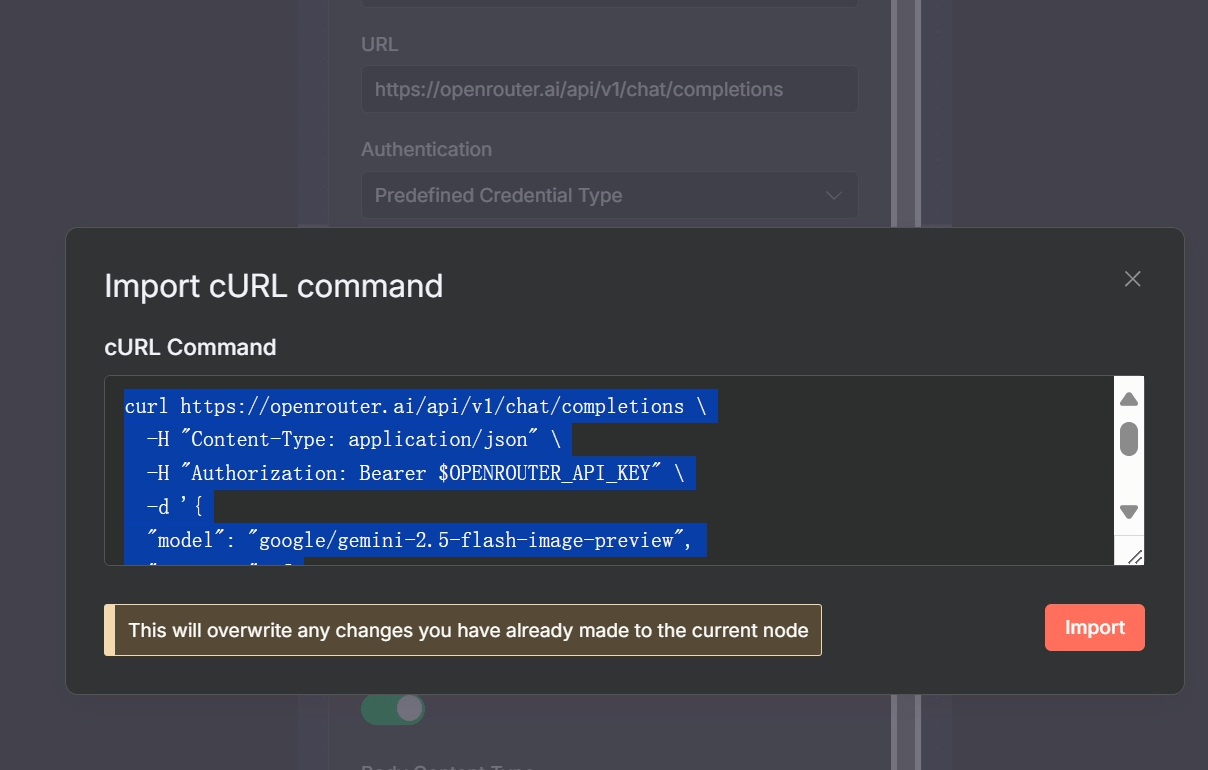
- Click the “Import cURL” button at the top of the parameters pane.
- Paste the cURL command into the text box that appears and click “Import”.
n8n will automatically parse the cURL command and configure the node’s parameters for you, including the Method, URL, Headers, and Body. It’s a massive time-saver and reduces the chance of manual errors.
Real‑life example walkthrough: from cURL snippet to working node setup
Let’s take a practical example from the Stripe API documentation for creating a new customer. The cURL example looks something like this:
curl https://api.stripe.com/v1/customers \
  -u sk_test_...: \
  -d description="My First Test Customer (created for API docs)" \
  -d email="test@example.com"
Here’s how you’d get this working in n8n:
- Copy the cURL command from the Stripe docs.
- Add an HTTP Request node and click “Import cURL”.
- Paste the command.
After you click “Import”, n8n will automatically set:
- Method:
POST - URL:
https://api.stripe.com/v1/customers - Authentication: It will detect the
-uflag and set up Basic Auth, using your API key as the username and leaving the password blank (as is standard for Stripe). You should, of course, replace the placeholder key with a proper n8n credential. - Body Type: It will recognize the
-dflags and set the body type to Form-urlencoded, populating the fields withdescriptionandemailand their respective values.
In seconds, your node is almost fully configured, saving you from manually setting each parameter.
8. Troubleshooting:How to Debug HTTP Request in n8n
Even with the best tools, you’ll inevitably run into issues when working with APIs. Understanding common error codes and how to debug is a critical skill.
Common error codes and solutions:
400 Bad Request: This is a generic client-side error meaning the server couldn’t understand your request.- Common Causes: Malformed JSON in the request body (e.g., a missing comma, an extra bracket), incorrect query parameter format, or sending data in the wrong format (e.g., sending JSON when the API expects form-urlencoded).
- Solution: Double-check your JSON syntax. If you’re using expressions, ensure they output valid JSON. A great tip is to execute the node *before* the HTTP Request node, copy the JSON output, and validate it using an online JSON validator. Also, verify the
Content-Typeheader matches your body format.
403 Forbidden: This error means you are authenticated, but you don’t have permission to access the requested resource.- Common Causes: Your API key might not have the necessary scopes or permissions (e.g., you have a read-only key but are trying to make a
POSTrequest). - Solution: Check the permissions associated with your API key in the service’s dashboard. Ensure you’ve requested the correct scopes during the OAuth2 authentication flow.
- Common Causes: Your API key might not have the necessary scopes or permissions (e.g., you have a read-only key but are trying to make a
404 Not Found: The server can’t find the resource you’re asking for.- Common Causes: A typo in the URL endpoint. You might also be using a dynamic ID in the URL from a previous node that is empty or incorrect.
- Solution: Carefully check the URL for typos. Execute the previous node and verify that the data you’re using to construct the URL is correct and present.
429 Too Many Requests: You’ve hit the API’s rate limit.- Common Causes: Your workflow is executing too many requests in a short period.
- Solution: Use the Batching options in the HTTP Request node to introduce delays. Set a reasonable “Number of Items in Each Batch” and a “Wait Between Batches”. For more robust workflows, enable the Retry on Fail option. Some APIs return
Retry-Afterheaders; you can build more advanced logic with a Function node to respect this delay.
- Invalid JSON formatting when using expressions: This is a classic n8n stumbling block. When building a JSON body with expressions, it’s easy to create invalid output. For example:
{"name": {{ $json.userName }} }. If$json.userNamecontains “John”, the output becomes{"name": John}, which is invalid JSON because the string valueJohnis not in quotes.- Solution: Always wrap expressions that output strings in double quotes within the JSON body:
{"name": "{{ $json.userName }}"}. This ensures the final output is valid{"name": "John"}.
- Solution: Always wrap expressions that output strings in double quotes within the JSON body:
For developers using the Code node, you can also trigger requests via custom logic (n8n code node http request), though the built-in HTTP Request node usually simplifies things.
How to inspect error output and debug workflows
When a node fails, n8n provides valuable debugging information.
- Check the Node’s Error Tab: Click on the failed node. The “Error” tab in the output panel will show you the status code and, most importantly, the response body from the API. APIs often return a descriptive error message in the body, like
{"error": "Missing required field: 'email'"}. - Use “Never Error” Mode: For tricky issues, go to the node’s Settings tab and enable “Never Error”. This forces the node to output the result, even if it’s an error. You can then add an
Ifnode immediately after to check thestatusCode({{ $json.statusCode }}). This lets you inspect the full error response (body, headers, etc.) and build logic to handle specific error codes differently. - Inspect the Input Data: Make sure the data flowing *into* the HTTP Request node is what you expect. Click the preceding node and check its output. Are the expressions in your HTTP Request node referencing the correct fields?
9. Real-World Use Case Examples
Let’s bring it all together with some practical examples.
Example 1: GET data from public API, parse JSON, use data downstream
- Goal: Get the current price of Bitcoin in USD.
- Workflow:
- HTTP Request Node:
- Method:
GET - URL:
https://api.coingecko.com/api/v3/simple/price?ids=bitcoin&vs_currencies=usd
- Method:
- Set Node:
- Add a new field called
btcPrice. - Set its value with an expression:
{{ $json.bitcoin.usd }}
- Add a new field called
- HTTP Request Node:
This workflow fetches the price data, and the Set node extracts the specific price, making it easily available for subsequent nodes (e.g., to send in an email or save to a spreadsheet).
Example 2: POST with JSON body to create a resource
- Goal: Create a new to-do item in the JSONPlaceholder API.
- Workflow:
- Set Node (to define the new item):
userId: 1title: ‘Learn n8n HTTP Request node’completed: false
- HTTP Request Node:
- Method:
POST - URL:
https://jsonplaceholder.typicode.com/todos - Body Type:
JSON - JSON Body:
{{ JSON.stringify($json) }}(This expression takes all the data from the previous node and formats it as the JSON body).
- Method:
- Set Node (to define the new item):
Example 3: Upload a file via multipart/form-data
- Goal: Upload a local image to a file hosting service.
- Workflow:
- Read Binary File Node:
- Set the “File Path” to the location of your image (e.g.,
/data/my_image.png).
- Set the “File Path” to the location of your image (e.g.,
- HTTP Request Node:
- Method:
POST - URL:
https://api.example.com/upload - Body Type:
Form-data - In the fields table:
- Name:
file - Type:
File from Binary Property - Property Name:
data(This is the default property name for binary data from the Read Binary File node).
- Name:
- Method:
- Read Binary File Node:
Example 4: Handling paginated responses across multiple pages
- Goal: Fetch all users from an API that returns 10 users per page.
- Workflow:
- HTTP Request Node:
- Method:
GET - URL:
https://api.example.com/users - Enable Pagination.
- Mode:
Update parameter per request - Parameter to Update:
page - Increment By:
1 - (Optional) Maximum Results: Set a limit if you don’t need all results.
- Method:
- HTTP Request Node:
n8n will automatically make requests to ?page=1, ?page=2, ?page=3, etc., until the API returns an empty list, and then it will aggregate all the results into a single output.
Example 5: Chaining HTTP Request nodes in workflows (loop, split‑in‑batches)
- Goal: Get a list of blog post IDs, then fetch the full details for each post.
- Workflow:
- HTTP Request (Get All IDs):
GET https://jsonplaceholder.typicode.com/posts - Split in Batches Node: Set Batch Size to 1 to process one post at a time.
- HTTP Request (Get Post Details):
- Method:
GET - URL (Expression):
https://jsonplaceholder.typicode.com/posts/{{ $item(0).json.id }}
- Method:
- HTTP Request (Get All IDs):
This pattern is extremely common. The first node gets a list of items. The Split in Batches node then iterates over that list, and the second HTTP Request node uses the unique ID of each item to fetch its detailed information.
In-Depth Case Study: AI Video Generation & Social Media Posting
The workflow below demonstrates a sophisticated, real-world use of multiple HTTP Request nodes to automate a content pipeline. For a complete walkthrough of this template, check out our guide on how to Generate & Auto-Post AI Videos to Social Media.
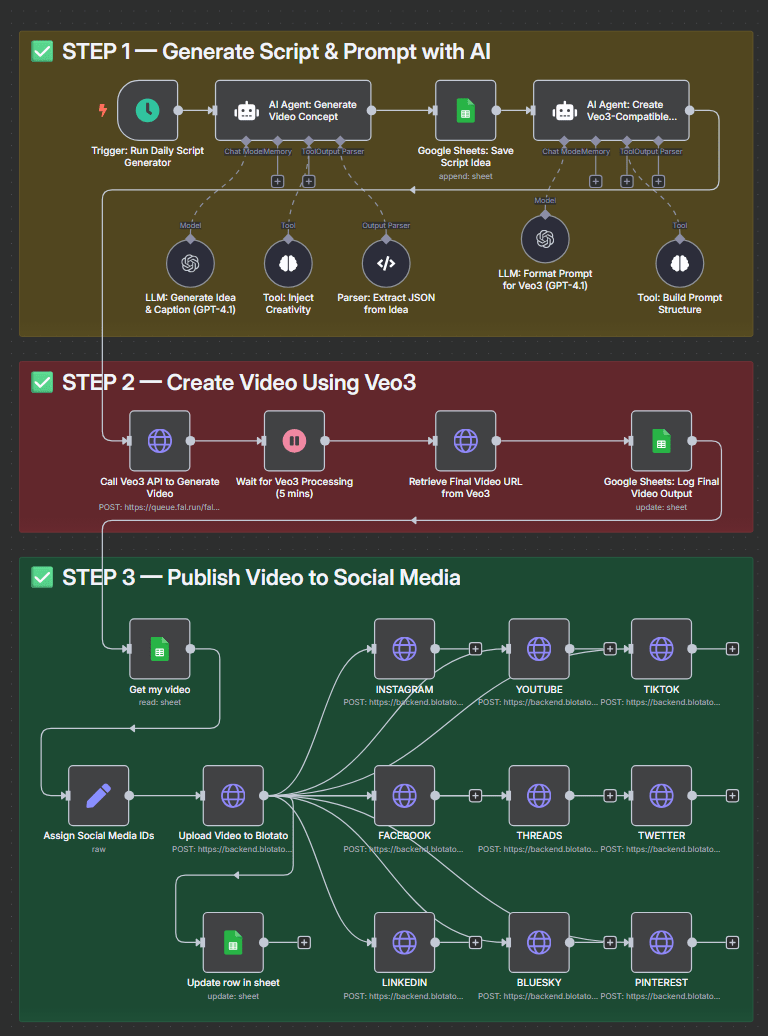
Let’s break down how the HTTP Request nodes are used here:
Call Veo3 API to Generate Video: This is aPOSTrequest to an AI video generation service (https://queue.fal.run/fal-ai/veo3). It sends a prompt in the JSON body ({ "prompt": "{{ $json.output }}" }). This is a “fire-and-forget” request that starts a long-running process on the server.Retrieve Final Video URL from Veo3: After a 5-minute wait, thisGETrequest polls the status of the video generation. The URL is dynamic, using therequest_idfrom the previous call:https://.../requests/{{ $json.request_id }}. This is a common pattern for dealing with asynchronous APIs.Upload Video to Blotato: Once the final video URL is retrieved, thisPOSTrequest sends that URL to a social media management platform called Blotato. This essentially “registers” the video with their service.INSTAGRAM,YOUTUBE,TIKTOK, etc.: This is where the magic happens. A series of parallel HTTP Request nodes, one for each social media platform, makesPOSTrequests to Blotato’s posting endpoint (https://backend.blotato.com/v2/posts). Each node has a unique JSON body tailored to the specific platform’s requirements, pulling data dynamically from previous nodes:- Instagram Body: Specifies
targetType: "instagram"and uses{{ $('Get my video').item.json.DESCRIPTION }}for the text. - YouTube Body: Includes additional fields like
titleandprivacyStatus, again using expressions to pull the correct data. - TikTok Body: Includes TikTok-specific options like
isAiGeneratedandprivacyLevel.
- Instagram Body: Specifies
This workflow is a masterclass in using the HTTP Request node to orchestrate a complex process across multiple APIs, with dynamic URLs and highly customized, expression-driven JSON bodies.
10. Tips, Best Practices & Security
- Secure Credentials Management: Never, ever hardcode API keys, tokens, or passwords directly in your nodes. Always use n8n’s built-in Credentials manager. For added flexibility, you can use environment variables within your credentials, allowing you to switch between development and production keys without changing your workflow.
- Rate-Limit Awareness: Be a good API citizen. Read the API documentation to understand its rate limits. Use the Batching and Retry on Fail settings in the HTTP Request node to stay within those limits and make your workflows more resilient to temporary API failures.
- Logging and Monitoring: For critical workflows, log your API requests. You can add a step after your HTTP Request node to write the request details and response status to a Google Sheet, Airtable, or a database. To handle errors, connect the red error output of the node to another sequence of nodes that might send you a Slack or Discord notification.
- When to use HTTP Request vs. Built-in/Community Nodes: The rule of thumb is: if a dedicated node exists for your service and it does what you need, use it. It will simplify authentication and provide a more user-friendly interface. Drop down to the HTTP Request node when you need to:
- Connect to an API with no dedicated node.
- Access a brand-new or beta endpoint not yet supported by the dedicated node.
- Implement a non-standard authentication method.
- Have complete, granular control over every aspect of the request.
11. Summary & Next Steps
You’ve made it! You now have a comprehensive understanding of the n8n HTTP Request node, from the basics of making a GET request to advanced strategies for pagination, error handling, and orchestrating complex API interactions.
Recap of what you’ve learned
- The fundamentals of HTTP methods, endpoints, and status codes.
- How to configure every field in the HTTP Request node, including URL, authentication, headers, query parameters, and body.
- Strategies for handling API responses, including different data formats and error conditions.
- Advanced techniques like batching, retries, and handling paginated data.
- How to troubleshoot common issues and debug your workflows effectively.
- Practical applications through real-world examples and an in-depth case study.
Suggested practice workflows and experimentation
Whether you’re just reading the n8n HTTP Request node docs, experimenting with a basic example, or configuring advanced authentication and batching, this node is your gateway to building powerful API automations in n8n. Bookmark this guide as your go-to documentation whenever you need to debug, add responses to existing data, or connect new services using HTTP requests in n8n.The best way to solidify your knowledge is to build something!
- Weather Notifier: Connect to a free weather API (like OpenWeatherMap) to get the forecast for your city and send yourself a summary via email or Pushbullet every morning.
- Content Aggregator: Find a few public APIs that interest you (e.g., NASA’s APOD, a news API, Hacker News) and build a workflow that fetches the latest updates and compiles them into a single daily digest.
- Automate a Personal Tool: Do you use a project management tool like Trello or Todoist? Try using their API via the HTTP Request node to create a new task.
Useful Resources:
- Official n8n Docs for HTTP Request Node: docs.n8n.io/nodes/n8n-nodes-base.httpRequest/
- n8n Community Forum: community.n8n.io – An invaluable resource for asking questions and seeing how others have solved similar problems.
- Public APIs Repository: github.com/public-apis/public-apis – A great list of free APIs to practice with.
Appendix
Glossary of Terms
- Endpoint: A specific URL where an API can be accessed.
- Authorization Type: The method an API uses to verify your identity (e.g., API Key, OAuth2, Basic Auth).
- Status Codes: 3-digit codes returned by the server indicating the result of a request (e.g.,
200for success,404for not found). - Pagination: The process of dividing a large set of data into smaller, discrete pages, used by APIs to send data efficiently.
Cheat‑Sheet: Parameter Quick Reference
| Parameter | Purpose | Common Usage |
|---|---|---|
| Method | The HTTP verb | GET (retrieve), POST (create), PUT/PATCH (update), DELETE (remove) |
| URL | The API endpoint address | https://api.example.com/resource |
| Authentication | How you prove your identity | Select a stored credential (e.g., Header Auth for an API key). |
| Query Parameters | Filter or modify a GET request | ?limit=10&status=active |
| Headers | Send metadata with the request | Content-Type: application/json |
| Body | The data payload for POST/PUT/PATCH | JSON, Form-data (for files), Form-urlencoded. |
| Pagination | Fetch all results from multiple pages | Enable for large datasets. Use “Update parameter” or “Next URL”. |
| Retry on Fail | Automatically retry failed requests | Enable for better reliability. Set max tries and delay. |