Mastering the n8n Webhook Node: Part B — Security, Advanced Scenarios & Deployment
Welcome to Part B of our guide. This article continues from Part A: Fundamentals, JSON Examples & Webhook Response, where we covered the fundamentals of the n8n Webhook node, including setup, data handling, and response configuration. Here, we will dive into advanced topics such as security, deployment, and real-world integrations.
Table of Contents
🔐 Part 4: Securing Your Webhook Endpoints in n8n
When you expose a webhook endpoint to the public internet, you also expose a potential attack surface. Without proper authentication and validation mechanisms in place, malicious actors can submit unauthorized requests, manipulate data, or overload your infrastructure.
In n8n, securing webhook endpoints is not just a best practice—it’s essential for production-grade automation. This part explores built-in authentication options, advanced signature verification for message integrity, and common authentication pitfalls (with practical fixes).
4.1 Built-in Authentication Methods in the Webhook Node
n8n’s Webhook node supports several out-of-the-box authentication schemes that can be configured directly in the node using Webhook Credentials. These are sufficient for most internal tools and API integrations.
🧾 Option 1: No Authentication
- Use case: Prototyping, internal development, public demo forms
- Security: ❌ None (not recommended in production)
This is the default setting when creating a new n8n webhook node.
🔐 Option 2: Basic Authentication
- Use case: Legacy tools, internal dashboards, test APIs
- Mechanism: Clients must send an
Authorization: Basic <base64(username:password)>header.
Authorization: Basic dXNlcjpwYXNzWhile simple to implement, Basic Auth provides limited protection and should only be used over HTTPS or within secure internal networks. Passwords are base64-encoded, not encrypted.
🛡️ Option 3: Header Authentication (Recommended)
- Use case: Most common pattern for securing custom APIs
- Mechanism: Client includes a custom HTTP header with a pre-shared secret.
X-API-Key: abcd1234-my-secret-tokenIn the Webhook node, configure:
- Header Name:
X-API-Key - Value:
abcd1234-my-secret-token
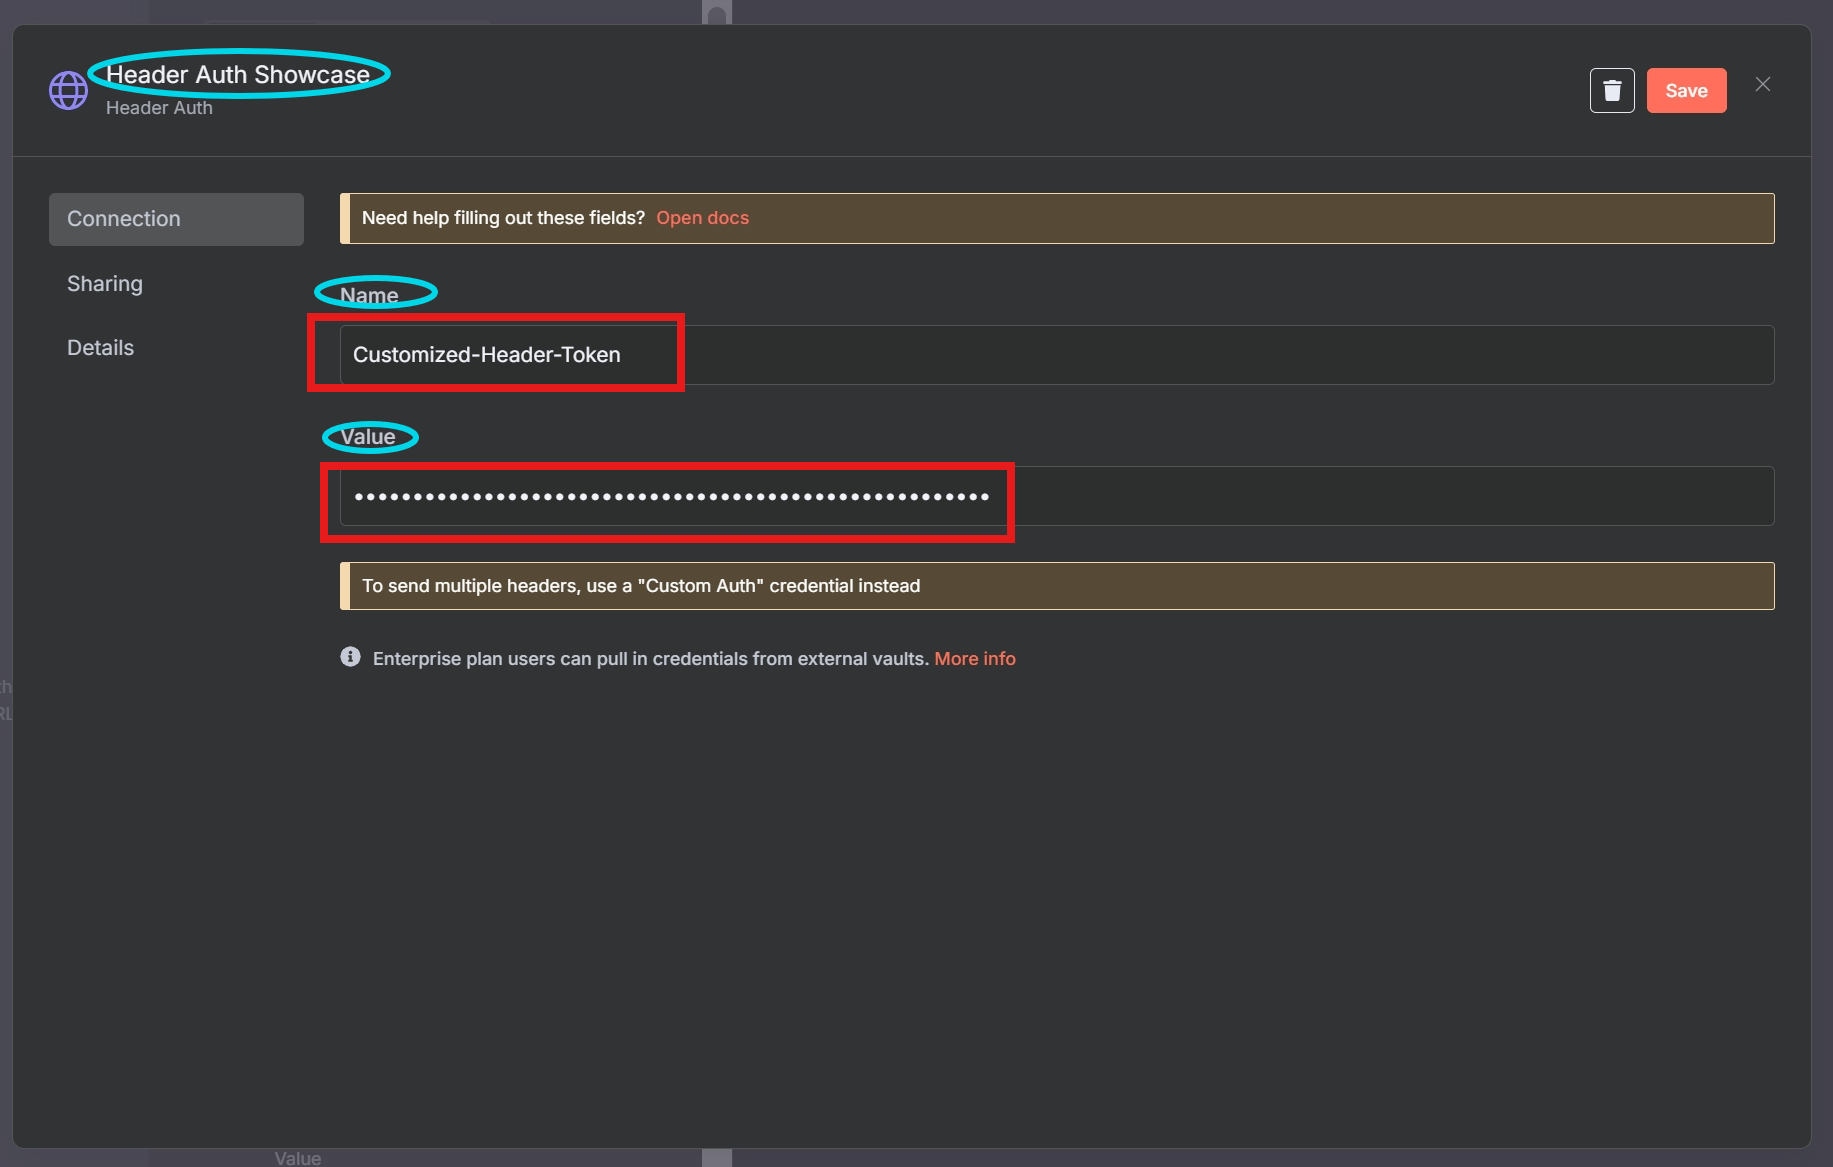
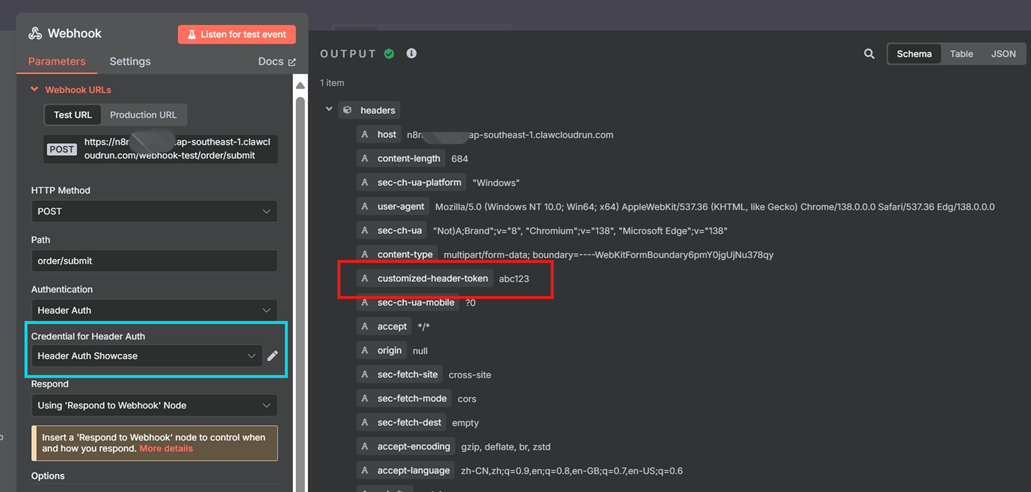
This pattern is flexible, works well with third-party systems, and avoids embedding credentials in URLs.
✅ Best practice: Rotate tokens periodically and use environment variables to store secrets securely in self-hosted setups.
🔑 Option 4: JWT Authentication
- Use case: Integrations with modern applications and identity providers (e.g., Auth0, Firebase)
- Mechanism: Clients send a signed JSON Web Token (JWT) in the Authorization or custom header.
Workflow Steps:
- Webhook node checks if JWT is present.
- JWT node (or Code node) validates the token using:
- Signature
- Expiration time (
exp) - Custom claims (e.g.,
role,userId)
You can combine JWT authentication with conditional logic to allow or deny workflow execution based on user claims.
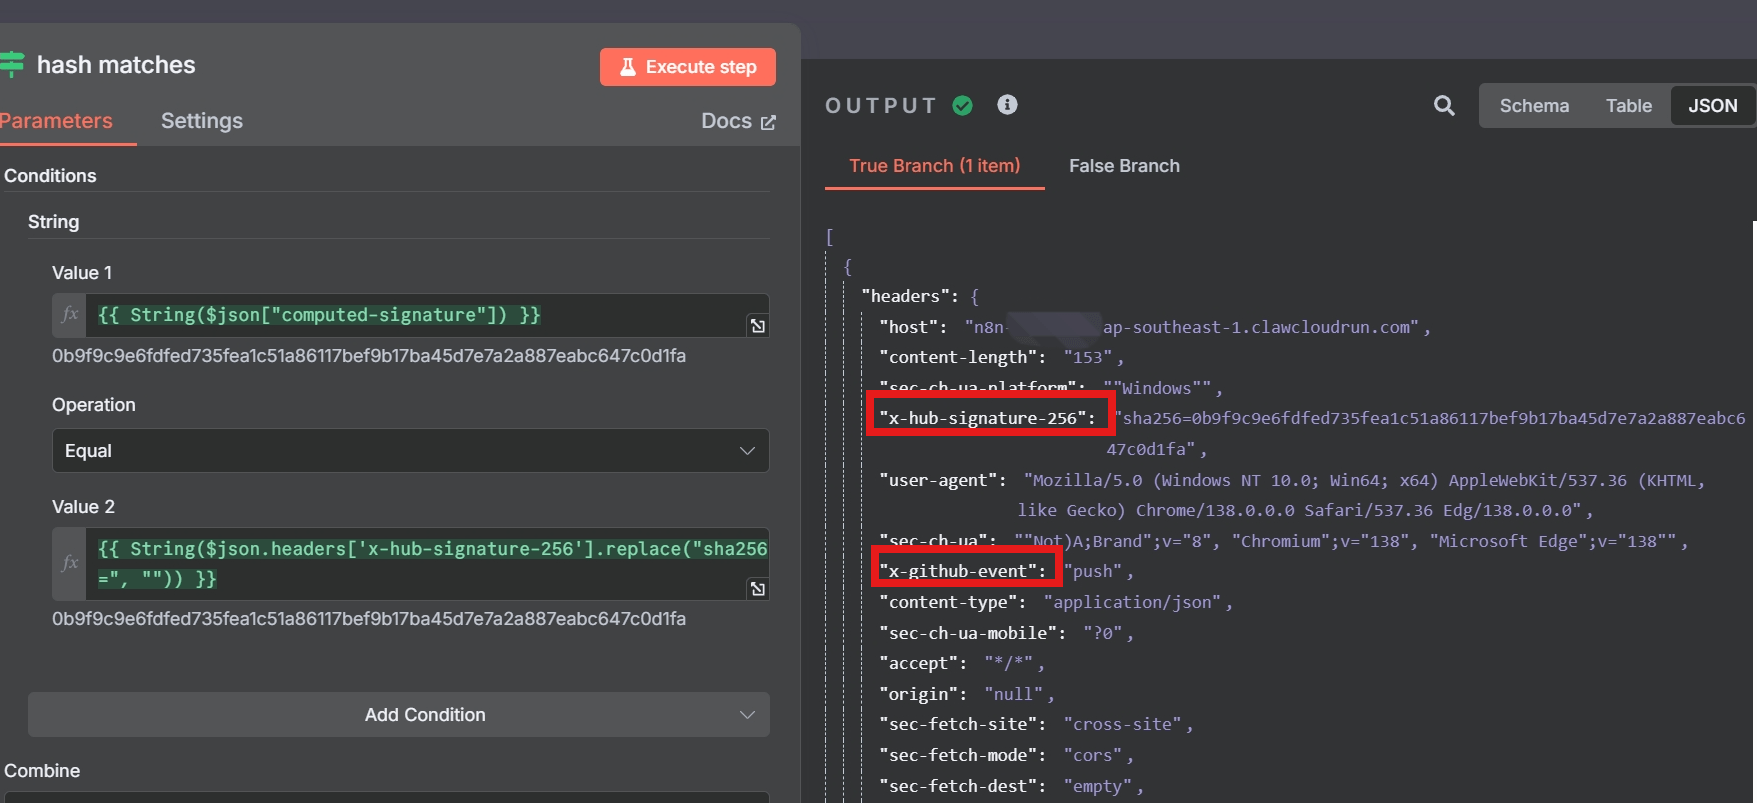
4.2 Advanced Security: Signature Verification
Authentication alone verifies who is calling your webhook. But for critical systems (e.g., financial events, Git push events), you also need to verify the integrity and authenticity of the message itself.
This is done via HMAC-based signature verification, a technique used by services like Stripe, GitHub, Shopify, etc. This level of security is crucial when your n8n webhook node is handling sensitive financial data from services like Stripe.
📦 Example: Verifying Stripe Webhook Signatures in n8n
Even though n8n provides a dedicated Stripe Trigger node (which handles this automatically), verifying signatures manually gives you greater control or compatibility with non-supported services.
🔐 Verification Workflow
- Create a Webhook Node Set response mode to “Immediately” (or “Respond to Webhook” if building a two-phase system).
- Retrieve the Raw Body Stripe signs the raw request body, not the parsed object. n8n stores the raw body under:
{{ $json.rawBody }} - Extract the Signature Header Read the
Stripe-Signaturefrom:{{ $json.headers['stripe-signature'] }} - Use HMAC-SHA256 to Reconstruct the Signature
- Use the Stripe endpoint’s signing secret
- Rebuild the expected signature using
crypto.createHmac()in a Code node
- Compare the calculated signature with the one received.
Example Code Node Snippet (Node.js / n8n)
const crypto = require('crypto');
const secret = $env.STRIPE_SIGNING_SECRET;
const rawBody = $json.rawBody;
const signature = $json.headers['stripe-signature'];
const timestamp = signature.split(',')[0].split('=')[1];
const receivedSig = signature.split(',')[1].split('=')[1];
const signedPayload = `${timestamp}.${rawBody}`;
const expectedSig = crypto
  .createHmac('sha256', secret)
  .update(signedPayload)
  .digest('hex');
if (expectedSig !== receivedSig) {
  throw new Error('Invalid Stripe signature');
}
return { json: { verified: true } };
✅ This logic can be adapted to any service that supports HMAC signature headers.
4.3 Troubleshooting Authentication Failures
n8n is powerful, but even small misconfigurations can cause authentication to fail silently or unpredictably. Below are real-world issues reported by users and their resolutions.
❌ “Authorization data is wrong!”
- Cause: The client’s credentials (token, password) don’t match the one configured in n8n’s Webhook credential.
- Fix: Check:
- Typos in header names or values
- Case sensitivity
- Extra whitespace in the token
✅ Always test with tools like curl, Postman, or your integration script.
❌ Authentication Appears to Work, but Workflow Fails
Symptoms:
- Auth passes (no error)
- But workflow throws an error or doesn’t proceed as expected
Root Cause: In some rare cases, n8n may cache internal state for a Webhook node or misapply credentials when copied between workflows.
✅ Fixes:
- Delete and re-create the Webhook node
- Fully recreate the workflow if necessary
- Restart the n8n instance (for self-hosted)
❌ Authentication Applied Automatically to New Nodes
Some users have reported that once a Webhook credential is created, n8n may auto-apply it to future Webhook nodes—even if you intended the node to be public.
✅ Fix:
- Manually check the “Authentication” setting on each new Webhook node
- Set it to
Noneif the endpoint should be unauthenticated
🔐 Security Summary Table
| Method | Use Case | Security Level | Setup |
|---|---|---|---|
| None | Prototyping, internal tools | 🚫 None | Default |
| Basic Auth | Simple backends, legacy systems | 🔐 Low | Webhook Credential |
| Header Auth | APIs with static tokens | 🔐 Medium | Webhook Credential |
| JWT | Modern apps with identity tokens | 🔐 High | Webhook Credential + JWT node |
| Signature Verification | Payments, Git events | 🔐🔐🔐 Very High | Stripe Trigger node or Code node with crypto logic |
✅ Summary of Part 4
| Concept | Best Practice |
|---|---|
| Use Basic/Auth headers | Via Webhook Credential manager |
| Prefer Header Auth for APIs | Static keys, easy to manage |
| Use JWT + claim checks | For user/session-based logic |
| Verify message integrity | Reconstruct HMAC signatures (Stripe, GitHub) |
| Fix auth bugs | Recreate node/workflow or restart instance |
🚀 Part 5: Integration, Deployment, and Advanced Scenarios for n8n Webhook Workflows
By this point, you’ve learned how to configure a Webhook node, parse incoming requests, build conditional responses, and secure your endpoints. Now let’s put those skills to work in real-world integration scenarios, and ensure you’re ready for deployment at scale.
This final part explores how to connect your webhook flows to major services (Stripe, GitHub, AI), how to host and expose n8n for production traffic, and how to deal with CORS, custom domains, logging, and REST-like API design.
5.1 Real-World Integration Examples
💸 Stripe: Receive Events via Webhook
Stripe lets you configure webhook endpoints for key lifecycle events (e.g. invoice.paid, checkout.session.completed). Here’s how to integrate it:
Setup Steps:
- Create Webhook node with path
/stripe/hooks - Set to POST, response mode Immediately
- Add a second Code node to verify signature (
$json.rawBody) - Use a Switch node to route by
event.type - Use different branches to handle:
payment_intent.succeededcharge.failedcheckout.session.completed
Pro Tip: Use the Stripe Trigger node if you want built-in signature validation, but Webhook + Code gives you more flexibility.
🤖 OpenAI: Build an AI-Powered API
You can use an n8n webhook node as the front-end to a text generation API:
Example Workflow:
- Webhook receives POST with a
promptfield - Call OpenAI or Claude with prompt via HTTP Request node
- Respond using Respond to Webhook with the completion
This enables you to:
- Create microservices (e.g., blog title generator)
- Serve AI tools directly from an API frontend
🧑💻 GitHub: Auto-Trigger Workflows on Push/PR
GitHub lets you define webhooks to trigger on:
pushpull_requestreleaseissues
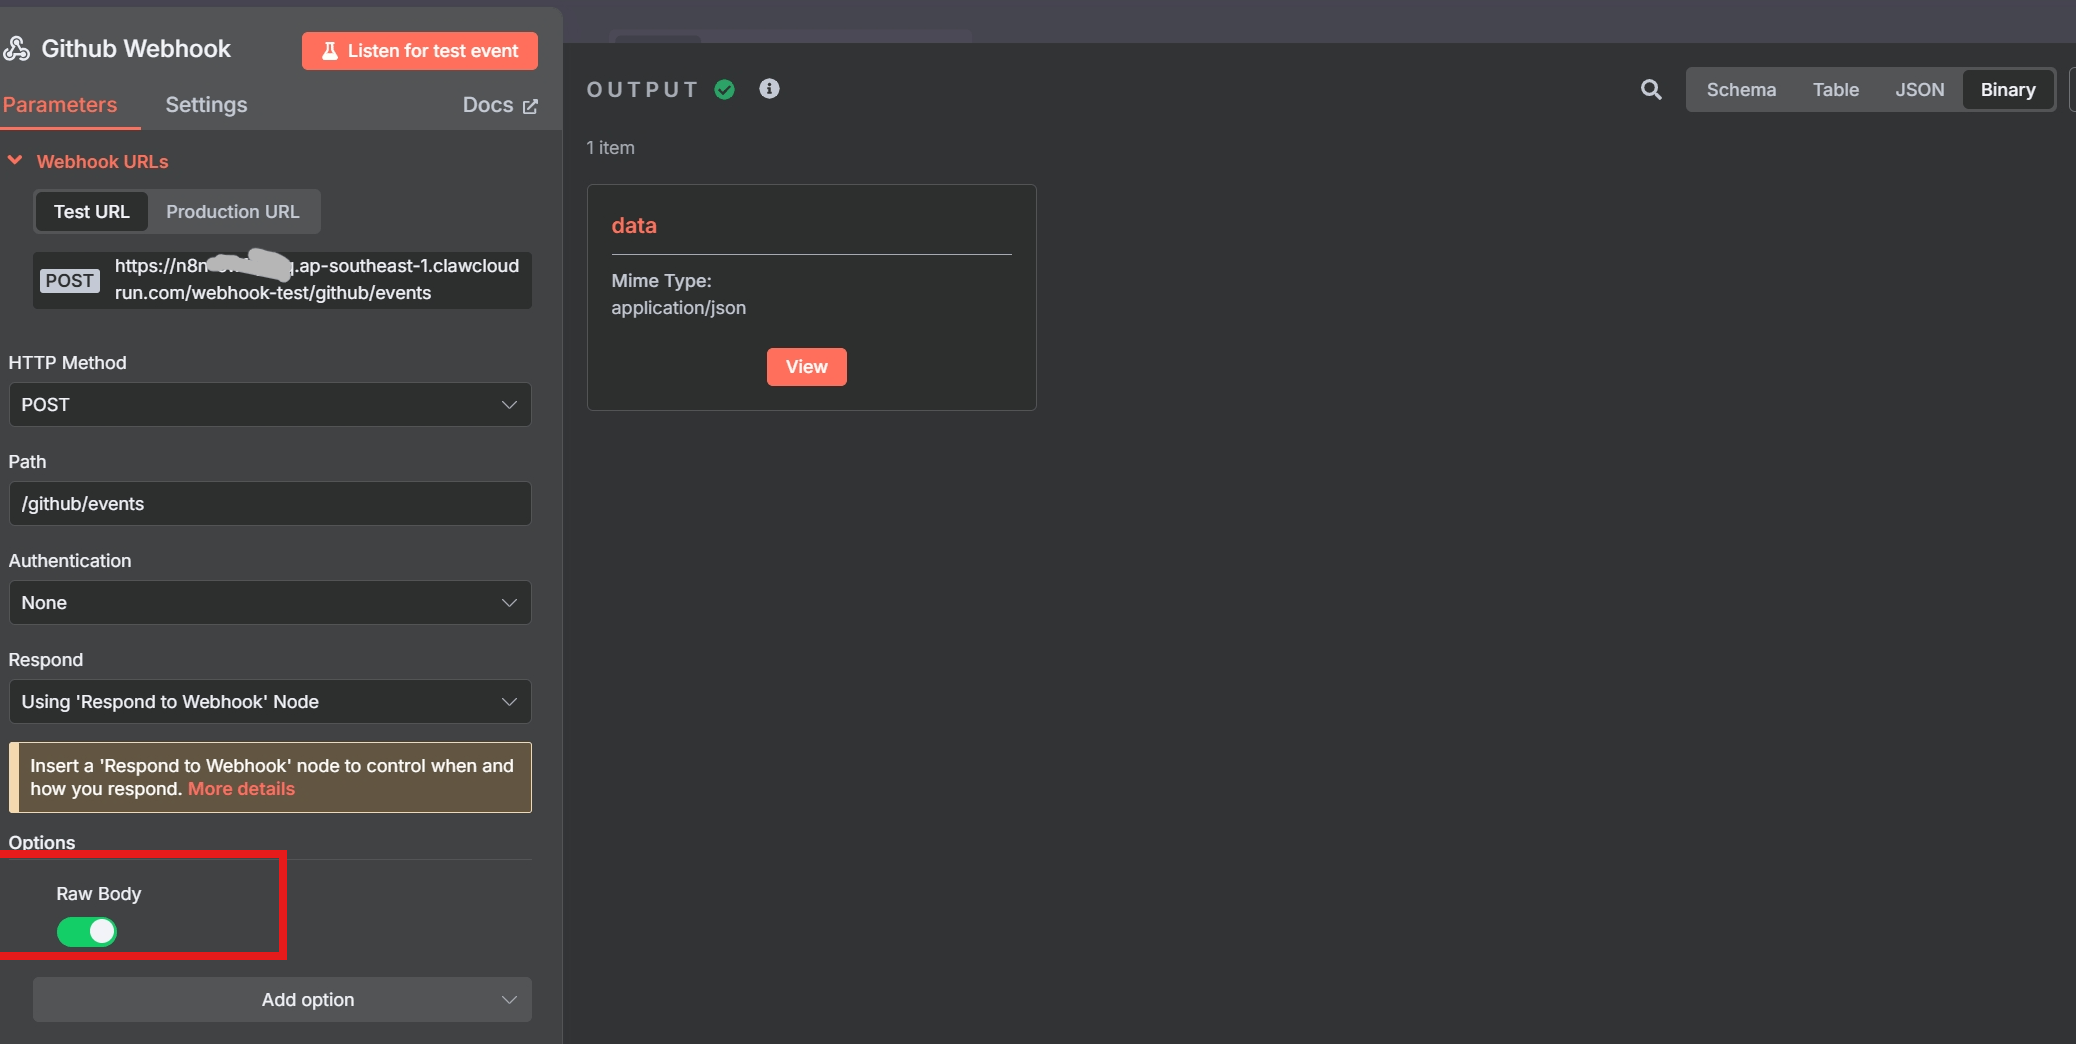
Example:
- Webhook listens at
/github/events - Configure signature verification (SHA-256 HMAC)
- Parse event type from
X-GitHub-Eventheader - Filter events with Switch/IF logic
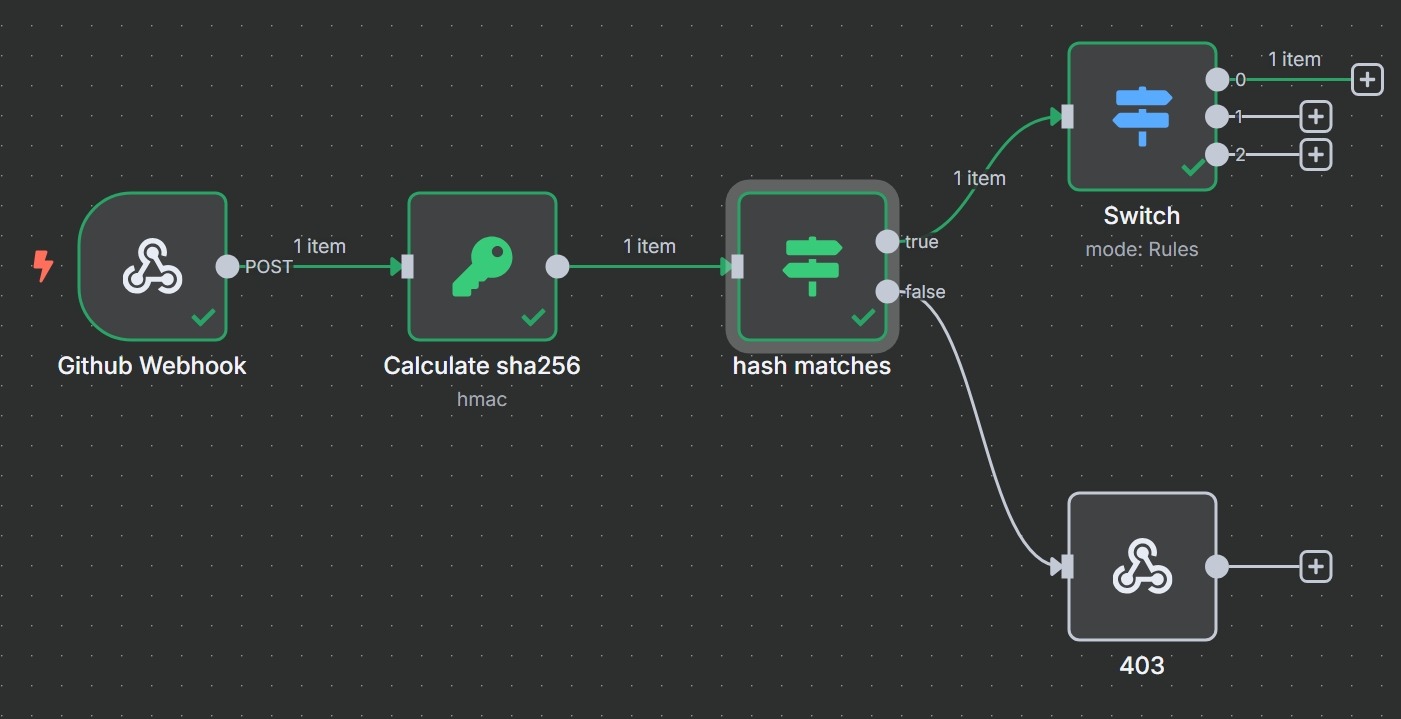
Use cases:
- Auto-sync repo changes
- Auto-deploy site after PR merge
- Notify Slack on new issue
5.2 Deploying Webhook Workflows in Production
Once your workflow, triggered by the n8n webhook node, is tested and reliable, the next step is production deployment.
🌐 Hosting Options
| Option | Description |
|---|---|
| n8n Cloud | Fully hosted, scalable, supports production webhooks |
| Self-hosted (Docker) | Customizable, needs HTTPS, reverse proxy |
| Claw Cloud Run | On-demand container hosting for workflows |
| Fly.io, Render, Railway | Great for personal projects, fast setup |
🔐 Enable HTTPS
Most third-party services (Stripe, Slack, GitHub) require secure HTTPS endpoints.
If you’re self-hosting, ensure:
- You have an SSL certificate (via Let’s Encrypt or paid)
- Use NGINX/Traefik as reverse proxy to n8n
- Terminate SSL at the proxy layer
Example NGINX SSL Config:
server {
  listen 443 ssl;
  server_name yourdomain.com;
  ssl_certificate /etc/ssl/yourdomain.crt;
  ssl_certificate_key /etc/ssl/yourdomain.key;
  location / {
    proxy_pass http://localhost:5678;
    proxy_set_header Host $host;
    proxy_set_header X-Real-IP $remote_addr;
  }
}
🧭 Custom Domain for Webhook URLs
Out of the box, n8n URLs are often ugly or random (e.g., /webhook/8934df). But you can expose workflows with clean custom URLs.
Approach:
- Use NGINX to rewrite public-friendly routes
- Or use n8n’s Webhook node → Path parameter to set
api/orders/new - Combine with domain routing:
https://api.mysaas.com/orders/new
✅ Best Practice: version your routes like /v1/orders to maintain compatibility.
5.3 CORS, Preflight, and Browser Clients
If your webhook is called from a frontend JavaScript app (e.g., React, Vue), you’ll need to handle CORS.
Cross-Origin Resource Sharing (CORS) is a browser security feature that restricts cross-origin HTTP requests that are initiated from scripts. For a deeper understanding of how it works, you can refer to the MDN Web Docs on CORS.
Problem: “CORS Policy: No ‘Access-Control-Allow-Origin’”
Browsers require:
- OPTIONS preflight responses
- Correct CORS headers in webhook response
✅ Fix:
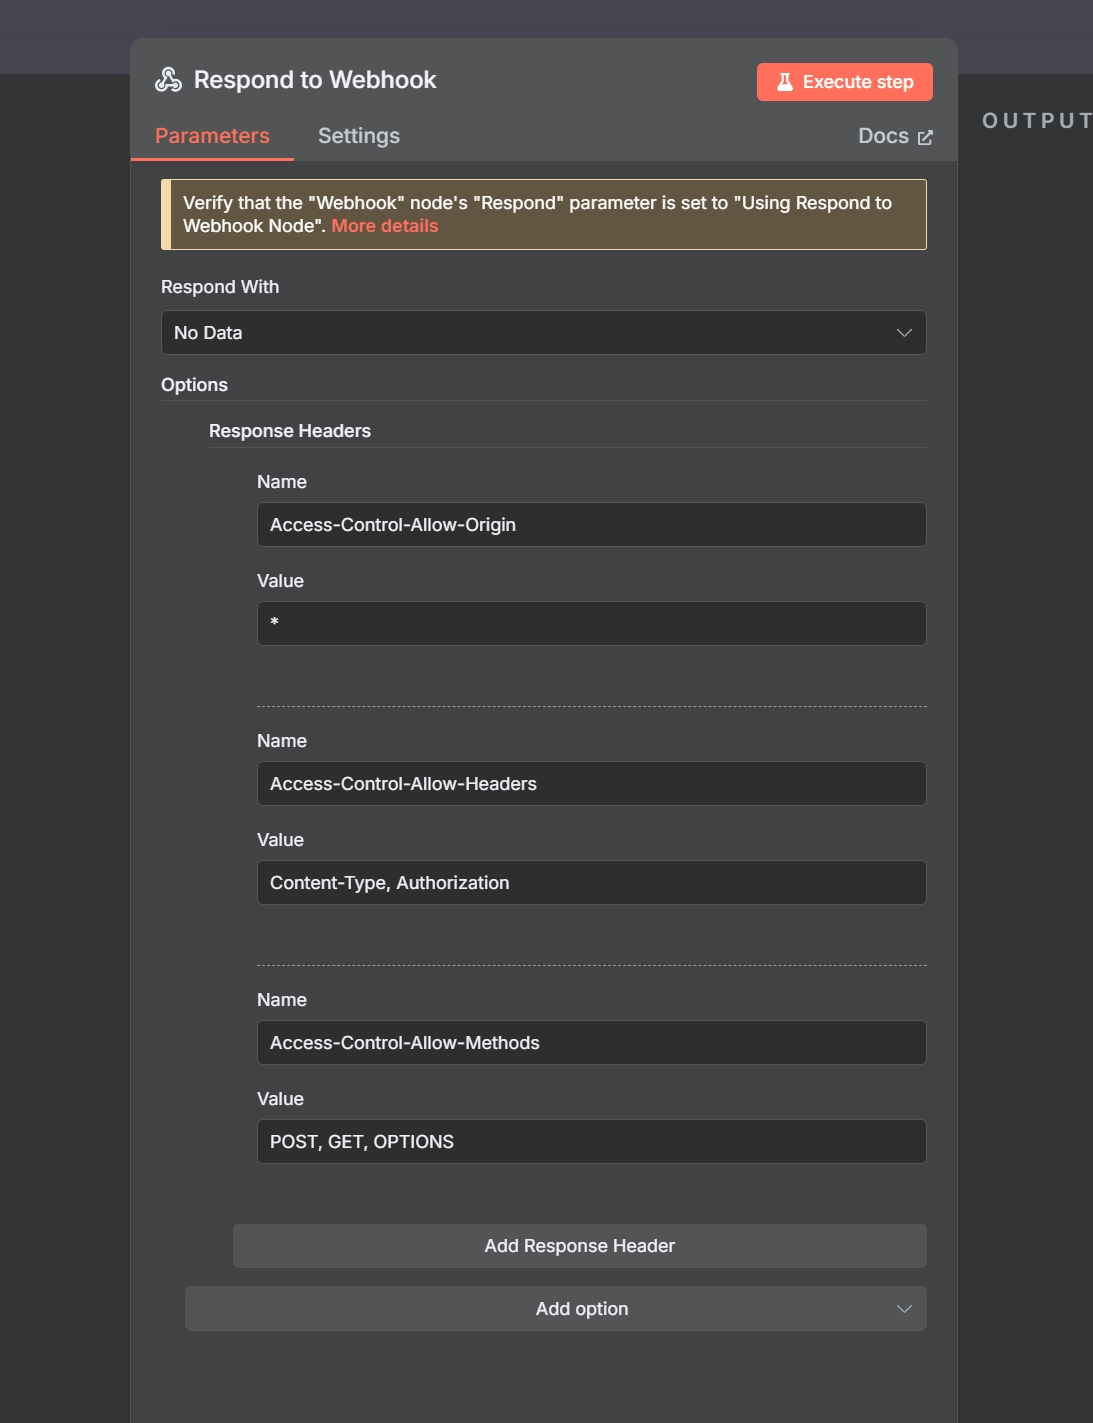
- Add CORS headers via Respond to Webhook node
- Use Method OPTIONS in a separate webhook for preflight
Example Header Configuration:
[
  {
    "name": "Access-Control-Allow-Origin",
    "value": "*"
  },
  {
    "name": "Access-Control-Allow-Headers",
    "value": "Content-Type, Authorization"
  },
  {
    "name": "Access-Control-Allow-Methods",
    "value": "POST, GET, OPTIONS"
  }
]
5.4 RESTful API Design Using Webhook Nodes
By combining multiple instances of the n8n webhook node, you can simulate a REST-style API backend.
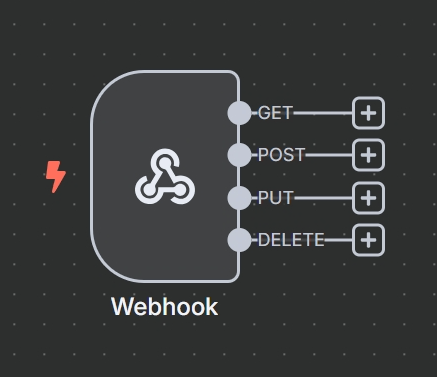
| HTTP Method | Path | Action |
|---|---|---|
| GET | /orders/:id | Retrieve order |
| POST | /orders | Create new order |
| PUT | /orders/:id | Update |
| DELETE | /orders/:id | Delete |
Workflow Design Tips:
- Use parameterized paths (
:id) - Add Switch or IF node to branch by method or route
- Use Respond to Webhook for tailored status + data
n8n isn’t a full API server, but for lightweight backends or event APIs, it works well.
5.5 Logging and Observability
A webhook in production is just like an endpoint in a backend service—it needs visibility.
Tools & Tips:
- Enable Execution Logs: Always turn this on in workflow settings
- Use Code node or Append node to write to log services like:
- Supabase
- Airtable
- Notion
- Google Sheets
- Add a timestamp field in initial Webhook node:
{{ new Date().toISOString() }} - Tag workflows with
#api,#webhook,#externalto track them easily
✅ Summary of Part 5
| Topic | Recommendation |
|---|---|
| Stripe/GitHub | Use signature verification |
| AI Integration | Webhook + OpenAI = dynamic microservices |
| Hosting | Use HTTPS via n8n Cloud, Docker, or reverse proxy |
| REST API | Build endpoint collections using multiple Webhook nodes |
| Logging | Always enable execution logs and append logs downstream |
🎉 Final Thoughts
Mastering the n8n Webhook node turns your automation platform into a fully programmable backend system. You can now receive, process, secure, and respond to external events—forming the foundation of modern event-driven architecture.
From simple forms to real-time AI workflows to GitHub sync engines, the Webhook node is at the heart of scalable automation. And with good practices in structure, authentication, and deployment, you’re now equipped to build robust workflows that can power production apps.