n8n Gmail Trigger Node Explained: Setup, Use-Cases & Advanced Troubleshooting

1. Introduction
In the world of workflow automation, few tools are as universally essential as email. It remains the backbone of business communication, customer interaction, lead generation, and internal operations. For this reason, the ability to seamlessly integrate your email inbox into automated processes is not just a convenience—it’s a superpower. This is where the n8n Gmail node and the broader capabilities of Gmail automation in n8n shine, making it one of the most popular and powerful use cases on the platform.
Whether you’re a marketer looking to automatically capture leads, a developer needing to parse bug reports, or a business owner wanting to archive invoices, your Gmail inbox is a treasure trove of structured and unstructured data. Manually sorting, processing, and acting on this information is time-consuming, repetitive, and prone to human error. n8n, an open-source workflow automation tool, provides a robust solution to reclaim that time and build intelligent, event-driven systems.
At the heart of this integration is the Gmail node, which functions both as a trigger to kickstart workflows when new emails arrive and as a regular node to perform actions like sending, replying, or managing emails. A well-configured n8n Gmail request can do everything from fetching a specific thread to applying a label or deleting a message. This guide will serve as your comprehensive manual for mastering Gmail automation in n8n. We will walk through everything from the initial credential setup and basic trigger configuration to advanced, real-world use-cases like extracting contact information, integrating with AI agents, and troubleshooting common issues. By the end, you’ll be equipped to transform your chaotic inbox into a streamlined, automated, and highly efficient business asset.
2. Getting Started with Gmail in n8n
Before you can start building powerful workflows, you need to establish a secure connection between n8n and your Gmail account. This process involves creating credentials within the Google Cloud Platform and then adding them to n8n. While it may seem daunting at first, it’s a one-time setup that unlocks the full potential of Google’s APIs. The primary method for n8n Gmail authentication is OAuth2, a secure protocol that allows n8n to access your Gmail data on your behalf without ever storing your password.
Prerequisites
- A Gmail Account: This can be a standard
@gmail.comaccount or a Google Workspace account. - An n8n Instance: You should have a running n8n instance, whether it’s on n8n Cloud, self-hosted, or running on your local machine.
- A Google Cloud Platform (GCP) Project: All of Google’s APIs, including the Gmail API, are managed through GCP. If you don’t have one, you’ll need to create a free account and set up a new project.
Step-by-Step Credential Setup (OAuth2)
Follow these steps carefully to create your Gmail OAuth2 n8n credentials.
Step 1: Create a Google Cloud Platform Project
- Navigate to the Google Cloud Console.
- If you don’t have a project, you’ll be prompted to create one. If you do, click the project selector dropdown at the top of the page and click “New Project”.
- Give your project a descriptive name (e.g., “n8n-Gmail-Integration”) and click “Create”.
Step 2: Enable the Gmail API
- Once your project is created, use the search bar at the top to search for “Gmail API”.
- Click on the “Gmail API” result from the Marketplace.
- Click the “Enable” button. This makes the Gmail API available for use within your project.
Step 3: Configure the OAuth Consent Screen
Before you can create credentials, you need to tell Google how your application will present itself to users when requesting permission.
- In the GCP Console, navigate to “APIs & Services” > “OAuth consent screen”.
- Choose a “User Type”. For personal use or internal testing, “External” is fine. If you are part of a Google Workspace, you can select “Internal”. Click “Create”.
- Fill in the required application details:
- App name: Something descriptive, like “n8n Automation”.
- User support email: Select your email address.
- Developer contact information: Enter your email address again.
- Click “Save and Continue”.
- On the “Scopes” page, click “Add or Remove Scopes”. In the filter bar, search for “Gmail API” and select the
.../auth/gmail.modifyscope. This scope provides broad permissions to read, compose, send, and permanently delete all your email from Gmail. It’s generally the most useful one for comprehensive automation. Click “Update”. - Click “Save and Continue”.
- On the “Test users” page, click “Add Users” and add the email address of the Gmail account you want to connect to n8n. This is crucial, as your app will be in “testing” mode and will only be accessible to these specified users.
- Click “Save and Continue” and then “Back to Dashboard”.
Step 4: Create OAuth2 Credentials
- Navigate to “APIs & Services” > “Credentials”.
- Click “+ Create Credentials” at the top of the screen and select “OAuth client ID”.
- For “Application type”, select “Web application”.
- Give the client ID a name (e.g., “n8n Gmail Credentials”).
- Under “Authorized redirect URIs”, you need to add the specific URL provided by n8n.
- Go to your n8n instance and open the “Credentials” panel.
- Click “Add Credential”, search for “Gmail”, and select it.
- n8n will display your unique “OAuth Redirect URL”. Copy this URL.
- Go back to the Google Cloud Console and paste this URL into the “Authorized redirect URIs” field.
- Click “Create”. A pop-up will appear with your Client ID and Client Secret. Keep this window open.
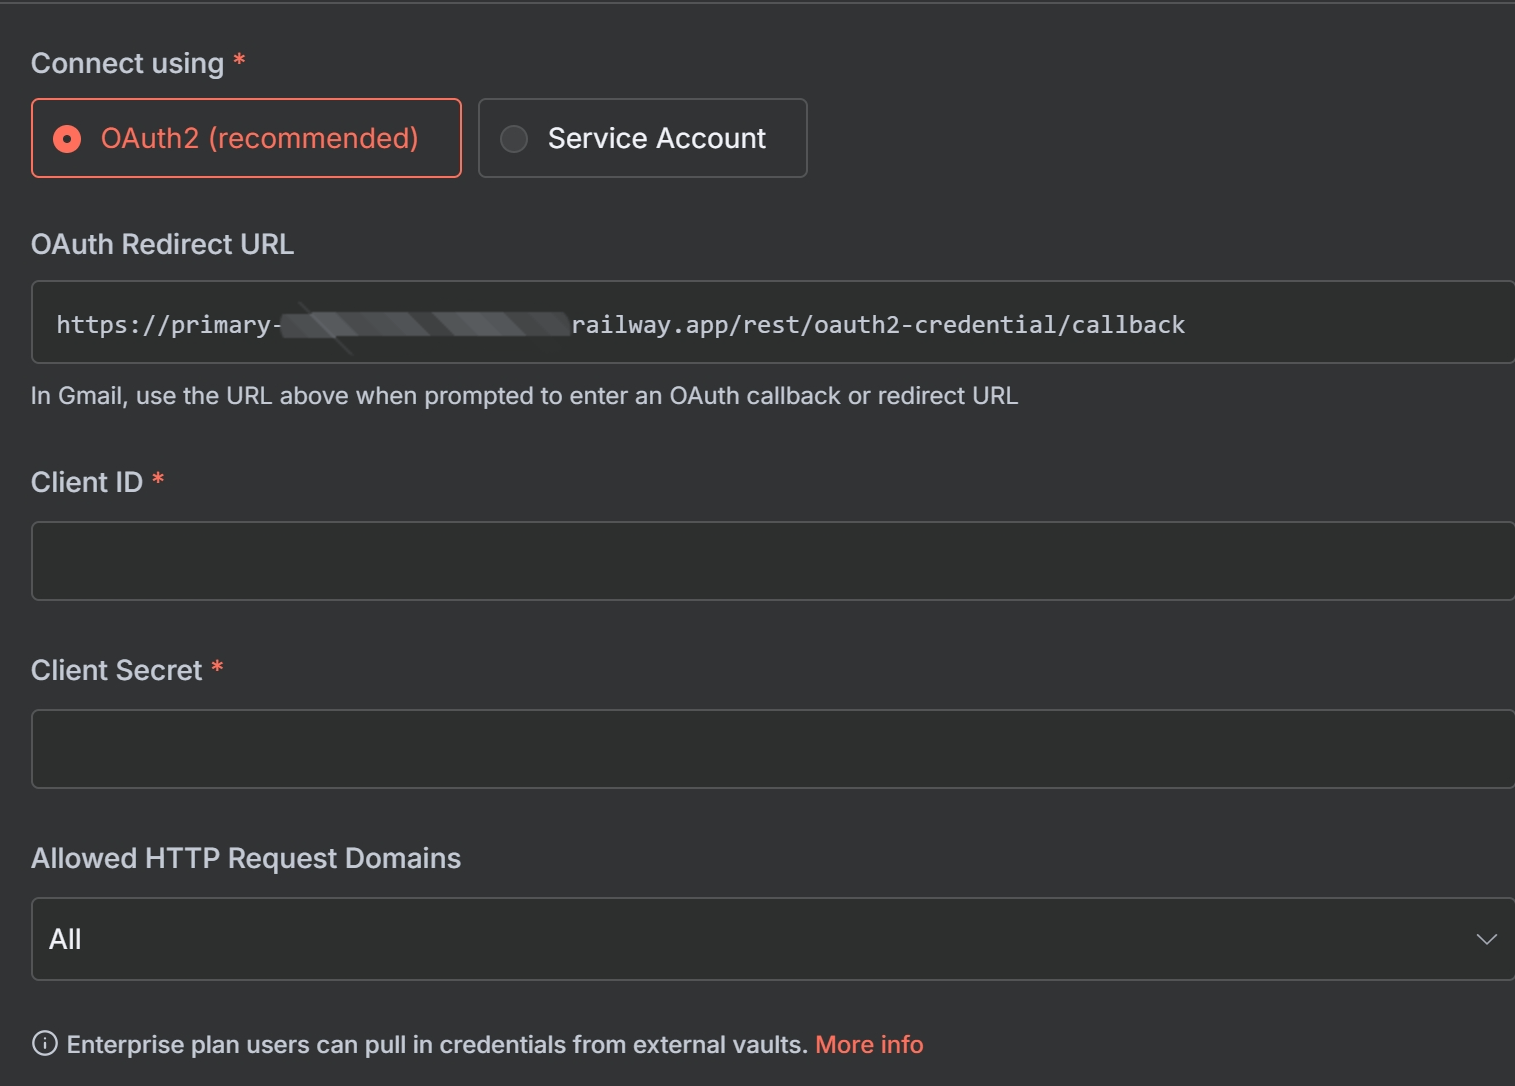
Step 5: Add the Credentials to n8n
- Go back to the credentials creation screen in n8n.
- Copy the “Client ID” from GCP and paste it into the “Client ID” field in n8n.
- Copy the “Client Secret” from GCP and paste it into the “Client Secret” field in n8n.
- Click “Sign in with Google”.
- A new window will open asking you to choose your Google account. Select the account you added as a test user.
- You may see a “Google hasn’t verified this app” warning. This is expected since it’s a personal application. Click “Advanced” and then “Go to [Your App Name] (unsafe)”.
- Grant the necessary permissions to allow n8n to access your Gmail account.
- Once successful, you can save the credentials in n8n.
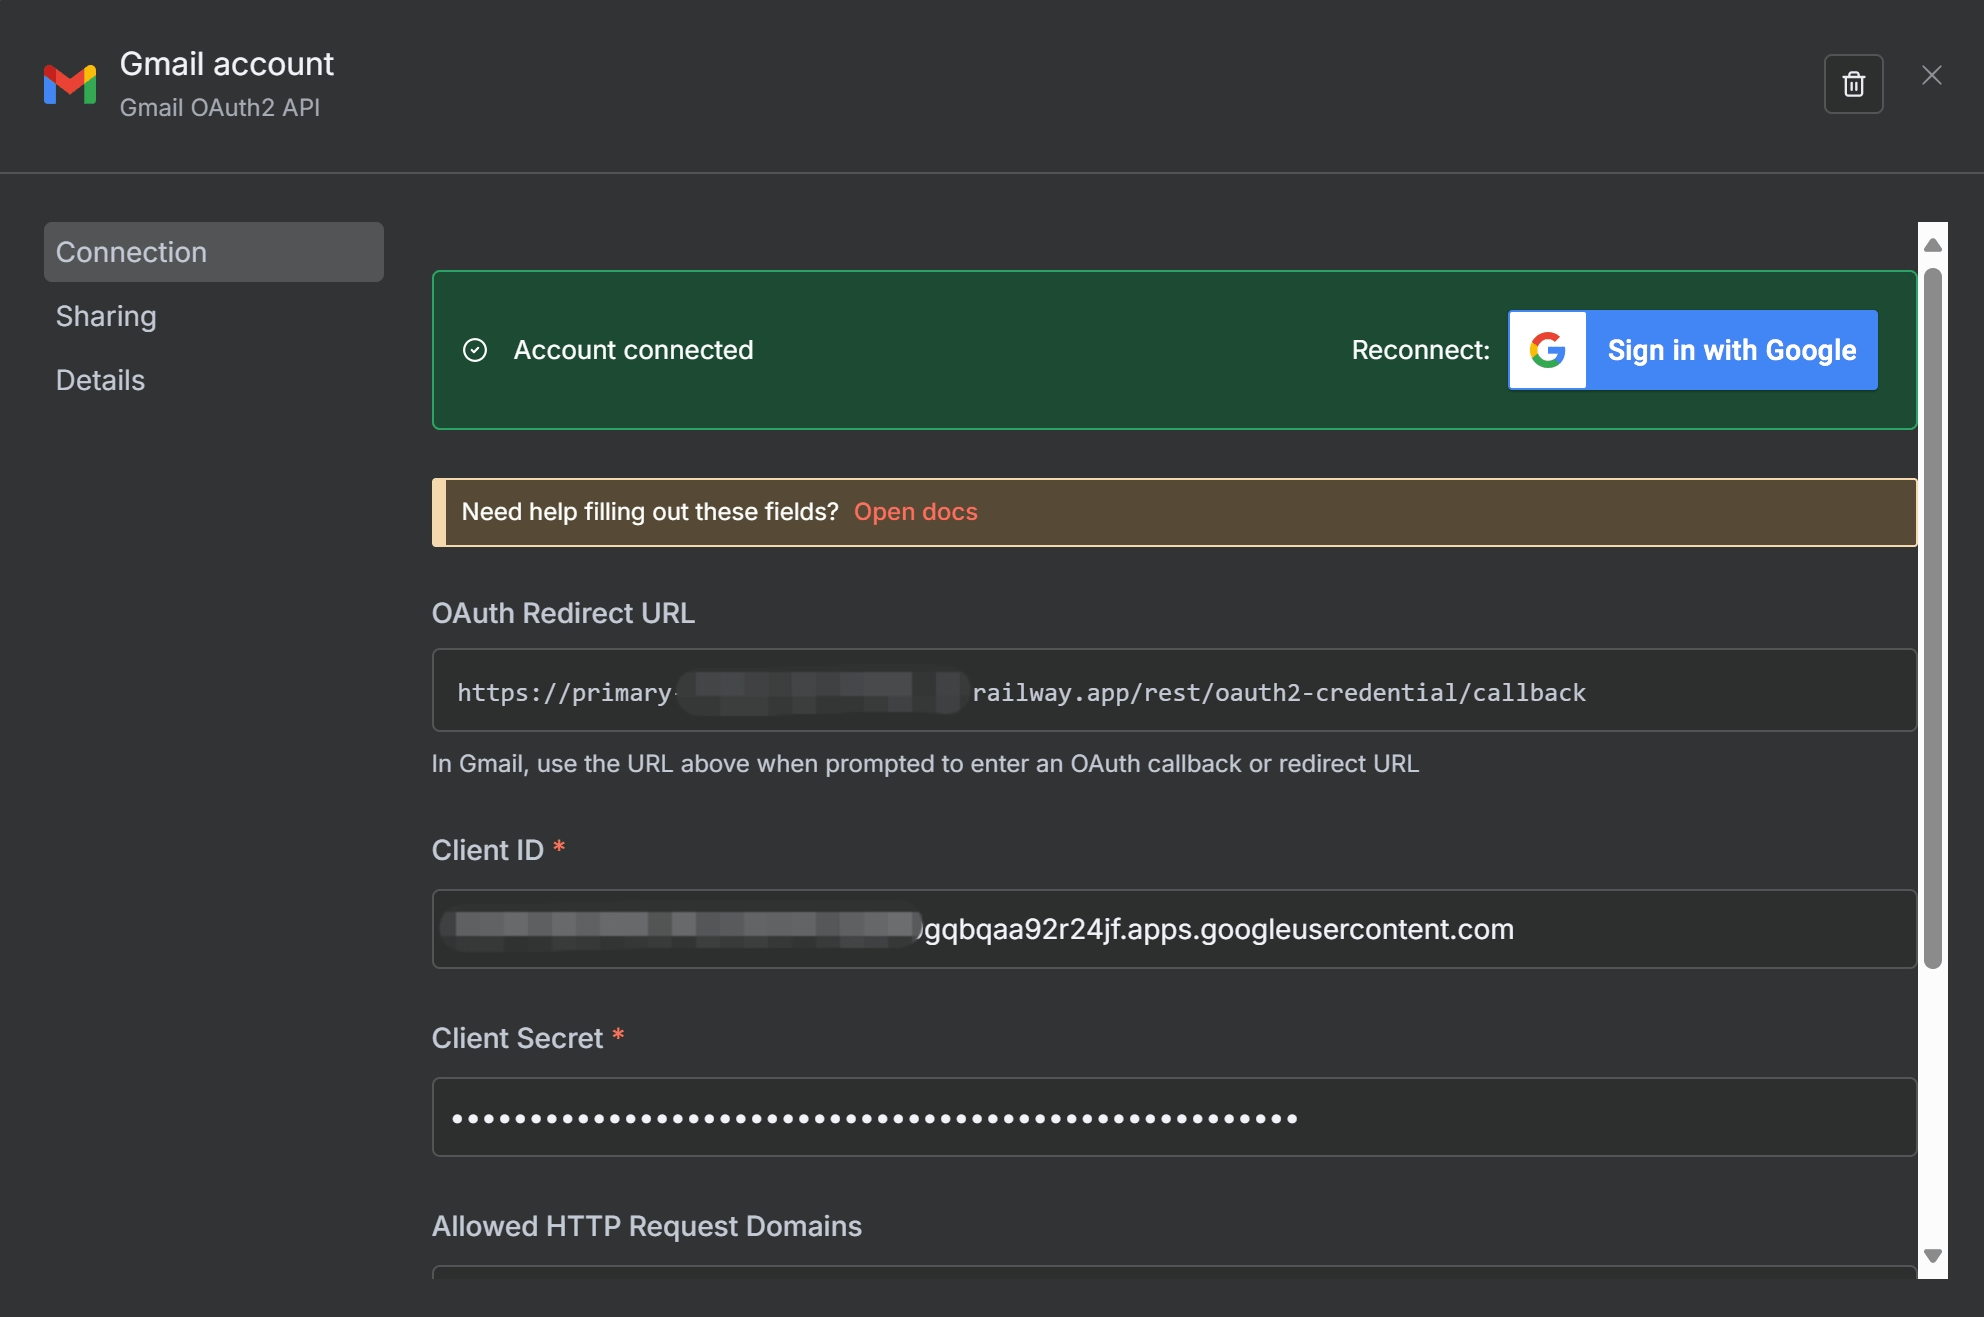
You’ve now successfully set up your n8n Gmail authentication! This credential can be reused across all your workflows that involve Gmail. For a more in-depth look at managing credentials, refer to our upcoming n8n Credentials Explained guide.
3. The n8n Gmail Trigger Node Explained
The n8n Gmail Trigger node is the starting point for most email-based automations. It polls your Gmail account at set intervals and executes the workflow whenever a specified event occurs. This reactive approach means you can build workflows that respond to emails in near real-time without any manual intervention.
Finding and Setting Up the Node
- In the n8n editor, click the
+button to add a new node. - Search for “Gmail Trigger” and select it.
- The node’s parameter panel will open on the right, where you can configure its behavior.
Supported Trigger Event
Based on the latest version of the node, the primary event is:
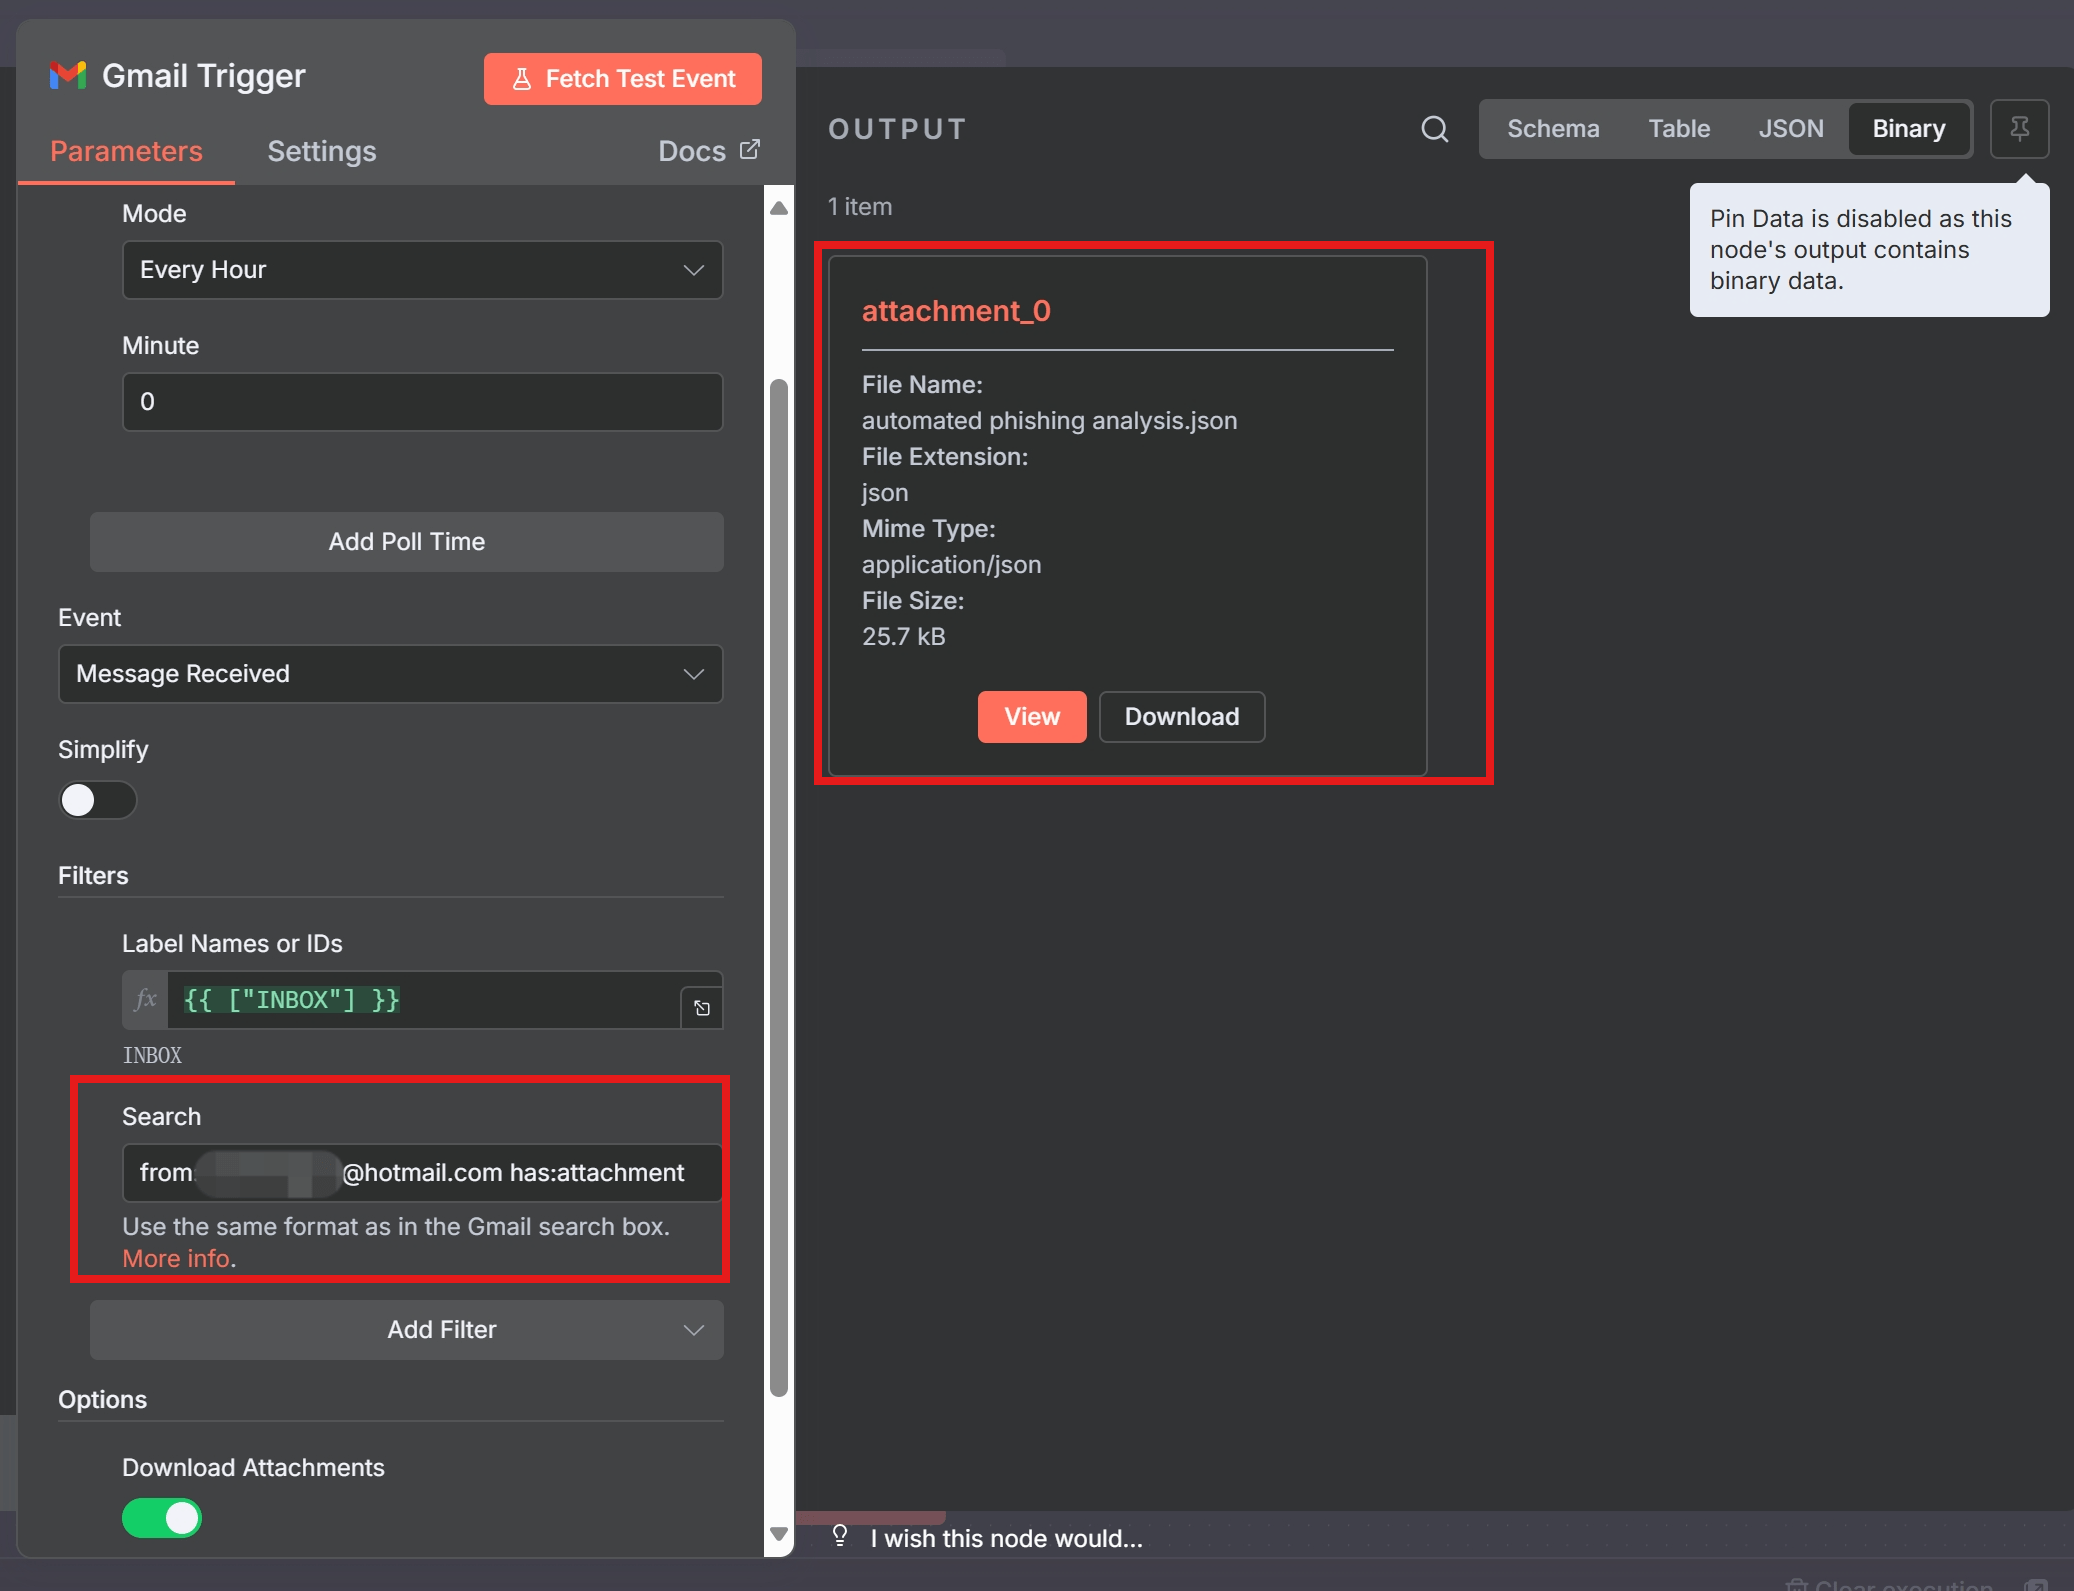
- Message Received: This event triggers for every new email message that arrives that matches your filters. It is the only event needed, as its powerful filtering capabilities cover all other use-cases like triggering on specific labels or attachments.
Key Parameters and Filters
The effectiveness of your trigger depends on how well you configure its parameters. Here are the most important ones for a Gmail trigger node setup:
- Credentials: Select the Gmail credentials you created in the previous step.
- Simplify: This toggle controls the level of detail in the output.
- Off (Default): Returns the full, raw email data, including the complete body (HTML and text), headers, and attachment data. For most workflows where you need to process the email’s content, you should leave this turned off.
- On: Returns a simplified version of the response, including just the email message ID, labels, and basic headers (From, To, Subject, etc.). This is useful for high-volume workflows where you only need metadata.
- Poll Times: n8n operates on a polling mechanism for triggers, meaning it checks for new items at regular intervals. You can configure this to check every minute, every 15 minutes, every hour, etc. Be mindful of your workflow’s urgency and your API quota.
- Filters: This section is where you define precisely which emails should start your workflow.
- Search: This is the most powerful filter. It allows you to use the same advanced search syntax as the Gmail search box. For a comprehensive guide on all available operators, refer to Google’s official documentation on how to Refine searches in Gmail. Examples include:
from:boss@company.com has:attachment,subject:(urgent OR important), oris:unread. - Label Names or IDs: Filter for emails that have (or don’t have) specific labels. You can specify labels like
INBOXor custom ones you’ve created. - Read Status: A dropdown to easily filter for
Unread emails only,Read emails only, or all emails regardless of status.
- Search: This is the most powerful filter. It allows you to use the same advanced search syntax as the Gmail search box. For a comprehensive guide on all available operators, refer to Google’s official documentation on how to Refine searches in Gmail. Examples include:
- Options:
- Download Attachments: If your workflow needs to process files sent via email, you must enable this option to make the binary data of the attachments accessible.
For more detailed information on every parameter, you can always refer to the official n8n Gmail trigger node docs, which are accessible directly from a link within the node’s description in the editor.
4. The Gmail Node
While the trigger node starts workflows, the regular Gmail node performs actions within a workflow. You can use it to programmatically read, send, and manage your inbox. The node is organized around Resources, which are the different types of items you can interact with in Gmail.
Resources and Operations
Once you add a Gmail node to your workflow, the first step is to choose a Resource. Each resource has its own set of Operations.

Message Resource
This is the most common and versatile resource, dealing with individual emails. It has the most extensive list of operations available.
- Send: Compose and send a new email. You can specify recipients (To, CC, BCC), subject, and body (HTML or text).
- Reply: Reply to an existing message. You’ll need the message ID of the email you’re replying to.
- Get: Retrieve a single email by its message ID. This is useful for fetching the full content of an email that was identified in a previous step.
- Get Many: Retrieve a list of emails, often using filters like labels or search queries.
- Add Label / Remove Label: Add or remove one or more labels from a message.
- Mark as Read / Mark as Unread: Change the read status of an email.
- Archive / Unarchive: Move a message to or from the archive.
- Star / Unstar: Add or remove a star from a message.
- Delete: Permanently delete a message. Use with caution!
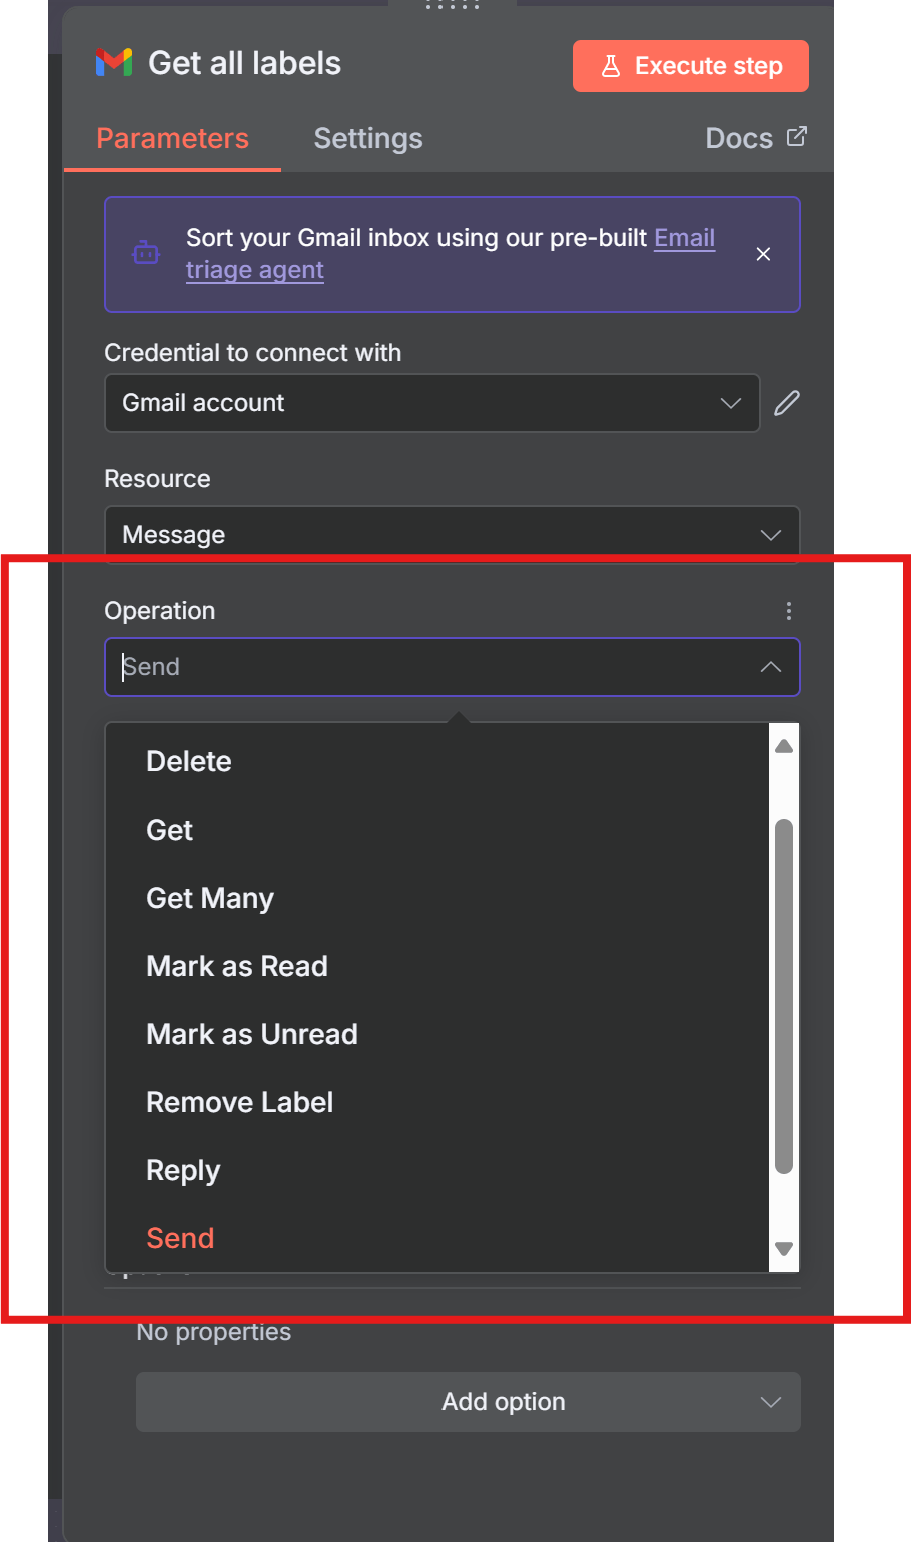
Label Resource
This resource is used to manage your Gmail labels.
- Create: Create a new label in your Gmail account.
- Delete: Delete an existing label.
- Get: Retrieve information about a specific label.
- Get All: Get a list of all labels in your account.
- Update: Change the name or settings of an existing label.
Draft Resource
This resource allows you to work with email drafts.
- Create: Create a new email draft without sending it. This is useful for human-in-the-loop workflows where a user needs to review the email before it’s sent.
- Get: Retrieve an existing draft.
- Send: Send a previously created draft.
Thread Resource
This resource operates on entire email conversations (threads).
- Get: Retrieve all messages within a specific thread ID.
- Get All: Get a list of threads.
- Add Label / Remove Label: Apply or remove labels from an entire thread.
- Archive / Unarchive: Archive or unarchive an entire thread.
This structured approach of Resources and Operations allows you to build workflows that not only react to emails but also manage them completely, from sending new campaigns to organizing your entire inbox.
5. Practical Use-Cases with Gmail
Beyond simple notifications, Gmail automation in n8n can solve complex business problems. Here are some of the most impactful and frequently requested use-cases, inspired by real-world templates and advanced techniques.
5.1 Using n8n to Extract Email Addresses from Gmail
Manually copying and pasting email addresses is a tedious task perfectly suited for automation. The goal is to use n8n to extract email addresses from Gmail bodies, subjects, or sender fields and store them in a structured format.
Using n8n to Extract Email Addresses from Gmail
This workflow will trigger on emails with a specific label (e.g., “New-Signups”), extract relevant email addresses, and add them to an Airtable base.
Extracting the Sender’s Email Address (Recommended Method)
The most reliable way to get the sender’s email is directly from the trigger’s JSON output. You do not need a Function node for this. You can access it using an expression like this in a subsequent node:
{{ $json.from.value[0].address }}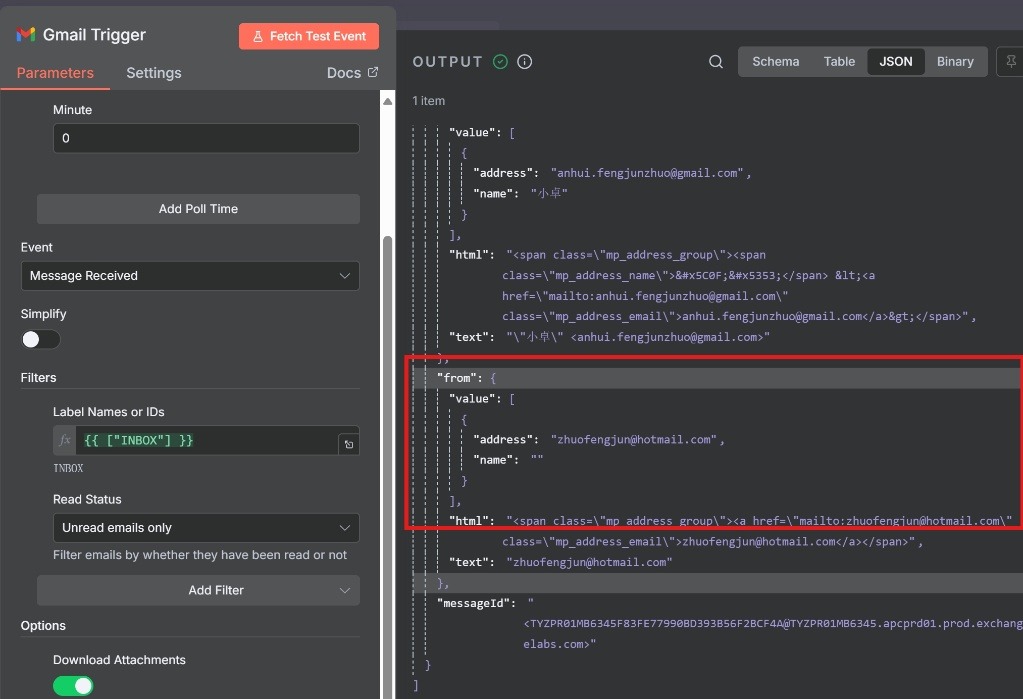
Extracting All Email Addresses from the Email Body
If your goal is to find all email addresses mentioned within the content of an email, you can use the following workflow. For example, imagine an email arrives with the following content in its body:
Hi Team,
Please follow up with the contacts from the conference. You can reach out to the main organizer at
events-coord@conference.com. For sales inquiries, contactsales@partner-corp.net, and for technical support, please emailsupport@tech-solutions.org. Also, remember to copymanager@mycompany.comon your initial outreach.Thanks,
Alex
The workflow below is designed to parse this text and extract all four email addresses.
Workflow Steps:
- Gmail Trigger Node:
- Event:
Message Received. - Simplify: Keep this turned off to access the email body.
- Filters > Search:
label:New-Signups.
- Event:
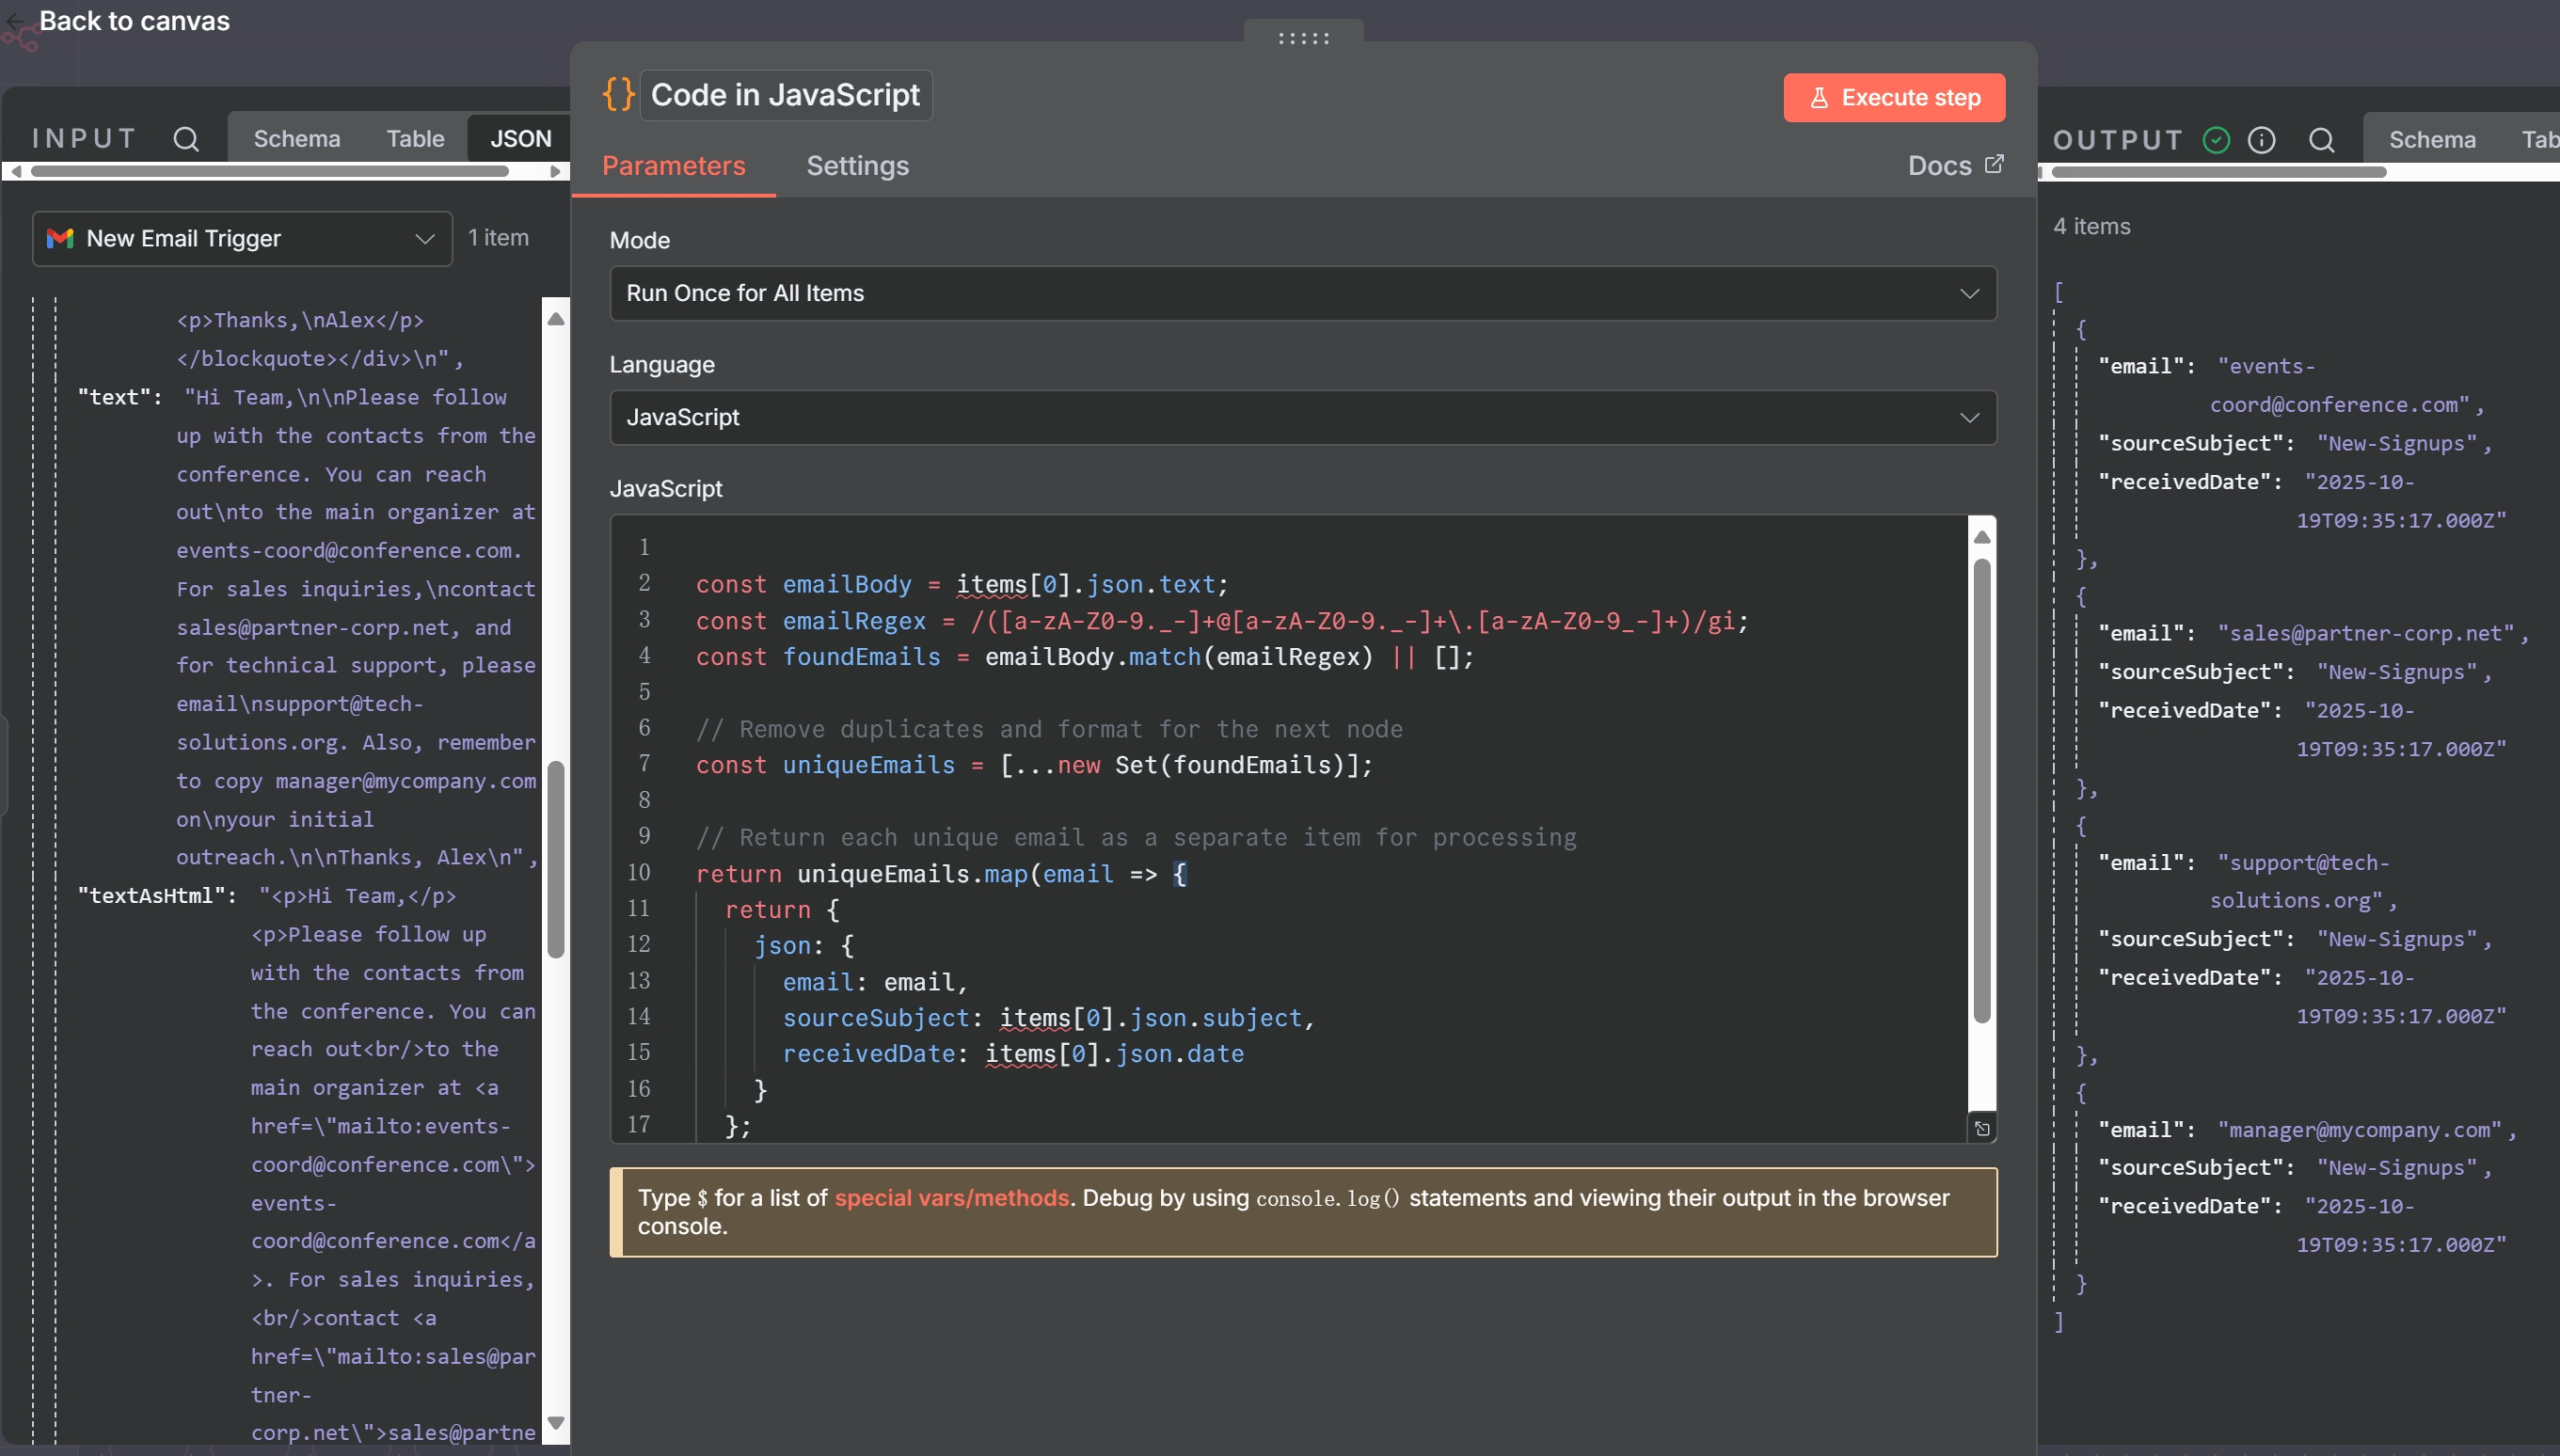
- Function Node (JavaScript Code):
- This node is the core of the extraction logic. We’ll use a regular expression to find all email addresses within the email’s text content.
- Add a “Function” node and paste the following code:
const emailBody = items[0].json.text; const emailRegex = /([a-zA-Z0-9._-]+@[a-zA-Z0-9._-]+\.[a-zA-Z0-9_-]+)/gi; const foundEmails = emailBody.match(emailRegex) || []; // Remove duplicates and format for the next node const uniqueEmails = [...new Set(foundEmails)]; // Return each unique email as a separate item for processing return uniqueEmails.map(email => { return { json: { email: email, sourceSubject: items[0].json.subject, receivedDate: items[0].json.date } }; });- This code finds all email-like strings, removes any duplicates, and restructures the data so that each email address becomes a new “item” for the subsequent nodes to process one by one. This is a key pattern for Gmail contact extraction n8n.
- Airtable Node:
- Configure this node to append the extracted
email,sourceSubject, andreceivedDateto your “Leads” table.
- Configure this node to append the extracted
5.2 AI-Powered Email Labeling and Archiving
Go beyond static filters and let AI categorize your inbox. This n8n Gmail auto labeling system can understand the content and intent of an email to apply the correct labels, creating a truly dynamic Gmail automation n8n workflow.
Workflow Overview
Managing a busy inbox is a common challenge. This workflow provides an intelligent solution by automatically detecting new emails, analyzing their content with an AI agent, and applying the most relevant Gmail labels. If a suitable label doesn’t exist, the AI can even create one, ensuring your inbox stays perfectly organized.
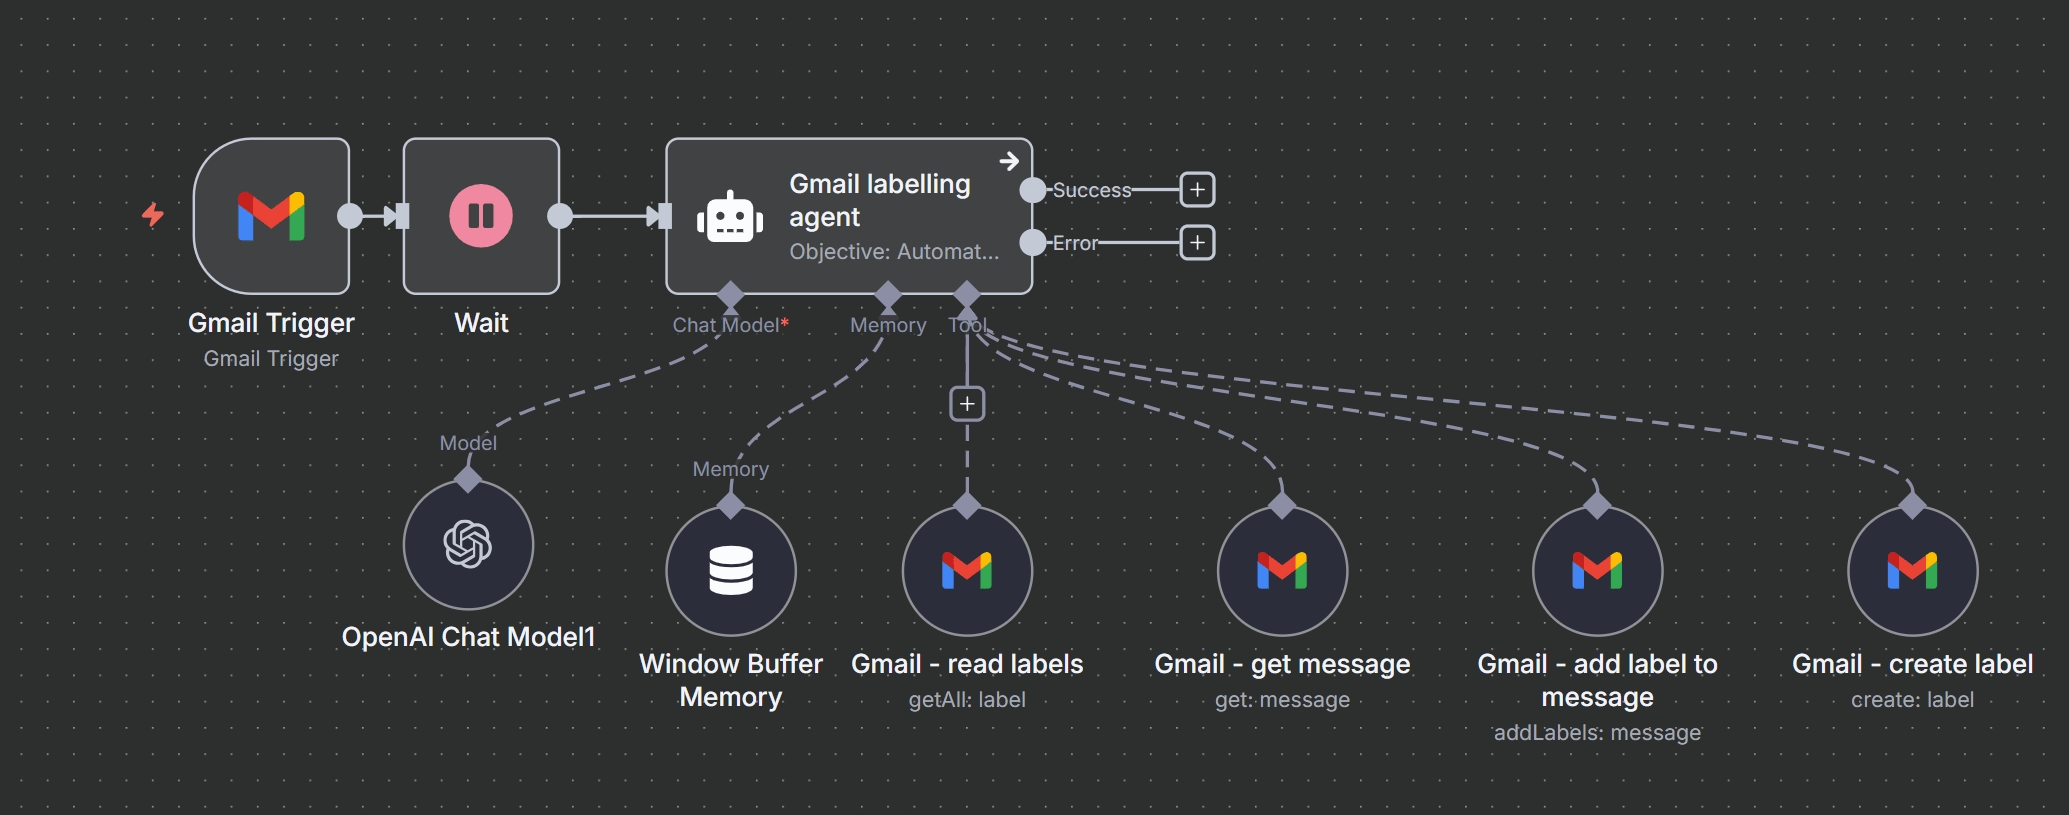
The core of this workflow is the LangChain Agent node, which acts as the decision-making brain. It uses a series of connected “tools”—in this case, various Gmail operations—to achieve its goal.
Step-by-Step Guide
- Gmail Trigger: The workflow begins with a Gmail Trigger node, configured to poll for new messages at a set interval (e.g., every 5 minutes).
- Wait Node: A Wait node adds a brief delay (e.g., 1 second). This is a good practice to prevent rate-limiting issues and ensure all data from the trigger is available for processing.
- Gmail Labelling Agent (LangChain Agent Node): This is the central processing unit. It receives the new email data and is given a primary objective via a
systemMessageprompt:- Objective: “Automatically categorize incoming emails based on existing Gmail labels or create a new label if none match.”
- The agent analyzes the email’s content, subject, and sender to understand its context.
- Connected Tools: The agent is empowered with several tools to interact with Gmail:
- OpenAI Chat Model: Provides the natural language understanding capabilities. The agent sends the email content to this model to get an analysis.
- Window Buffer Memory: Gives the agent short-term memory, allowing it to remember the context of the current email it’s processing. The
sessionKeyis set to the email’s unique ID ({{ $json.id }}) to keep conversations separate. - Gmail – Read Labels Tool: The agent’s first step is usually to call this tool to fetch a list of all existing labels. This prevents the creation of duplicate labels.
- Gmail – Get Message Tool: If needed, the agent can use this tool to retrieve the full body and metadata of the message for a deeper analysis.
- Gmail – Create Label Tool: If the agent determines that no existing label is a good fit, it will use this tool to create a new one. The prompt instructs it to follow existing naming conventions and create sub-labels where appropriate (e.g.,
AI/Invoices). - Gmail – Add Label to Message Tool: Once the correct label (either existing or newly created) is identified, the agent uses this tool to apply it to the message. The prompt also includes logic to remove the
INBOXlabel for low-priority emails like promotions.
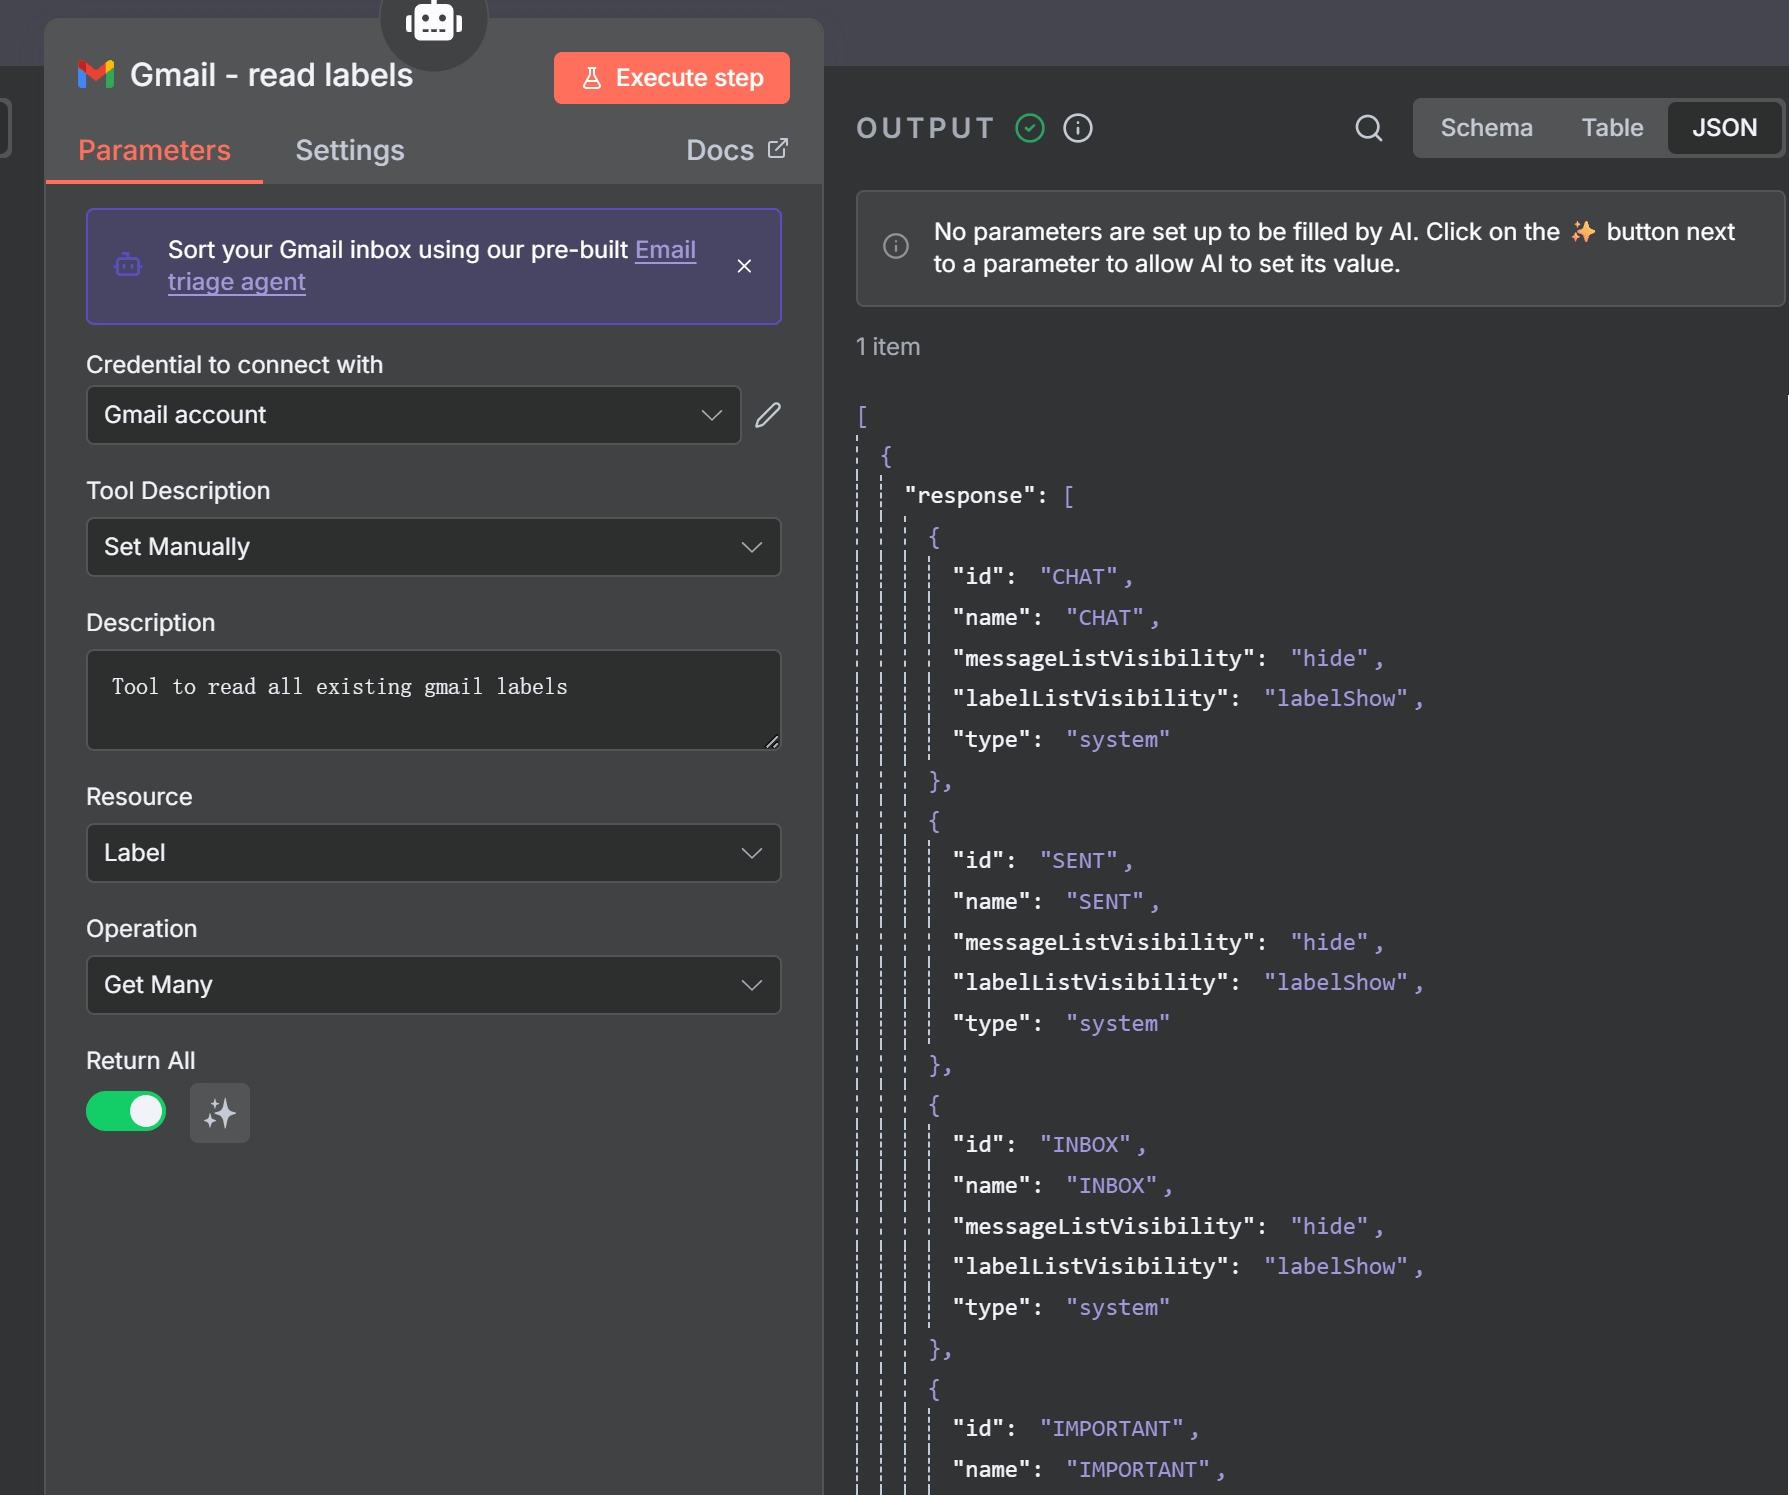
The ‘Gmail – read labels’ tool, configured to get all existing labels for the AI agent. 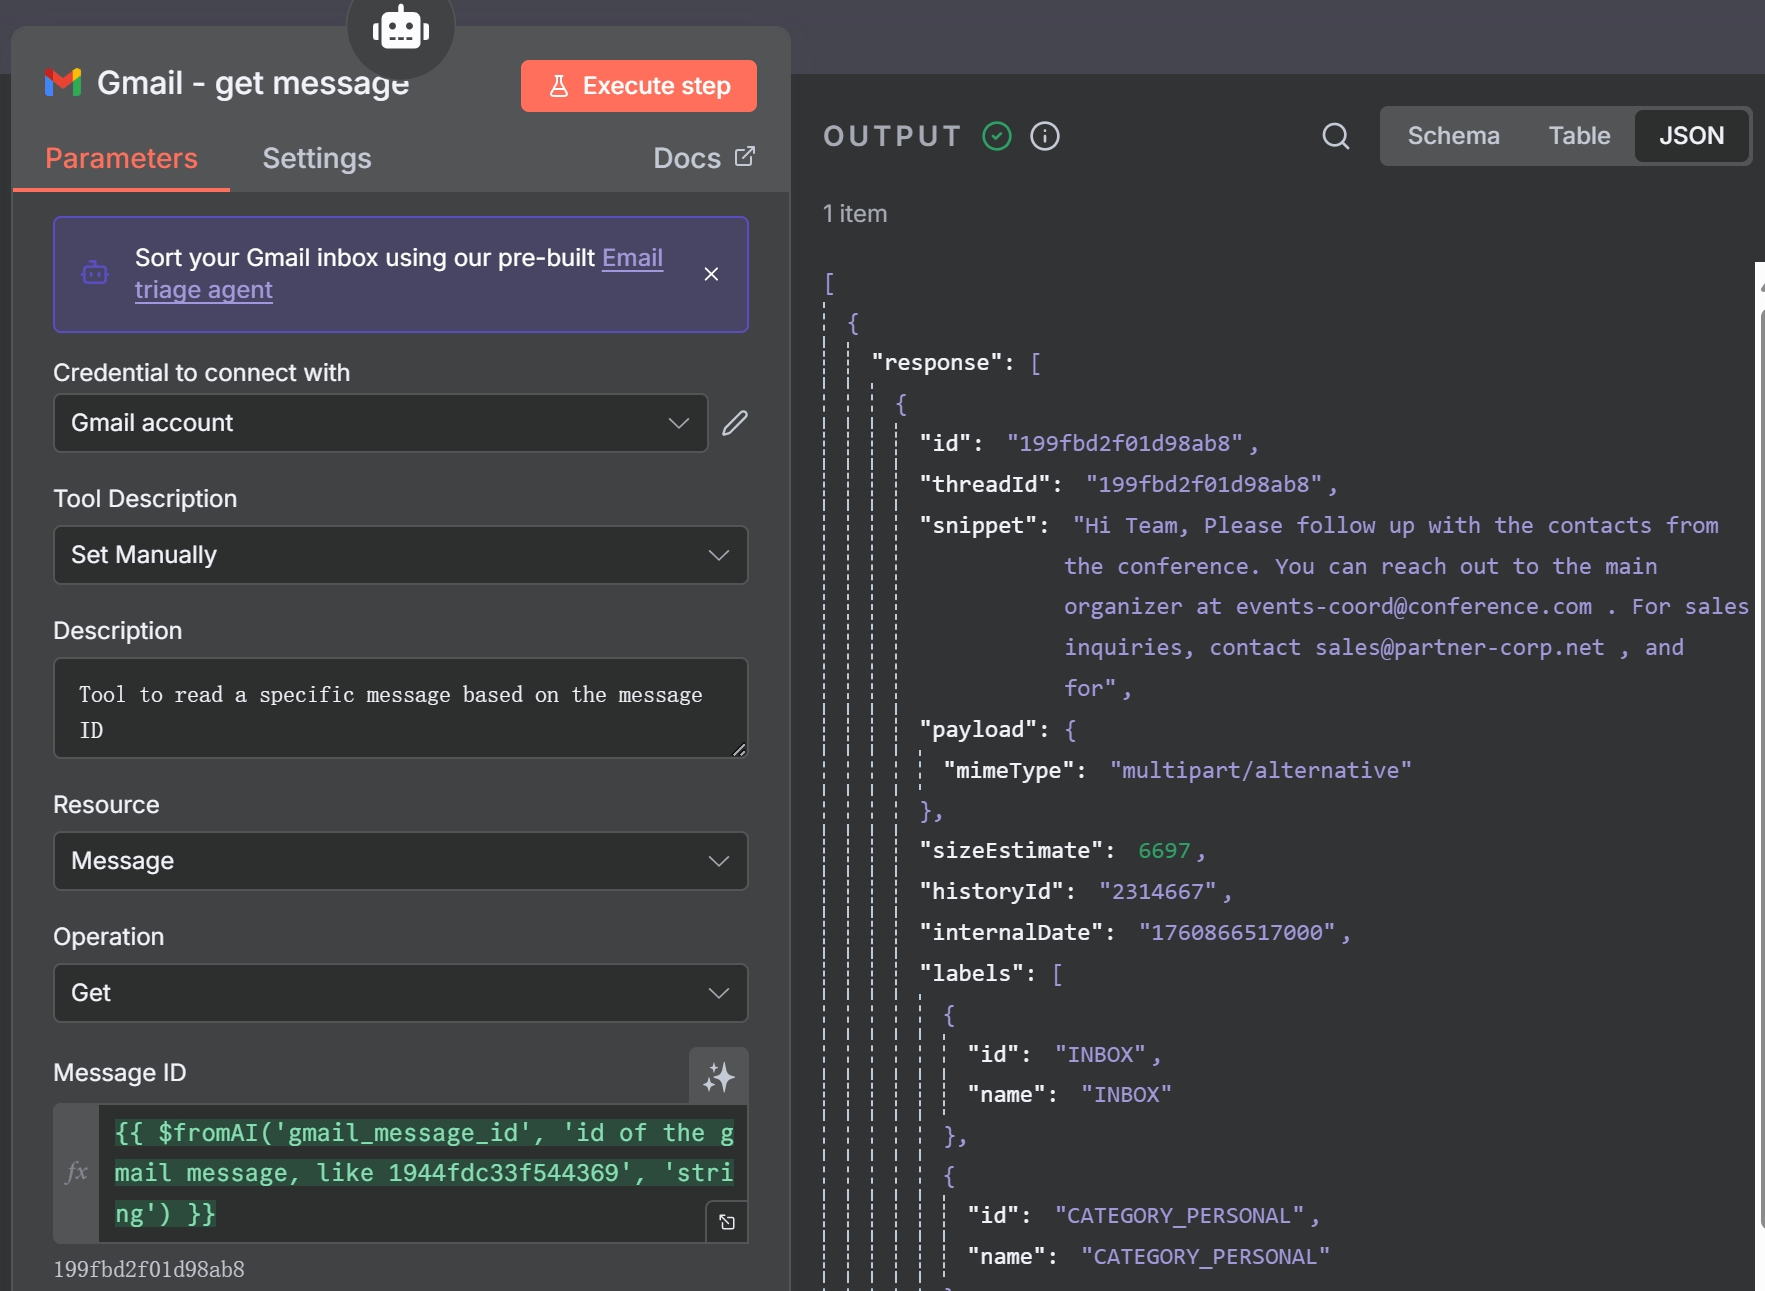
The ‘Gmail – get message’ tool, used by the AI to fetch full email content. 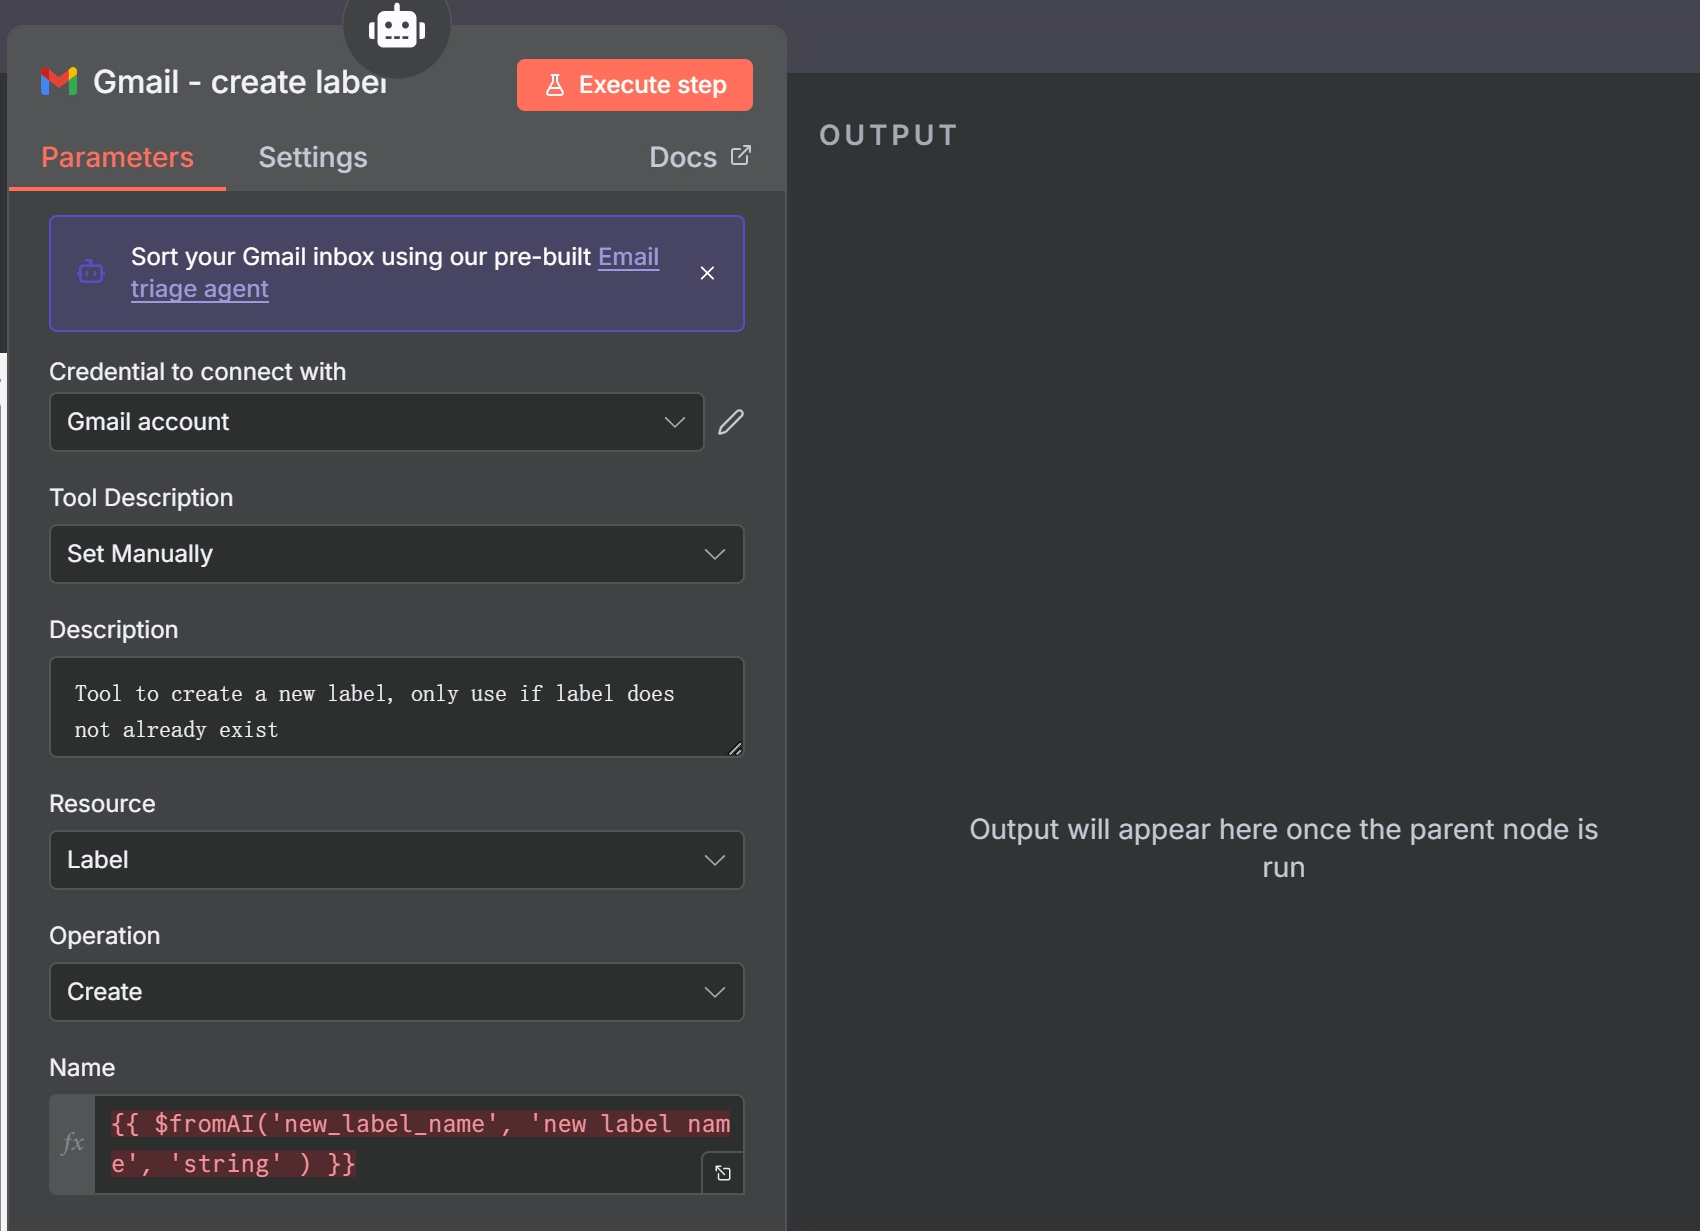
The ‘Gmail – create label’ tool, allowing the AI to create new labels dynamically. 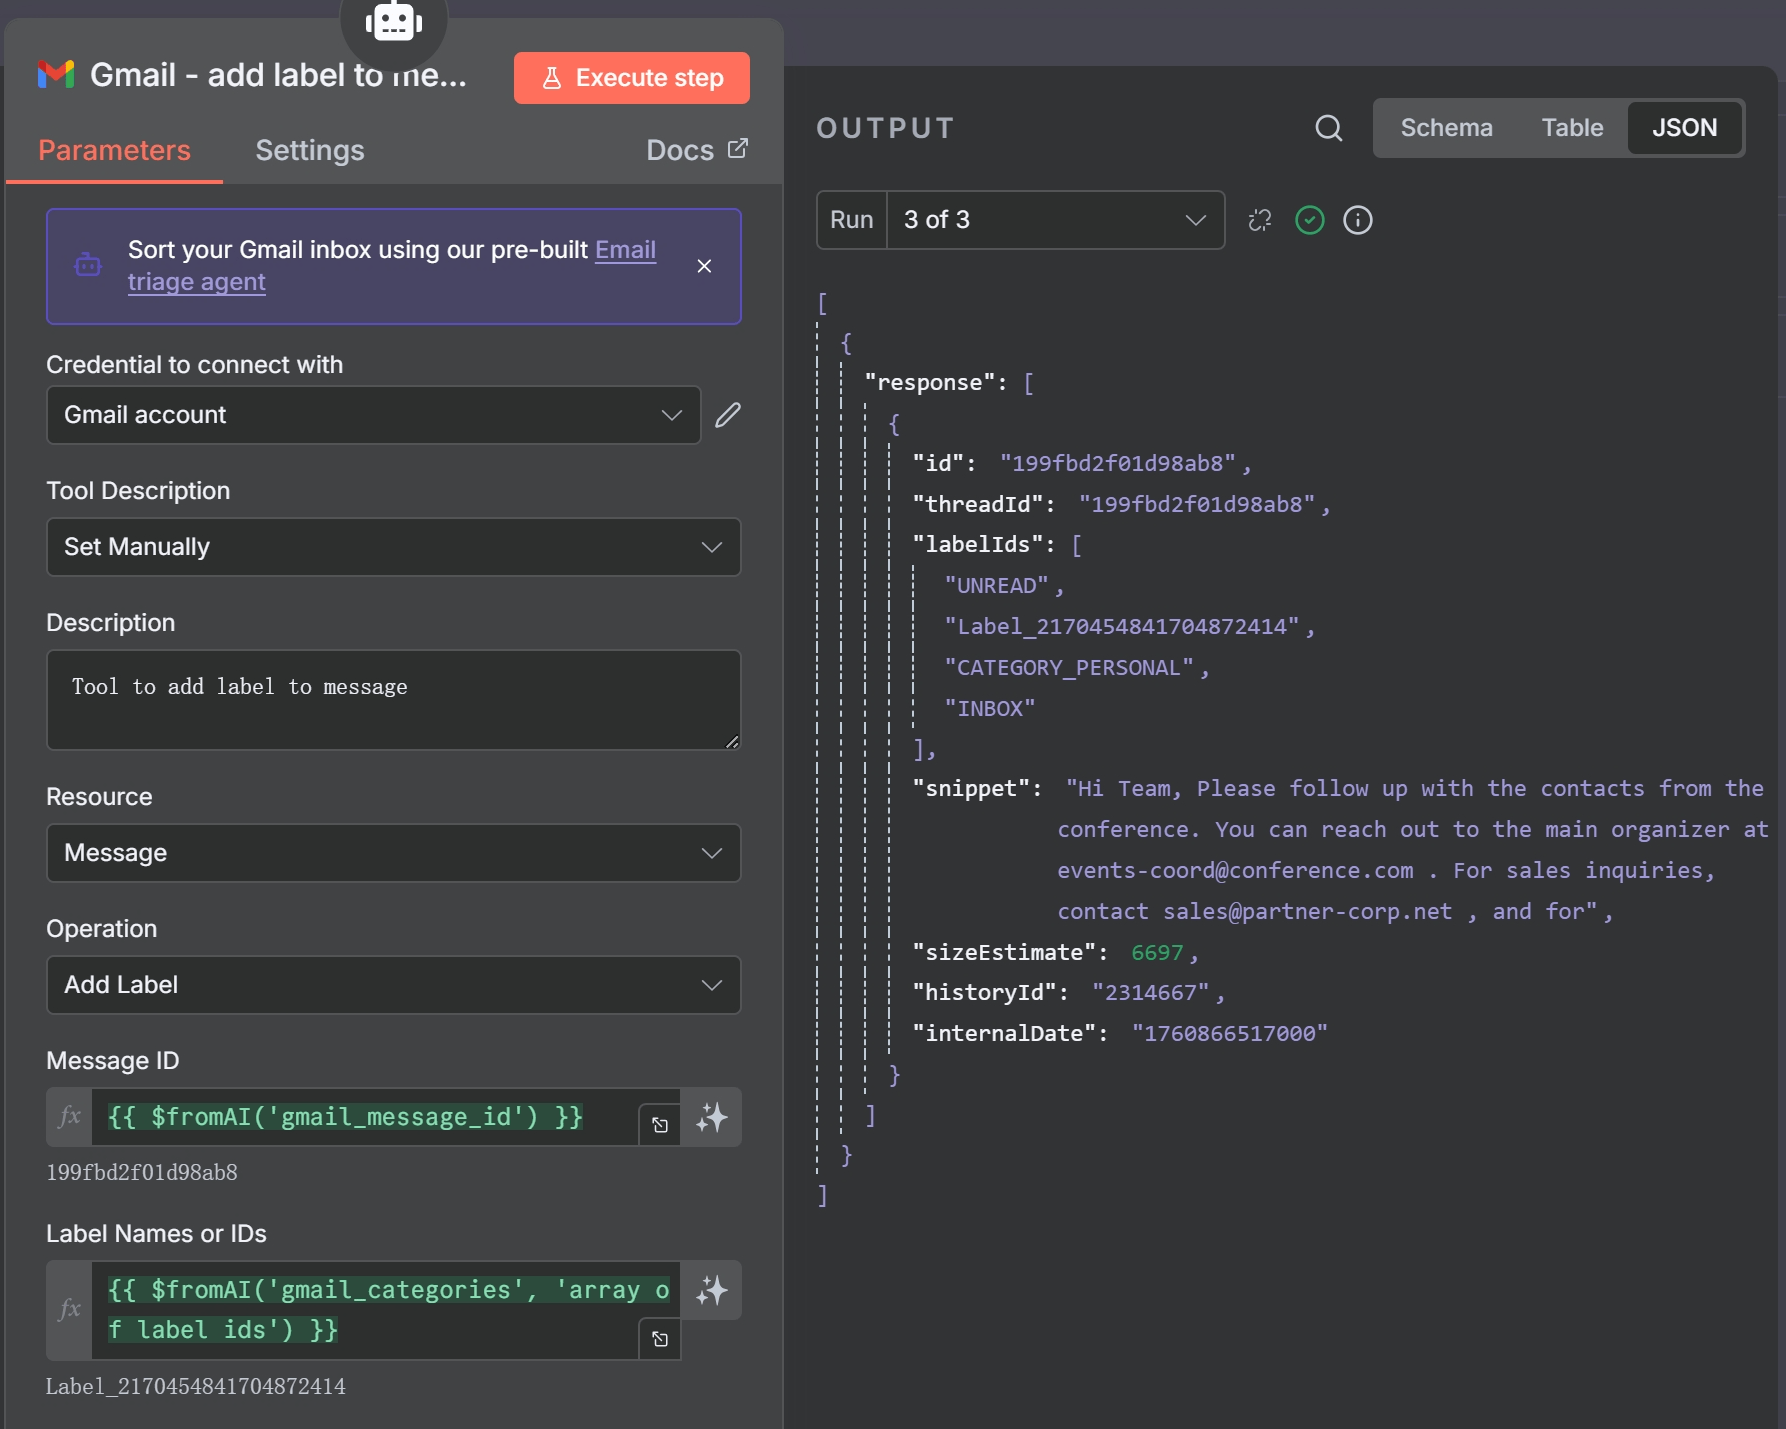
The ‘Gmail – add label to message’ tool, used by the AI to apply the chosen label.
Expanding Use Cases
This intelligent labeling workflow is a powerful foundation. You can adapt the agent’s prompt and tools to perform even more advanced tasks:
- Priority Inbox: Instruct the agent to identify emails from key clients and apply a “High Priority” label, then trigger a separate workflow to send you a Slack notification.
- Automated Task Creation: If an email contains phrases like “can you please” or “by next Friday,” the agent could be instructed to extract the task and create an entry in Notion or Todoist.
- Advanced Spam Filtering: Give the agent a prompt that describes the characteristics of phishing emails. If it detects a match, it can apply a “Suspected Pham” label and move the email out of the inbox.
With this setup, your Gmail becomes a self-organizing inbox, powered by the combined intelligence of n8n and modern AI.
5.3 Advanced Gmail and AI Agent Workflows
A. Automated Phishing Analysis
Security is paramount. You can build an automated defense system that analyzes suspicious emails and alerts your team.

- Gmail Trigger Node: Trigger on emails labeled “Phishing-Report”.
- HTTP Request Node (Screenshot): Send the email’s HTML body to an “HTML to Image” service to get a visual representation of the email.
- OpenAI Node: Send all relevant data (email headers, body text, and even the screenshot) to a vision-capable AI model like GPT-4o.
- Prompt:
"Analyze the following email headers, body, and screenshot to determine if it is a phishing attempt. Provide a summary and a boolean 'malicious' flag in your JSON response."
- Prompt:
- IF Node: Check the
maliciousflag from the AI’s response. - Jira/Slack Node: If malicious, automatically create a high-priority security ticket in Jira and send a Slack alert with the analysis and screenshot. This is a powerful n8n AI agent Gmail http request.
B. Automated Reply Drafts with OpenAI
Save time by letting an AI draft replies to common inquiries. This workflow creates a draft directly in the email thread for you to review and send.
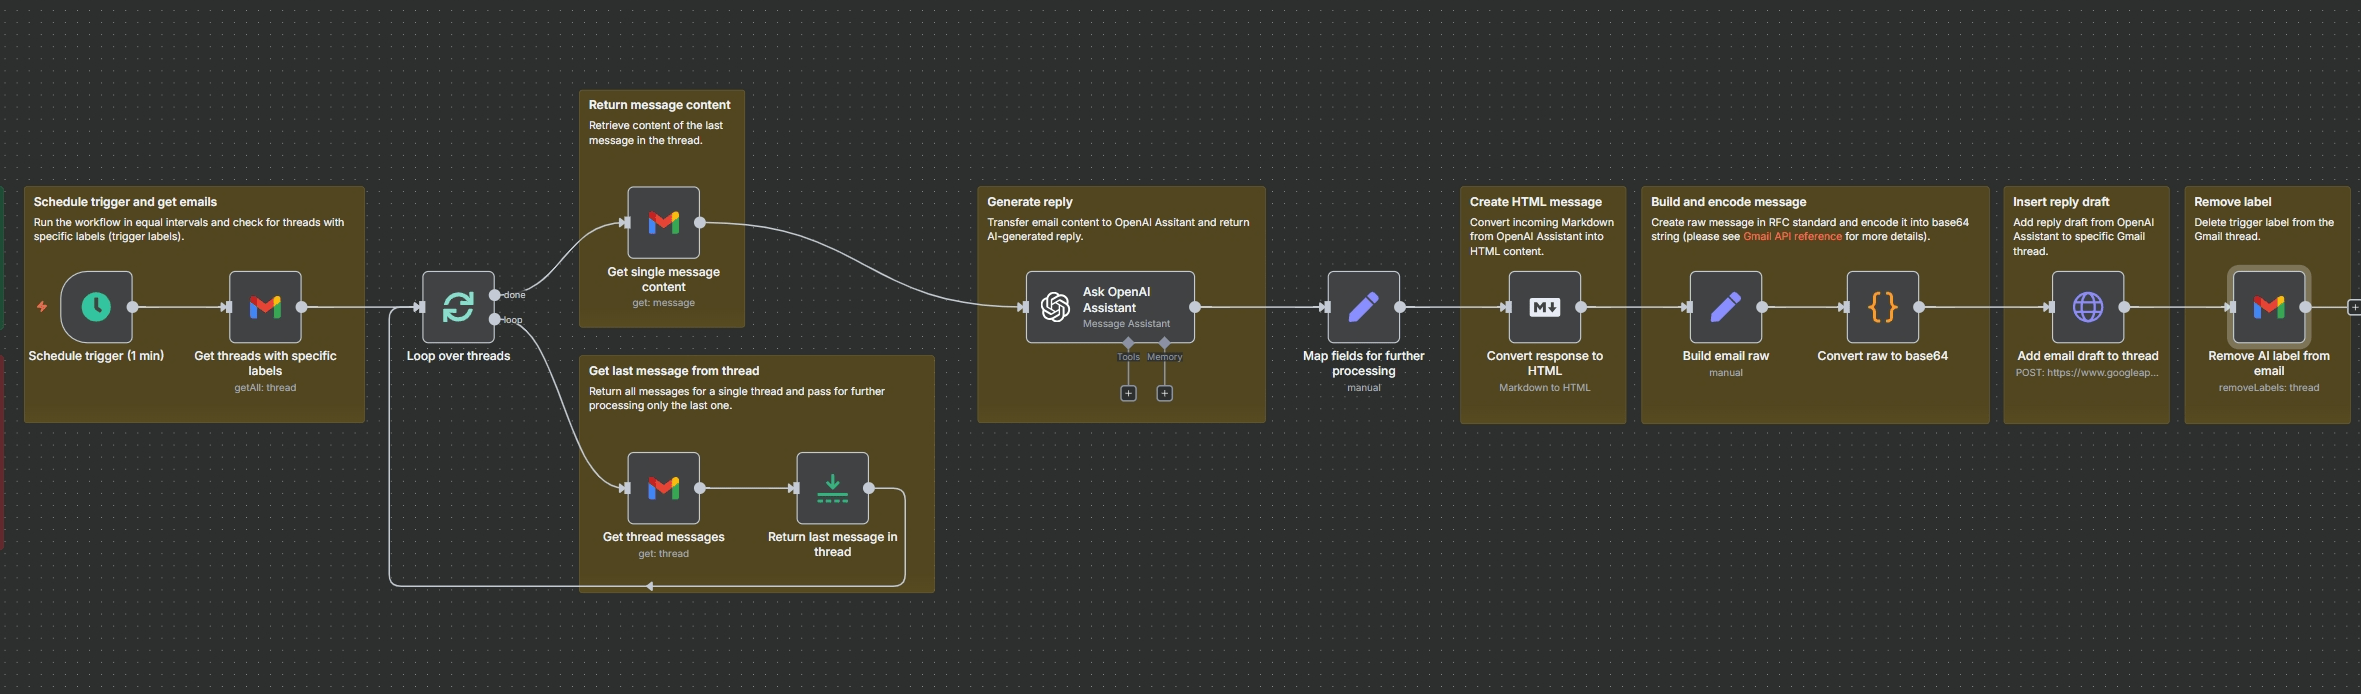
- Gmail Trigger Node: Trigger on emails labeled “Draft-Reply”.
- OpenAI Assistant Node: Send the last message of the email thread to a pre-configured OpenAI Assistant trained to handle your specific customer inquiries.
- Set Nodes: Build a raw email reply in RFC 2822 format, including the
To,Subject, and HTML body from the AI’s response. - Code Node: Convert the raw email string to a Base64 encoded string, which is required by the Gmail API.
- HTTP Request Node (to Gmail API): Make a
POSTrequest to thehttps://www.googleapis.com/gmail/v1/users/me/draftsendpoint, sending the encoded data. This creates the draft in the correct thread. - Gmail Node: Remove the “Draft-Reply” label to mark it as processed.
This n8n Gmail automation AI workflow is a perfect example of human-in-the-loop automation, where AI assists rather than fully replaces.
5.4 Gmail + CRM / Marketing Tools: AI-Enhanced Task Creation
Turn incoming emails into actionable tasks in your project management tool, enhanced with AI summaries. This is a classic Gmail automation workflow that ensures every client request is captured and actioned, forming a powerful n8n Gmail integration with CRM and other tools.
Overview — What This Workflow Solves & What It’s Made Of
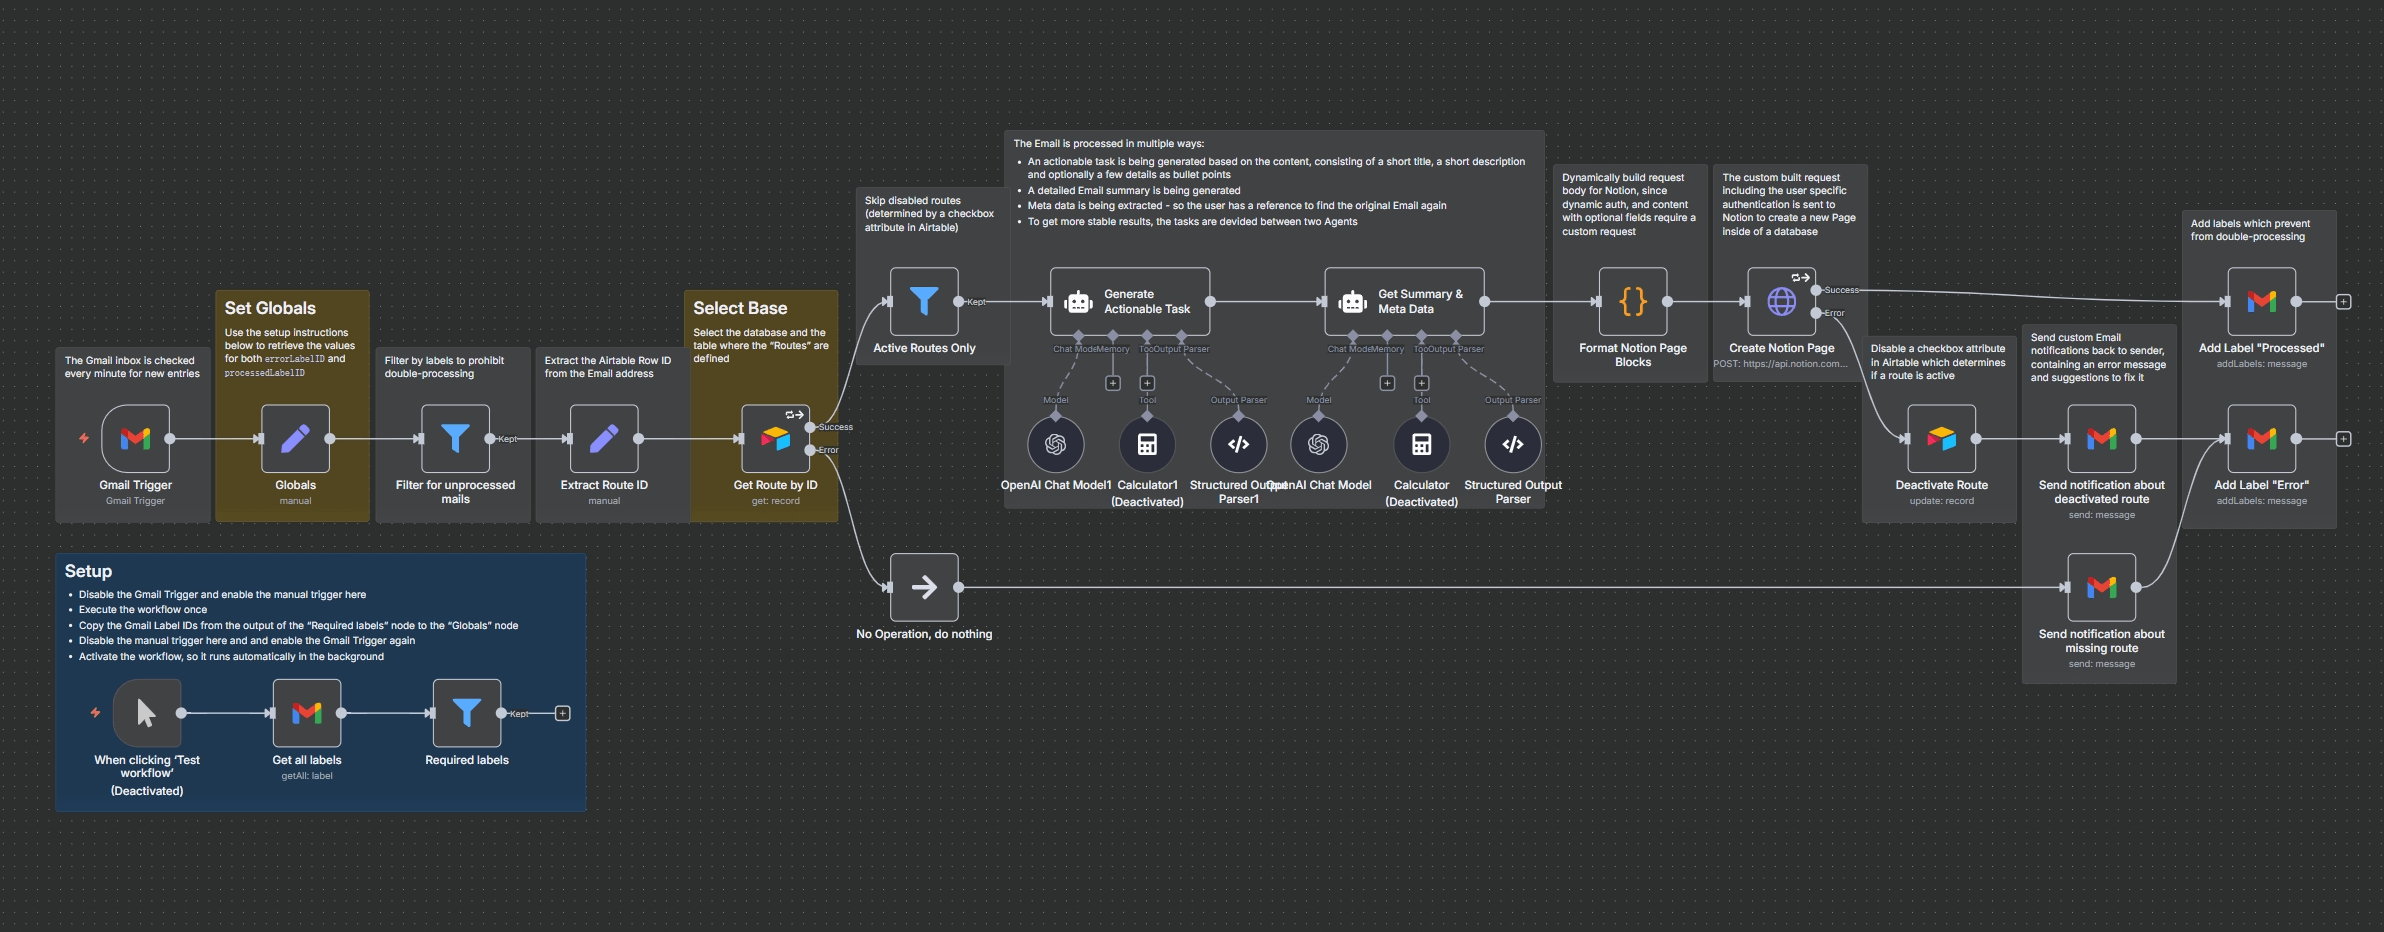
Goal: Turn incoming emails into AI-enhanced tasks in Notion, routed per recipient alias (e.g., you+sales@…, you+support@…) with guardrails to avoid double-processing and to notify senders when a route is missing or deactivated.
Problems Solved:
- Triage at Scale: Every new Gmail message becomes a structured Notion page with a title, description, bullet points, summary, and metadata.
- Multi-Workspace Routing: A single inbox can dispatch tasks to different Notion databases based on the email alias, managed centrally in a tool like Airtable.
- Idempotency: Using “Processed” and “Error” labels prevents re-processing emails and provides a visible audit trail directly in your Gmail.
- Self-Healing UX: If a route is missing or an API call fails, the sender can be automatically notified, and the route can be deactivated to prevent error loops.
Node-by-Node Explanation
This workflow is a sophisticated pipeline with several key stages:
- Gmail Trigger & Guards:
- A Gmail Trigger polls the inbox every minute.
- A Set node (named “Globals”) stores the static IDs for your “Processed” and “Error” labels for easy reference.
- A Filter node acts as a crucial guardrail, only allowing emails that do not already have the “Processed” or “Error” label and contain a routable alias (e.g.,
yourname+routeID@...).
- Routing Logic:
- An Extract Route ID node uses a regex
match(/\+([^@]+)@/)to pull the unique route ID from theto:address. - An Airtable node (“Get Route by ID”) fetches the configuration for that specific route, including the Notion API token and database URL.
- Another Filter ensures the workflow only continues for routes marked as “Active” in Airtable.
- An Extract Route ID node uses a regex
- AI Task Building:
- Two parallel LangChain Agent nodes, powered by OpenAI, process the email content:
- Agent A (“Generate Actionable Task”): Creates a concise title, description, and scannable bullet points.
- Agent B (“Get Summary & Meta Data”): Generates a detailed summary and extracts metadata like sender, subject, and date.
- Two parallel LangChain Agent nodes, powered by OpenAI, process the email content:
- Notion Page Creation:
- A Code node (“Format Notion Page Blocks”) merges the outputs from both AI agents and constructs the final JSON payload required by the Notion API, including rich text blocks, dividers, and properties.
- An HTTP Request node sends this payload to the Notion API’s
POST /v1/pagesendpoint, using the specific token for that route.
- Post-Processing & Error Handling:
- On Success: A Gmail node applies the “Processed” label.
- On Failure: The workflow branches into an error path. An Airtable node deactivates the route to prevent repeated failures. A Gmail node then notifies the original sender about the issue and applies the “Error” label to the email. If the route was simply missing or inactive, a similar notification is sent.
Extensions & Variations
This foundational workflow can be extended in numerous ways:
- Replace Airtable with n8n Data Tables: Keep your routing configuration native to n8n for faster lookups and fewer external dependencies.
- Attachments Pipeline: If an email contains attachments, add nodes to upload them to Google Drive or S3 and then insert the file links into the created Notion page.
- Team Auto-Assign: Expand your Airtable/Data Table schema to include a Notion user. The workflow can then set the “Assignee” property on the new Notion page and notify that person via Slack.
- SLA & Escalation: Add a
Waitnode and anIFnode. If a newly created Notion task isn’t updated to a “status = acknowledged” within a certain time frame, the workflow can escalate by pinging a manager on Slack or Teams.
6. Advanced Configuration & Performance
As you scale your Gmail automations, you’ll need to consider API limits, performance, and handling more complex data types.
Batching Requests to Avoid Gmail API Quota Limits
Google imposes rate limits on API requests. If a workflow triggers on a sudden influx of 100 emails, it may fail.
- Workflow Settings: In the workflow’s settings, you can configure batching. For example, setting the batch size to 10 means the trigger will process emails in chunks of 10, passing them to the next node together. This allows nodes like Google Sheets to perform a single
appendoperation for 10 rows instead of 10 separate operations, drastically reducing API calls. This is a key strategy for n8n Gmail batching.
Direct API Calls with the HTTP Request Node
Sometimes, the standard Gmail node may not support a niche feature or you might need more control. As seen in the “Automated Reply Drafts” example, you can use the HTTP Request Node to interact with the Gmail API directly.
- Authentication: Set the authentication to “Predefined Credential Type” and select your n8n Gmail OAuth2 credential. n8n will handle the token refresh automatically.
- Endpoint: Use the official Google Gmail API documentation to find the correct URL and method for your desired action (e.g.,
POST /v1/users/me/drafts). This provides ultimate flexibility for any Gmail http request node n8n scenario.
Using the Gmail Tool for AI Agents
For advanced AI workflows, n8n offers a Gmail Tool node that can be connected to a LangChain Agent. This allows the AI agent to decide which Gmail actions to perform. You can grant it tools to read emails, read labels, create labels, and assign labels. The AI can then intelligently interact with your inbox to achieve a goal, like organizing emails based on a complex set of instructions.
7. Troubleshooting & Debugging Gmail Workflows
Even with careful setup, things can go wrong. Understanding common errors and knowing how to debug them is essential.
Common Errors and Their Solutions
- OAuth Token Expired / Invalid Grant:
- Cause: Google’s OAuth tokens can expire or be revoked. This often happens if the app is in “testing” mode in GCP and the token expires after 7 days.
- Solution: Put your OAuth Consent Screen in “Production” mode in the Google Cloud Console. If that’s not possible, you’ll need to re-authenticate your credential in n8n periodically.
- 403 Forbidden / API Not Enabled:
- Cause: The Gmail API is not enabled in your GCP project, or you didn’t grant the necessary scopes.
- Solution: Double-check that the Gmail API is enabled and that your OAuth Consent Screen includes the
.../auth/gmail.modifyscope.
- Quota Exceeded:
- Cause: You’ve made too many API calls.
- Solution: Implement batching, increase the polling interval on your trigger, and refine your trigger filters to be more specific.
How to Debug with an “Error Workflow”
Instead of letting a workflow fail and stop, configure it to handle errors gracefully. In the workflow settings, you can set an Error Workflow. This is a separate workflow that runs whenever the main one fails. You can use it to send you a Slack or email notification with details about the failed execution ({{ $json.error.message }}), allowing you to investigate without halting your automation. This is a crucial technique for n8n Gmail troubleshooting.
8. Security & Best Practices
With great automation power comes great responsibility. Handling email data requires a security-first mindset.
Safe Storage of Credentials
n8n encrypts all credentials at rest. The way n8n handles n8n Gmail authentication via OAuth2 is inherently secure because it uses tokens instead of your password, and these tokens can be revoked at any time from your Google Account security settings.
Data Privacy with AI
When sending email content to third-party AI services like OpenAI, be mindful of data privacy. Avoid sending sensitive personal or financial information. Consider using local, self-hosted AI models for maximum privacy or implementing data redaction steps in your workflow before sending data to external services.
Avoiding Quota Overuse
- Be Specific with Trigger Filters: Use the Search filter in the trigger node with a precise query. The more specific your search criteria, the fewer unnecessary workflow executions you’ll have.
- Use Batching: Always configure batching for nodes that process multiple items.
- Set Realistic Poll Times: Does your workflow really need to check for new emails every minute? For many tasks, checking every 15 or 60 minutes is perfectly acceptable and much more efficient.
By following these best practices for managing your Gmail API credentials n8n and designing efficient workflows, you can build automations that are not only powerful but also secure and reliable.
9. Summary & Next Steps
We’ve covered the entire lifecycle of Gmail automation in n8n, from initial setup to advanced, production-ready workflows. You now have the knowledge to connect your inbox to n8n securely, trigger workflows based on highly specific criteria, and implement practical, AI-enhanced solutions for common business problems.
Recap of Key Benefits:
- Automated Lead Extraction: Transform your inbox from a simple communication tool into a dynamic lead capture machine.
- Intelligent Inbox Management: Use AI to create sophisticated, content-aware rules for labeling, archiving, and responding to emails.
- AI-Powered Workflows: Integrate your emails with the power of modern AI to summarize threads, draft replies, analyze for security threats, and create tasks in other apps, creating a truly intelligent AI Agent Gmail Workflow.
By leveraging the n8n Gmail trigger node and its corresponding action node, you can eliminate hours of manual work, reduce human error, and ensure that important information is acted upon instantly.
Next Steps and Further Reading:
To continue your automation journey, we recommend exploring these related topics:
- n8n HTTP Request Node Guide: Master the node that allows you to connect Gmail to any third-party API, unlocking limitless integration possibilities.
- n8n Credentials Setup Guide: A deeper dive into managing all types of credentials securely within your n8n instance.
All of the showcase workflows discussed in this guide can be found and downloaded from AutomateGeniusHub.