The Ultimate Powerful Guide to n8n Google Sheets Integration n8n Google Sheets Integration: Automate, Sync, and Scale Your Workflows with Ease
Table of Contents
- 🚀 Introduction: Why n8n Google Sheets Integration Is a Must
- ⚙️ Mastering the Google Sheets Node in n8n
- 🔐 Step-by-Step Guide: Setting Up Google Sheets OAuth2
- 🛠️ Real Use Case #1: Log Contact Form Submissions
- 📊 Real Use Case #2: Generate and Email Reports
- 🤖 Bonus Use Case: AI Agent + Google Sheets Automation
- 🔁 Lookup, Update & Conditional Logic
- ⚠️ Common Pitfalls and How to Fix Them
- Power Tips for Scaling with Google Sheets
- 🧰 Curated Tools & Templates
- 📦 Summary & What You Can Build Next
Introduction: Why n8n Google Sheets Integration Is a Must
Let’s be honest, if you’re in the world of automation, you’ve almost certainly worked with Google Sheets. It’s the Swiss Army knife of data tools – a flexible, powerful, and universally understood platform for everything from tracking project tasks and managing budgets to creating lightweight databases and powering interactive dashboards. For many businesses, freelancers, and teams, Google Sheets is the backbone of their data operations.
So, it’s no surprise that for those of us who build and automate with n8n, integrating with Google Sheets is not just a nice-to-have, it’s an absolute game-changer. This integration unlocks a world of possibilities, allowing you to create powerful, automated workflows that can read, write, update, and manage your data in Google Sheets without ever leaving the comfort of your spreadsheet interface.
This guide is your deep dive into the n8n Google Sheets integration. We’ll cover everything you need to know, from the initial setup and authentication to best practices, real-world use cases, and common troubleshooting tips. By the end of this guide, you’ll be a pro at automating Google Sheets with n8n, saving yourself countless hours and building more efficient and scalable workflows.
Mastering the Google Sheets Node in n8n
The heart of the n8n Google Sheets integration is the Google Sheets node. This powerful node is your gateway to interacting with your spreadsheets, and it supports a wide range of operations to cover almost any use case you can imagine.
Overview of Supported Resources
The Google Sheets node is divided into two main categories of operations:
- Document Operations: These actions allow you to manage your Google Sheets files themselves. You can:
- Create a new spreadsheet: perfect for generating new reports or logs on the fly.
- Delete a spreadsheet: useful for cleaning up temporary files or outdated reports.
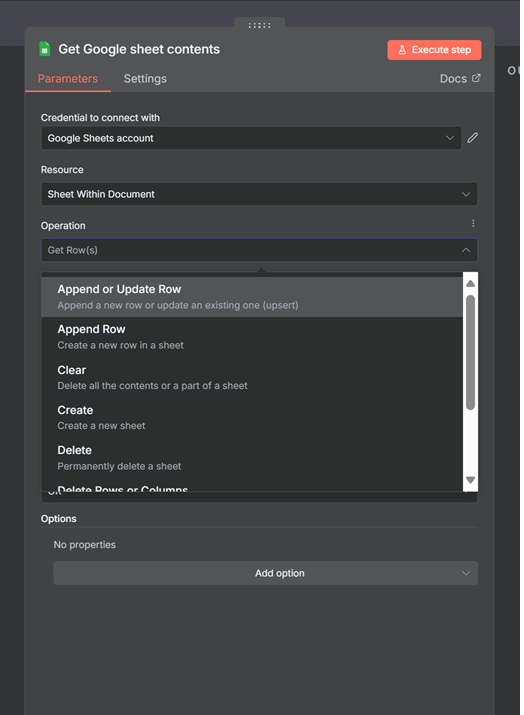
- Sheet Operations: These actions are all about working with the data inside your spreadsheets. You can:
- Read data from a sheet: Get all rows, a specific range of rows, or even lookup rows based on a specific value.
- Write data to a sheet: Append new rows, update existing rows, or even clear a sheet entirely.
- Delete rows or columns: Programmatically remove data from your sheets.
- Manage tabs (sheets): Create new tabs, duplicate existing ones, or delete them as needed.
Key Node Configuration Options
When you start working with the Google Sheets node, you’ll come across a few key configuration options that are important to understand:
- Mapping Modes: This is one of the most critical settings in the node, and it determines how your incoming data is mapped to the columns in your Google Sheet. You have three options:
- Automatically: n8n will try to match the keys in your incoming JSON data to the column headers in your sheet. This is the default and works well for simple workflows, but it can lead to issues if your data isn’t perfectly clean.
- Map Each Column Manually: This is the recommended approach for production workflows. It gives you full control over how your data is mapped, allowing you to explicitly link each incoming data field to a specific column in your sheet. This prevents errors caused by mismatched column headers or extra data fields.
- None: This option is for more advanced use cases where you want to provide the data in a specific format that the node can understand without any mapping.

Choose “Map Each Column Manually” for robust and reliable data mapping. - Append vs. Update Operation: When you’re writing data to a sheet, you have two main options:
- Append: This will add a new row to the end of your sheet. This is the most common operation for logging data or adding new entries.
- Update: This will modify an existing row in your sheet. You’ll need to specify a key column to match on, so n8n knows which row to update.
- Data Range, Row Index, and Formatting Controls: The node also gives you granular control over how your data is handled:
- Range: You can specify a specific range of cells to read from or write to using standard A1 notation (e.g.,
"A1:C10"). - Row Index: When updating or deleting rows, you’ll often use the row index to specify which row to target.
- Value Render Mode: This setting allows you to control how the values in your sheet are formatted. You can choose to get the raw, unformatted value, or the formatted value as it appears in the sheet.

The Range option allows you to target specific cells in your sheet. - Range: You can specify a specific range of cells to read from or write to using standard A1 notation (e.g.,
✅ Pro Tip Box: Always use “Map Each Column Manually” in your production workflows. This will save you a lot of headaches down the road by preventing row misalignment issues caused by unexpected changes in your incoming data.
Step-by-Step Guide: Setting Up Google Sheets OAuth2 for n8n
Before you can start automating your Google Sheets, you need to set up the proper authentication. This involves creating a Google Cloud project and configuring OAuth2 credentials so n8n can securely access your Google Sheets data. This section will serve as your standalone reference for getting this set up correctly.
✅ Step-by-step:
- Visit the Google Cloud Console: Head over to the Google Cloud Console and create a new project. If you already have a project you want to use, you can select that instead.

Create a new project in the Google Cloud Console. - Enable the Google Sheets API: In your project’s dashboard, navigate to the “APIs & Services” section and click on “Enable APIs and Services.” Search for “Google Sheets API” and enable it.

Navigate to APIs & Services. 
Click to enable APIs and Services. 
Search for the Google Sheets API in the library. 
Enable the Google Sheets API for your project. - Enable the Google Drive API: While you’re at it, you should also enable the “Google Drive API.” This is necessary for some of the document operations in the Google Sheets node, such as creating or deleting spreadsheets.
- Create OAuth2 Credentials:
- In the “APIs & Services” section, go to the “Credentials” tab and click on “Create Credentials.”
- Choose “OAuth client ID.”
- For the “Application type,” select “Web application.”
- Give your OAuth client ID a name, like “n8n Google Sheets.”
- Under “Authorized redirect URIs,” add the following URI:
https://api.n8n.io/oauth2-credential/callback

Start creating credentials for the API. 
Select the appropriate credential type. 
Configure the Application type and Redirect URI. - Configure the OAuth Consent Screen:
The consent screen is what users will see when they authorize your application to access their Google account.
- Navigate to “APIs & Services” > “OAuth consent screen”.
- Choose a User Type:
- Internal: Only for users within your Google Workspace organization.
- External: For any user with a Google Account, including standard @gmail.com addresses. This is the most common selection.
- Fill in the required application details: App name, User support email, and Developer contact information.
- Under “Audience,” note that new “External” apps start in Testing mode. This mode has a critical limitation: refresh tokens expire after 7 days, leading to connection failures. While in testing mode, you must explicitly add the email addresses of authorized testers under the “Test users” section. Add your own Gmail account here to allow yourself to authenticate.
- Add Your Credentials to n8n:
- Now, go back to the “Credentials” tab in the Google Cloud Console and copy your “Client ID” and “Client Secret.”
- In your n8n workspace, go to the “Credentials” section and click on “Add credential.”
- Search for “Google Sheets” and select the “Google Sheets OAuth2 API.”
- Paste your “Client ID” and “Client Secret” into the corresponding fields.
- Click “Connect my account” and follow the prompts to authenticate with your Google account.

Copy your new Client ID and Client Secret. - Test Your Integration: To make sure everything is working correctly, create a new workflow in n8n and add a Google Sheets node. Try to use the “Append” operation to add a new row to a test sheet. If the row is added successfully, you’re all set!
Common Errors FAQ Box:
- “Redirect URI mismatch”: Double-check that you’ve entered the correct redirect URI in the Google Cloud Console. It should be exactly
https://api.n8n.io/oauth2-credential/callback. - “Access denied”: Make sure you’ve added the correct scopes to your OAuth consent screen. You need both the
spreadsheetsanddrivescopes. - “Error 403: The caller does not have permission”: This usually means you haven’t enabled the Google Sheets or Google Drive API in your Google Cloud project. Go back and make sure both APIs are enabled.
Real Use Case #1: Log Contact Form Submissions to Google Sheets
One of the most common use cases for the n8n Google Sheets integration is logging data from a contact form. This is a simple but powerful workflow that can save you a lot of time and ensure that all your leads are captured in one central location.
Workflow Overview:
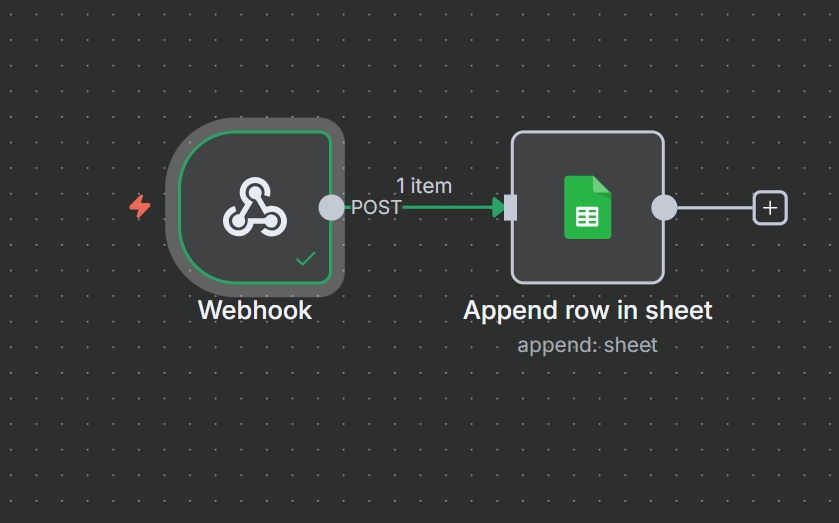
- Trigger: A Webhook node receives data from your contact form (e.g., name, email, message).
- Optional: A Set or Function node can be used to format the values before they’re sent to Google Sheets.
- Action: A Google Sheets node with the “Append Row” operation logs each submission to a spreadsheet.
Step-by-step:
- Create a Webhook: In your n8n workflow, add a Webhook node. Set the “HTTP Method” to “POST.” This will give you a unique URL that you can use to send data to your workflow.
- Configure Your Form: In your website’s contact form, configure it to send a POST request to the webhook URL you just created. Make sure the form fields have names that are easy to identify, like “name,” “email,” and “message.”
- Add a Google Sheets Node: Add a Google Sheets node to your workflow and set the “Operation” to “Append.”
- Map Your Data:
- Select your Google Sheets credentials and choose the spreadsheet and sheet where you want to log the data.
- Set the “Mapping Mode” to “Map each column manually.”
- Now, you’ll need to map the data from your webhook to the columns in your sheet. You can do this by dragging the output of the Webhook node to the corresponding fields in the Google Sheets node. For example, you would map the “name” field from the webhook to the “Name” column in your sheet.

Map the incoming data from your form to the correct columns in your Google Sheet. - Test Your Workflow: Save your workflow and then submit a test entry through your contact form. You should see the data appear as a new row in your Google Sheet.
✅ Optional: You can extend this workflow by adding a Slack or email notification to let you know whenever a new form is submitted.
Real Use Case #2: Generate and Email Reports from Sheet Data
Another powerful use case for the n8n Google Sheets integration is generating and emailing reports from your sheet data. This is a great way to automate your weekly or monthly reporting and keep your team informed about key metrics.
Workflow Overview:
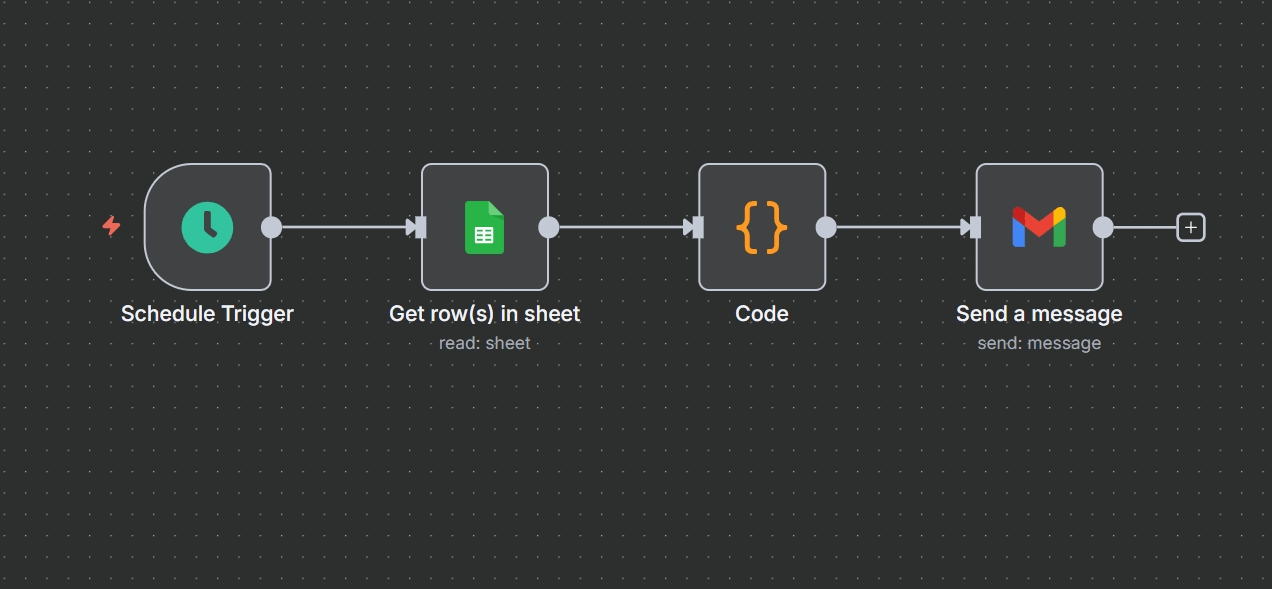
- Trigger: A Schedule node triggers the workflow to run on a regular basis (e.g., every Monday at 9 AM).
- Action: A Google Sheets node with the “Get Rows” operation pulls the relevant data from your sheet.
- Transform: A Function node summarizes the data, calculates key metrics, or builds an HTML table for the report.
- Output: A Gmail or Email node sends the report to the specified recipients.
Step-by-step:
- Set Up Your Schedule: Add a Schedule node to your workflow and configure it to run at your desired interval.

Configure the Schedule Trigger to run the workflow automatically. - Get Your Data: Add a Google Sheets node and set the “Operation” to “Get Rows.” Select your credentials and the sheet you want to pull data from. You can also use the “Range” option to specify a specific range of cells to read.
- Transform Your Data:
- Add a Function node to your workflow to process the data you just retrieved.
- In the Function node, you can write JavaScript code to perform calculations, filter the data, or format it into an HTML table.

Part 1: The Function node code for filtering and grouping data. 
Part 2: Building the HTML table structure within the Function node. 
Part 3: Populating the table with data and returning the final report. - Send Your Report:
- Add a Gmail or Email node to your workflow.
- In the node’s configuration, you can use the output of the Function node to populate the body of your email.
- If you created an HTML table in the Function node, you can paste that into the “HTML” field in the email node to send a nicely formatted report.

Configure the email node to send the generated HTML report.
✅ Bonus: You can add an IF node to your workflow to add some conditional logic. For example, you could check if there’s any new data to report on, and if not, skip sending the email.
Bonus Use Case: AI Agent + Google Sheets Automation
Now for a more advanced and exciting use case: combining an AI agent with Google Sheets to create an intelligent data logging system. This workflow allows you to log structured data from natural language input, which can be incredibly useful for a wide range of applications.
Scenario: Logging Natural Language Expense Input
Imagine you could just type “I spent $25 on lunch today” into a chat interface and have it automatically logged to your expense tracking spreadsheet. With n8n, an AI agent, and Google Sheets, you can do just that.
Nodes:
- Chat Trigger: Receives the natural language input from a chat application like Slack or Telegram.
- AI Agent: Uses a large language model like OpenAI’s GPT or Google’s Gemini to convert the unstructured text into structured JSON data.
- Set Node: Formats the JSON data for the Google Sheets node.
- Google Sheets Node (Append Row): Logs the structured data to your spreadsheet.
Output Format:
The AI agent would be prompted to output a clean JSON object like this:
{
  "date": "2025-08-03",
  "amount": 25.00,
  "category": "Food",
  "note": "Lunch"
}
💡 Tip: To ensure that the AI outputs clean JSON, you can use a Code or Set node to sanitize the output before it’s sent to the Google Sheets node. You might need to parse the AI’s response to extract the JSON object or handle any potential formatting errors.
Lookup, Update & Conditional Logic with Google Sheets
Once you’ve mastered the basics of reading and writing data, you can start to explore some of the more advanced features of the Google Sheets node, like looking up and updating rows, and using conditional logic to create more dynamic workflows.
Lookup Row Based on a Value
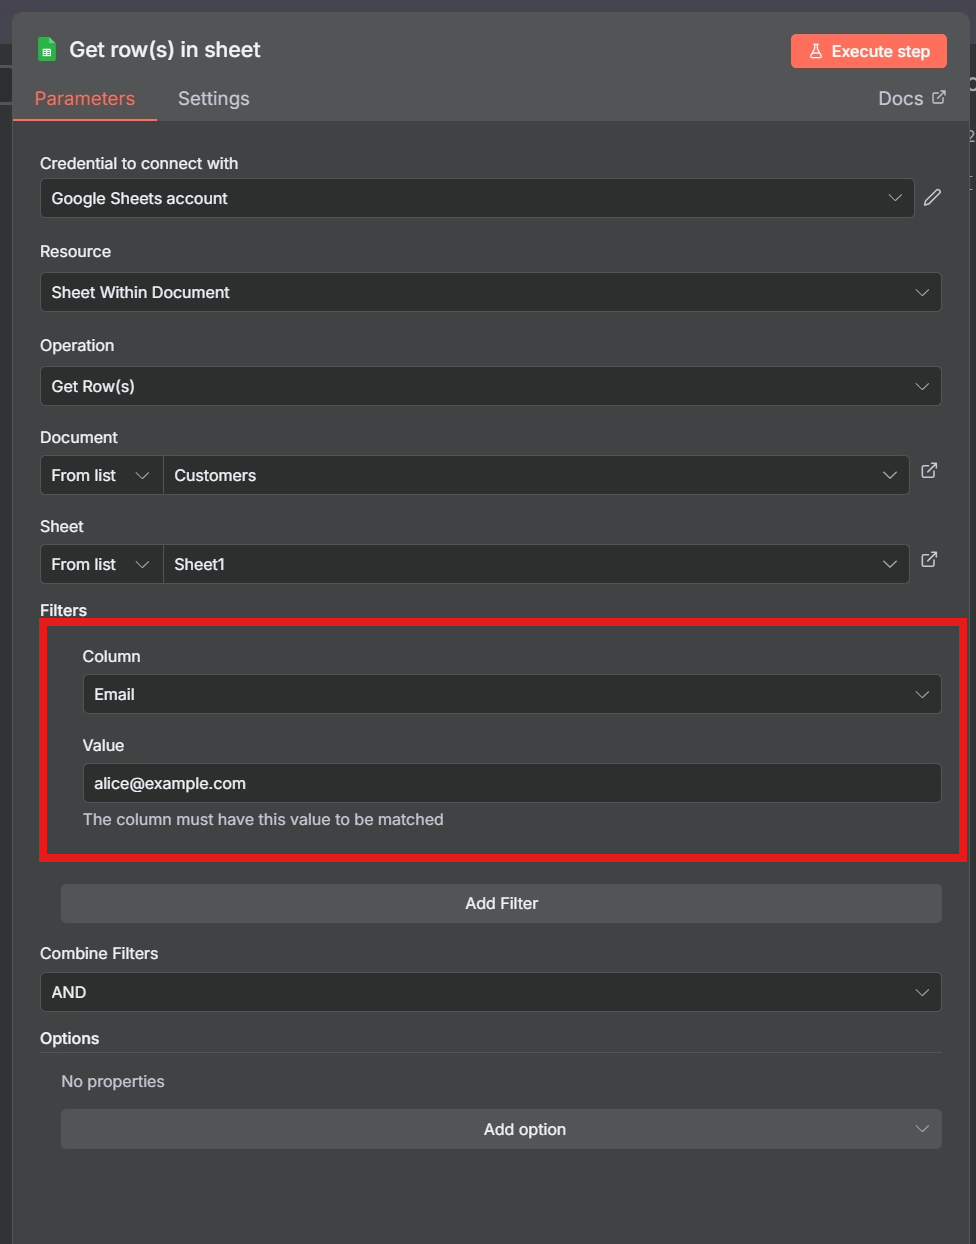
The “Get Rows” operation can be used to look up a specific row based on a value in one of the columns. For example, you could look up a customer’s record by their email address or a product’s information by its SKU.
Update Existing Row Using Row Index
Once you’ve found the row you want to update, you can use the “Update” operation to modify its data. You’ll need to provide the row index of the row you want to update, which you can get from the output of the “Get Rows” operation.
Upsert Pattern
A common pattern in data management is the “upsert” pattern, which means “update if it exists, otherwise insert.” You can implement this pattern in n8n by combining the “Get Rows,” “IF,” and “Append/Update” operations:
- Lookup: Use the “Get Rows” operation to look for a row that matches your criteria.
- If exists → Update: Use an IF node to check if the “Get Rows” operation returned any results. If it did, use the “Update” operation to update the existing row.
- Else → Append: If the “Get Rows” operation didn’t return any results, use the “Append” operation to add a new row.
📘 Use case: This pattern is perfect for creating a simple CRM system. You can use it to log new leads or update the information of existing contacts.
Common Pitfalls and How to Fix Them
While the n8n Google Sheets integration is very powerful, there are a few common pitfalls that you might run into. Here’s a quick guide to some of the most common issues and how to fix them:
| Problem | Solution |
|---|---|
| Blank values inserted | This is often caused by using the “Automatically” mapping mode. Use “Map Each Column Manually” to ensure that your data is always mapped to the correct columns. |
| Misaligned rows | Check that your column headers in Google Sheets match the keys in your incoming data exactly. Even a small typo can cause the rows to be misaligned. |
| OAuth errors | Re-check that you’ve entered the correct redirect URI and added the necessary scopes in the Google Cloud Console. |
| Append to wrong row | Make sure there are no gaps in your sheet, and turn off the “Append” endpoint if you’re not intending to add new rows. |
| Rate limits hit | Google Sheets has a rate limit of 300 requests per minute. If you’re hitting this limit, you can use the “Split In Batches” node to batch your updates and a “Wait” node to add a delay between requests. |
| Renamed headers | If you rename a header in your Google Sheet, you’ll need to reconfigure the Google Sheets node in n8n to reload the columns. |
🔗 Reference: For more troubleshooting tips, check out the official n8n Common Issues Page.
Power Tips for Scaling with Google Sheets
As you start to build more complex workflows, you can use these power tips to scale your Google Sheets integrations and unlock even more possibilities:
- Use Sheets as a config source: Instead of hardcoding API keys, email addresses, or other configuration values in your workflows, you can store them in a Google Sheet and use the “Get Rows” operation to retrieve them at runtime. This makes it much easier to manage your configurations and update them without having to edit your workflows.
- Store dynamic logs across workflows: You can create a centralized logging system by having all of your workflows append their logs to a single Google Sheet. This makes it easy to monitor your workflows and debug any issues that arise.
- Visualize logs with Google Data Studio or Looker Studio: Once you have your logs in a Google Sheet, you can connect it to a data visualization tool like Google Data Studio or Looker Studio to create interactive dashboards and reports.
- Parse nested JSON: If you’re working with complex nested JSON data, you can use a Function or Code node to parse it and extract the data you need before writing it to your sheet.
- Use Sheets + OpenAI for AI-assisted audits: You can combine the power of Google Sheets and AI to create an automated data auditing system. For example, you could have an AI agent read through your data and flag any anomalies or inconsistencies.
Curated Tools & Templates
To help you get started with your n8n Google Sheets integrations, here are some curated tools and templates:
- 🔗 AutomateGeniusHub templates tagged with Sheets: A great resource for finding more advanced and production-ready n8n templates.
- 🧪 Developer tools:
- JSON formatter: A must-have tool for working with JSON data. It helps you visualize the structure of your data and debug any issues.
- ChatGPT/Gemini Prompt Tester: When you’re working with AI agents, it’s important to test your prompts to make sure you’re getting the desired output.
- Sheet column validator: A simple tool to help you validate that your column headers are correct and consistent.
Summary & What You Can Build Next
Congratulations! You’ve now learned everything you need to know to become a pro at integrating n8n with Google Sheets. You’ve learned:
- How to authenticate your Google Sheets account with n8n.
- The core features and configuration options of the Google Sheets node.
- How to troubleshoot common issues and avoid pitfalls.
- How to build three real-world workflows to automate your data.
Now that you have the knowledge and the tools, it’s time to start building your own amazing automations. Here are a few ideas to get you started:
- A CRM-light system: Track your customers, deals, and interactions in a Google Sheet, and use n8n to automate your sales and marketing workflows.
- An AI-powered data logger: Create a system that can understand natural language and automatically log your data to a Google Sheet.
- A dynamic campaign tracker: Track the performance of your marketing campaigns in a Google Sheet, and use n8n to automatically generate reports and send notifications.
The possibilities are endless. So go ahead, start building, and see what you can create with the power of n8n and Google Sheets!